Canon PIXMA MP810 Quick Start Guide - Page 58
When Printing Becomes Faint or Colors Are Incorrect, Step 1
 |
View all Canon PIXMA MP810 manuals
Add to My Manuals
Save this manual to your list of manuals |
Page 58 highlights
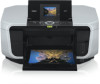
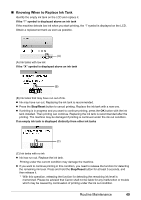
When Printing Becomes Faint or Colors Are Incorrect When printing becomes faint or colors are incorrect even if ink remains in the ink tanks, the print head nozzles are probably clogged. Print the nozzle check pattern to confirm the condition of the nozzles and then perform Print Head Cleaning. If the ruled lines are shifted after running print head maintenance, align the Print Head. Note Before performing maintenance z Open the Scanning Unit (Printer Cover) and make sure that all lamps for the ink tanks are lit red. - If any one of the lamps is flashing slowly, the associated ink tank is running low. You can continue printing for a while, but we recommend you to have a replacement ink tank available. - If any one of the lamps is flashing fast, the associated ink tank is empty. Replace the ink tank. See "Replacing Ink Tanks" on page 50. If an ink lamp is flashing fast even though ink remains in that ink tank, it is inserted in the wrong position. Make sure that the ink tank of the correct color is inserted in each position, matching the label. See "Replacing an Ink Tank" on page 48. - If the ink lamp is not lit, the tank is not set properly. Press the mark on the ink tank until the tank clicks into place. Make sure that all packaging material is peeled off the ink tank. See "Prepare the replacement tank." on page 51. z Increase the Print Quality setting in the printer driver settings. See "Print Results Not Satisfactory" on page 77. Step 1 See "Printing the Nozzle Check Pattern" on page 55. If lines are missing or if white streaks appear Step 2 See "Print Head Cleaning" on page 58. If the problem is not resolved after performing Print Head Cleaning twice After cleaning the Print Head, print and examine the nozzle check pattern. Step 3 See "Print Head Deep Cleaning" on page 60. Note If Print Head Deep Cleaning does not resolve the problem, the Print Head may be damaged. Contact your Canon service representative. z If the Ruled Lines Are Shifted Step 1 See "Aligning the Print Head" on page 62. 54 Routine Maintenance
-
 1
1 -
2
-
3
-
4
-
5
-
6
-
7
-
8
-
9
-
10
-
11
-
12
-
13
-
14
-
15
-
16
-
17
-
18
-
19
-
20
-
21
-
22
-
23
-
24
-
25
-
26
-
27
-
28
-
29
-
30
-
31
-
32
-
33
-
34
-
35
-
36
-
37
-
38
-
39
-
40
-
41
-
42
-
43
-
44
-
45
-
46
-
47
-
48
-
49
-
50
-
51
-
52
-
 53
53 -
 54
54 -
 55
55 -
 56
56 -
 57
57 -
 58
58 -
 59
59 -
 60
60 -
 61
61 -
 62
62 -
 63
63 -
64
-
65
-
66
-
67
-
68
-
69
-
70
-
71
-
72
-
73
-
74
-
75
-
76
-
77
-
78
-
79
-
80
-
81
-
82
-
83
-
84
-
85
-
86
-
87
-
88
-
89
-
90
-
91
-
92
-
93
-
94
-
95
-
96
-
97
-
98
-
99
-
100
-
101
-
102
-
103
-
104
-
105
-
106
-
107
-
108
-
109
-
110
-
111
-
112
 |
 |