Canon PIXMA MP810 Quick Start Guide - Page 96
Cannot Scan Films, Cannot Obtain a Clean Scan or Colors Scan Incorrectly Displayed, Image Is Not Clear - scanner lock switch
 |
View all Canon PIXMA MP810 manuals
Add to My Manuals
Save this manual to your list of manuals |
Page 96 highlights
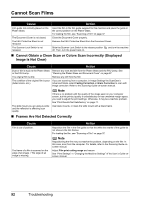
Cannot Scan Films Cause Action Film guide not correctly placed on the Platen Glass. The Document Cover is not closed. The FAU Protective Sheet is not removed. The Scanner Lock Switch is not released. Insert the film in the film guide supplied for this machine and place the guide in the correct position on the Platen Glass. For loading the film, see "Scanning a Film" on page 37. Close the Document Cover properly. Remove the FAU Protective Sheet from the Document Cover. Slide the Scanner Lock Switch to the release position off. Then, turn the power back on. and turn the machine „ Cannot Obtain a Clean Scan or Colors Scan Incorrectly (Displayed Image Is Not Clear) Cause Action Dust or dirt is stuck to the Platen Glass Remove any dust and dirt from the Platen Glass and the FAU Lamp. See or the FAU Lamp. "Cleaning the Platen Glass and Document Cover" on page 67. The original film is dirty. Remove any dirt from the film. The condition of the original film is poor If you are scanning from a computer, in Image Settings the ScanGear's (faded colors, etc.). Advanced Mode, select Fading Correction or Grain Correction to scan with image correction. Refer to the Scanning Guide on-screen manual. The slide mount you are using is white and the reflection is affecting scan quality. Note If there is no problem with the quality of the image seen on your computer screen, but the printout quality is unsatisfactory or has unwanted margin space, you need to adjust the print settings. Otherwise, it may be a machine problem. See "Print Results Not Satisfactory" on page 77. Use black mounts, or mask the slide mount with a black frame. „ Frames Are Not Detected Correctly Cause Film is out of position. The frame of a film is scanned on the edge of an image. / The edge of an image is missing. Action Reposition the film in the film guide so that the white line marks of the guide do not obscure the film frames. For loading the film, see "Scanning a Film" on page 37. Note Repositioning the film may not resolve the problem, depending on the film. In this case, scan from the computer. For details, refer to the Scanning Guide onscreen manual. Adjust Film print cutting range and rescan. See "Print Settings" in "Changing the Machine Settings" of the User's Guide onscreen manual. 92 Troubleshooting
-
 1
1 -
2
-
3
-
4
-
5
-
6
-
7
-
8
-
9
-
10
-
11
-
12
-
13
-
14
-
15
-
16
-
17
-
18
-
19
-
20
-
21
-
22
-
23
-
24
-
25
-
26
-
27
-
28
-
29
-
30
-
31
-
32
-
33
-
34
-
35
-
36
-
37
-
38
-
39
-
40
-
41
-
42
-
43
-
44
-
45
-
46
-
47
-
48
-
49
-
50
-
51
-
52
-
53
-
54
-
55
-
56
-
57
-
58
-
59
-
60
-
61
-
62
-
63
-
64
-
65
-
66
-
67
-
68
-
69
-
70
-
71
-
72
-
73
-
74
-
75
-
76
-
77
-
78
-
79
-
80
-
81
-
82
-
83
-
84
-
85
-
86
-
87
-
88
-
89
-
90
-
 91
91 -
 92
92 -
 93
93 -
 94
94 -
 95
95 -
 96
96 -
 97
97 -
 98
98 -
 99
99 -
 100
100 -
 101
101 -
102
-
103
-
104
-
105
-
106
-
107
-
108
-
109
-
110
-
111
-
112
 |
 |