Canon PIXMA MX392 Manual
Canon PIXMA MX392 Manual
 |
View all Canon PIXMA MX392 manuals
Add to My Manuals
Save this manual to your list of manuals |
Canon PIXMA MX392 manual content summary:
- Canon PIXMA MX392 | Manual - Page 1
MX390 series Online Manual Scanning English - Canon PIXMA MX392 | Manual - Page 2
with Application Software that You are Using (ScanGear) Useful Information on Scanning Other Scanning Methods Placing Items (When Scanning from a Computer) Scanning from the Operation Panel of the Machine Forwarding Scanned Data to the Computer Using the Operation Panel of the Machine Setting Items - Canon PIXMA MX392 | Manual - Page 3
Scanning from a Computer Scanning with IJ Scan Utility Scanning with Application Software that You are Using (ScanGear) Useful Information on Scanning Other Scanning Methods Placing Items (When Scanning from a Computer) - Canon PIXMA MX392 | Manual - Page 4
Scanning from the Operation Panel of the Machine Forwarding Scanned Data to the Computer Using the Operation Panel of the Machine Setting Items on the Operation Panel of the Machine Selecting a Response to Commands from the Operation Panel Using IJ Scan Utility Basic - Canon PIXMA MX392 | Manual - Page 5
Is IJ Scan Utility (Scanner Software)? Starting IJ Scan Utility Easy Scanning with Auto Scan Basic Scanning Photos Scanning Documents Scanning with Favorite Settings Scanning Items Larger than the Platen (Image Stitch) Scanning Multiple Items at One Time Scanning Multiple Documents at One Time from - Canon PIXMA MX392 | Manual - Page 6
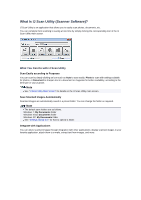
Is IJ Scan Utility (Scanner Software)? IJ Scan Utility is an application that allows you to easily scan photos, documents, etc. You can complete from scanning to saving at one time by simply clicking the corresponding icon in the IJ Scan Utility main screen. What You Can Do with IJ Scan Utility Scan - Canon PIXMA MX392 | Manual - Page 7
Important Some functions are available only when My Image Garden is installed. Note See "Settings Dialog Box" for how to set the applications to integrate with. - Canon PIXMA MX392 | Manual - Page 8
Starting IJ Scan Utility From the Start menu, select All Programs > Canon Utilities > IJ Scan Utility > IJ Scan Utility to start IJ Scan Utility. - Canon PIXMA MX392 | Manual - Page 9
Settings.... In the Settings (Auto Scan) dialog box, you can also make advanced scan settings. Settings (Auto Scan) Dialog Box Refer to the following pages to scan by specifying the item type. Scanning Photos Scanning Documents Scanning with Favorite Settings Scanning Multiple Documents at One - Canon PIXMA MX392 | Manual - Page 10
. Scanning starts. Note Click Cancel to cancel the scan. Scanned images are saved in the folder set for Save in in the Settings (Photo Scan) dialog box displayed by clicking Settings.... In the Settings (Photo Scan) dialog box, you can also make advanced scan settings. Settings (Photo Scan) Dialog - Canon PIXMA MX392 | Manual - Page 11
. Scanning starts. Note Click Cancel to cancel the scan. Scanned images are saved in the folder set for Save in in the Settings (Document Scan) dialog box displayed by clicking Settings.... In the Settings (Document Scan) dialog box, you can also make advanced scan settings. Settings (Document Scan - Canon PIXMA MX392 | Manual - Page 12
saving frequently used settings or when specifying scan settings in detail. 1. Start IJ Scan Utility. Starting IJ Scan Utility 2. Click Settings..., select the Settings (Custom Scan) dialog box, then set the select source, resolution, etc. Settings (Custom Scan) Dialog Box When setting is completed - Canon PIXMA MX392 | Manual - Page 13
them back into one image. Items up to approximately twice as large as the platen are supported. Note The following explains how to scan from the item to be placed on the left side. 1. Start IJ Scan Utility. Starting IJ Scan Utility 2. Click Settings..., select the Settings (Scan and Stitch) dialog - Canon PIXMA MX392 | Manual - Page 14
is to be displayed on the left side of the screen face-down on the platen. 7. Click Start Scanning Image 1. The first item is scanned and appears in 1. Note Click Cancel to cancel the scan. 8. Place the item that is to be displayed on the right side of the screen face-down on - Canon PIXMA MX392 | Manual - Page 15
and appears in 2. Note Click Cancel to cancel the scan. 10. Adjust the scanned images as required. Use the Toolbar to rotate or zoom in/out, or drag the images to adjust their positions. Note Select the Adjust cropping - Canon PIXMA MX392 | Manual - Page 16
, allowing you to scan the item 11. Click Save. The combined image is saved. Note See "Image Stitch Window" for details on the Image Stitch window. You can make advanced scan settings in the Settings (Scan and Stitch) dialog box displayed by clicking Settings.... Settings (Scan and Stitch) Dialog - Canon PIXMA MX392 | Manual - Page 17
at One Time with ScanGear (Scanner Driver)" for your model from Home of the Online Manual for details. Using Auto Scan Whether there are multiple items or not is detected automatically. Click Auto and scan. Easy Scanning with Auto Scan Not Using Auto Scan In the Settings dialog box, set Paper - Canon PIXMA MX392 | Manual - Page 18
5. Select Select Source according to the items to be scanned. 6. Select Auto scan for Paper Size, then click OK. - Canon PIXMA MX392 | Manual - Page 19
pages for details on the setting items in the Settings dialog box. Settings (Photo Scan) Dialog Box Settings (Document Scan) Dialog Box Settings (Custom Scan) Dialog Box 7. Click Custom. Multiple items are scanned at one time. Note Click Cancel to cancel the scan. Scanned images are saved in the - Canon PIXMA MX392 | Manual - Page 20
Software that You are Using (ScanGear)" for your model from Home of the Online Manual for how to scan using ScanGear (scanner driver). Using Auto Scan The item type is detected automatically. Click Auto and scan. Easy Scanning with Auto Scan Not Using Auto Scan In the Settings dialog box, set - Canon PIXMA MX392 | Manual - Page 21
then the back side of each document, select Document (ADF Manual Duplex). 6. Set the color mode, document size, and scanning resolution as required. Click Document Scan Orientation Settings... to specify the orientation of the documents to be scanned. In the displayed dialog box, you can specify the - Canon PIXMA MX392 | Manual - Page 22
in the Settings dialog box. Settings (Document Scan) Dialog Box Settings (Custom Scan) Dialog Box 7. Click Document. Scanning starts. Note Click Cancel to cancel the scan. When Document (ADF Manual Duplex) is selected for Select Source, proceed to Step 8. 8. Follow the on-screen instructions to - Canon PIXMA MX392 | Manual - Page 23
the orientation of the output documents. 9. Click OK. Scanning starts. Note Click Cancel to cancel the scan. Scanned images are saved in the folder set for Save in in the corresponding Settings dialog box displayed by clicking Settings.... In each Settings dialog box, you can also make advanced - Canon PIXMA MX392 | Manual - Page 24
panel. Note The screens for scanning photos are used as examples in the following descriptions. 1. Start IJ Scan Utility. Starting IJ Scan Utility 2. Click Settings.... The Settings dialog box appears. Settings Dialog Box 3. Click Photo Scan. 4. Select the Check scan results checkbox, then click OK - Canon PIXMA MX392 | Manual - Page 25
the scan. 6. Change the image order or file save options as required. You can change the image order or file save options in the Save Settings dialog box. Save Settings Dialog Box Note The default save folders are as follows. Windows 7: My Documents folder Windows Vista: Documents folder Windows XP - Canon PIXMA MX392 | Manual - Page 26
Scanned images are saved according to the settings. - Canon PIXMA MX392 | Manual - Page 27
images via e-mail. Note The screens for scanning photos are used as examples in the following descriptions. 1. Start IJ Scan Utility. Starting IJ Scan Utility 2. Click Settings.... The Settings dialog box appears. Settings Dialog Box 3. Click Photo Scan. 4. Select Attach to e-mail in Application - Canon PIXMA MX392 | Manual - Page 28
If None (Attach Manually) is selected, manually attach scanned and saved images to e-mail. 5. Click OK. The IJ Scan Utility main screen appears. Note See the following pages for details on the setting items in the Settings dialog box. Settings (Auto Scan) Dialog Box Settings (Photo Scan) Dialog Box - Canon PIXMA MX392 | Manual - Page 29
. After you set the save options and click OK, the scanned images are saved and automatically attached to a new message of the specified e-mail client. Save Settings Dialog Box 7. Specify the recipient, enter the subject and message, then send e-mail. For details, see the manual of your e-mail - Canon PIXMA MX392 | Manual - Page 30
with Windows). Note You can extract text when scanning via Document, Custom, or ScanGear. The screens for scanning documents are used as examples in the following descriptions. 1. Start IJ Scan Utility. Starting IJ Scan Utility 2. Click Settings.... The Settings dialog box appears. Settings Dialog - Canon PIXMA MX392 | Manual - Page 31
appears in Notepad (included with Windows). 5. Click OK. The IJ Scan Utility main screen appears. Note See the following pages for details on the setting items in the Settings dialog box. Settings (Document Scan) Dialog Box Settings (Custom Scan) Dialog Box Settings (ScanGear) Dialog Box 6. Click - Canon PIXMA MX392 | Manual - Page 32
according to the settings, and the extracted text appears in the specified application. Note Click Cancel to cancel the scan. Text displayed in Notepad (included with Windows) is for with narrow line spacing Documents with colors in the background of text Documents containing multiple languages - Canon PIXMA MX392 | Manual - Page 33
(Scan and Stitch) Dialog Box Settings (ScanGear) Dialog Box Settings (Save to PC (Auto)) Dialog Box Settings (Save to PC (Photo)) Dialog Box Settings (Save to PC (Document)) Dialog Box Settings (General Settings) Dialog Box Data Format Settings Dialog Box Save Settings Dialog Box Image Stitch Window - Canon PIXMA MX392 | Manual - Page 34
(scanner driver) in which you can make image corrections and color adjustments when scanning. Scan/save settings and applications can be specified in the Settings (ScanGear) dialog box. Settings (ScanGear) Dialog Box • Instructions Opens this guide. • Settings... Displays the Settings dialog box - Canon PIXMA MX392 | Manual - Page 35
to respond when scanning from IJ Scan Utility or My Image Garden. Settings (Auto Scan) Dialog Box Settings (Photo Scan) Dialog Box Settings (Document Scan) Dialog Box Settings (Custom Scan) Dialog Box Settings (Scan and Stitch) Dialog Box Settings (ScanGear) Dialog Box (Scanning from the Operation - Canon PIXMA MX392 | Manual - Page 36
(General Settings) Tab You can set the product to use, file size restriction on e-mail attachment, language to detect text in images, and folder in which to save images temporarily. Settings (General Settings) Dialog Box - Canon PIXMA MX392 | Manual - Page 37
advanced scan settings to scan by automatically detecting the item type. (1) Scan Options Area (2) Save Settings Area (3) Application Settings Area Important When the Settings dialog box is displayed from My Image Garden, the setting items for Application Settings do not appear. • Supported Items - Canon PIXMA MX392 | Manual - Page 38
corrections automatically based on the item type. Important The color tone may differ from the source image due to corrections. In that case, deselect the checkbox and scan. Note Scanning takes longer than usual when you enable this function. (2) Save Settings Area • File Name Enter the file name of - Canon PIXMA MX392 | Manual - Page 39
Send to a folder Select this when you also want to save the scanned images to a folder other than the one specified in Save in. You can specify the folder from the pull-down pull-down menu. • Instructions Opens this guide. • Defaults You can restore the settings in the displayed screen to the default - Canon PIXMA MX392 | Manual - Page 40
Options Area (2) Save Settings Area (3) Application Settings Area Important When the Settings dialog box is displayed from My Image Garden, the setting items for Application Settings do not appear. (1) Scan Options Area • Select Source Photo is selected. • Color Mode Select the color mode in which - Canon PIXMA MX392 | Manual - Page 41
images upon transfer Compresses scanned images when transferring them to a computer. This is useful when your scanner or printer and computer are connected with a slow interface such as USB1.1. • Image Processing Settings Click (Plus) to set the following. Important When Color Mode is Black and - Canon PIXMA MX392 | Manual - Page 42
Send to a folder Select this when you also want to save the scanned images to a folder other than the one specified in Save in. You can specify the folder from the pull-down pull-down menu. • Instructions Opens this guide. • Defaults You can restore the settings in the displayed screen to the default - Canon PIXMA MX392 | Manual - Page 43
Settings do not appear. (1) Scan Options Area • Select Source Select the type of item to be scanned. Scanning documents: Document or Document (ADF/Platen) Scanning magazines: Magazine Scanning documents from the ADF (Auto Document Feeder): Document (ADF Simplex), Document (ADF Manual Duplex - Canon PIXMA MX392 | Manual - Page 44
side of each document. • Compress scanned images upon transfer Compresses scanned images when transferring them to a computer. This is useful when your scanner or printer and computer are connected with a slow interface such as USB1.1. • Image Processing Settings Click (Plus) to set the following. - Canon PIXMA MX392 | Manual - Page 45
when such photos or pictures printed with fine dots are scanned. Note Scanning takes longer than usual when driver)'s Advanced Mode tab to correct gutter shadows when scanning non-standard size items or specified areas. Refer to "Gutter Shadow Correction" for your model from Home of the Online Manual - Canon PIXMA MX392 | Manual - Page 46
to save the scanned images. You can select JPEG/Exif, TIFF, PNG, PDF, or PDF (Multiple Pages). Important You cannot select JPEG/Exif when Color Mode is Black and White. When Start OCR is selected in Application Settings, you cannot select PDF or PDF (Multiple Pages). • Settings... Click to display - Canon PIXMA MX392 | Manual - Page 47
Send to a folder Select this when you also want to save the scanned images to a folder other than the one specified in Save in. You can specify the folder from the pull-down pull-down menu. • Instructions Opens this guide. • Defaults You can restore the settings in the displayed screen to the default - Canon PIXMA MX392 | Manual - Page 48
Area • Select Source Select the type of item to be scanned. When Auto is selected, the item type is automatically detected. Color Mode, Paper Size, and Resolution are automatically set as well. Important Item types supported by Auto are photos, postcards, business cards, magazines, newspapers - Canon PIXMA MX392 | Manual - Page 49
of the same size even if Auto is set. Note To convert text in the image into text data after scanning, specify Select Source instead of selecting Auto. To reduce moire, set Select Source to Magazine. • Color Mode Select the color mode in which to scan the item. Important To select Black and White - Canon PIXMA MX392 | Manual - Page 50
due to corrections. In that case, deselect the checkbox and scan. Note Scanning takes longer than usual when you enable this function. When Select Source is Photo Important When Color Mode is Black and White, Image Processing Settings is not available. • Sharpen outline Emphasizes the outline of the - Canon PIXMA MX392 | Manual - Page 51
checkbox is not selected. Note Use ScanGear (scanner driver)'s Advanced Mode tab to correct gutter shadows when scanning non-standard size items or specified areas. Refer to "Gutter Shadow Correction" for your model from Home of the Online Manual for details. • Correct slanted text document Detects - Canon PIXMA MX392 | Manual - Page 52
you place the item. See "Placing Items (When Scanning from a Computer)" for details on how to place items. You cannot select JPEG/Exif when Color Mode is Black and White. When Start OCR is selected in Application Settings, you cannot select PDF, PDF (Multiple Pages), or Auto. Note Auto appears only - Canon PIXMA MX392 | Manual - Page 53
. Note Specify the application or folder in the Select Application or Select Destination Folder dialog box displayed by selecting Add... from the pull-down menu. • Instructions Opens this guide. • Defaults You can restore the settings in the displayed screen to the default - Canon PIXMA MX392 | Manual - Page 54
• Select Source Select the type of item to be scanned. Scanning photos: Photo Scanning documents: Document Scanning magazines: Magazine Note To reduce moire, set Select Source to Magazine. • Color Mode Select the color mode in which to scan the item. • Resolution Select the resolution of the item - Canon PIXMA MX392 | Manual - Page 55
Reduces moire patterns. Printed materials are displayed scanned images. You can select JPEG/Exif, TIFF, PNG, PDF, or PDF (Multiple Pages). Important You cannot select JPEG/Exif when Color Mode is Black and White. • Settings... Click to display the Data Format Settings dialog box in which you can set - Canon PIXMA MX392 | Manual - Page 56
Send to a folder Select this when you also want to save the scanned images to a folder other than the one specified in Save in. You can specify the folder from the pull- pull-down menu. • Instructions Opens this guide. • Defaults You can restore the settings in the displayed screen to the default - Canon PIXMA MX392 | Manual - Page 57
images. You can select JPEG/Exif, TIFF, PNG, PDF, or PDF (Multiple Pages). Note When PDF or PDF (Multiple Pages) is selected, images up to 9600 pixels x 9600 pixels can be scanned. When the Enable large image scans checkbox is selected in Save Settings, or when Start OCR is selected in Application - Canon PIXMA MX392 | Manual - Page 58
Windows Vista: Documents folder Windows XP: My Documents folder Important When the Settings dialog box is displayed from My Image Garden, this option does not appear. • Enable large image scans Select this checkbox to scan Add... from the pull-down menu. • Instructions Opens this guide. • Defaults - Canon PIXMA MX392 | Manual - Page 59
You can restore the settings in the displayed screen to the default settings. - Canon PIXMA MX392 | Manual - Page 60
you can specify how to respond when saving images to a computer after scanning them from the operation panel by automatically detecting the item type. (1) Scan Options Area (2) Save Settings Area (3) Application Settings Area (1) Scan Options Area • Paper Size Auto is selected. • Resolution Auto is - Canon PIXMA MX392 | Manual - Page 61
corrections automatically based on the item type. Important The color tone may differ from the source image due to corrections. In that case, deselect the checkbox and scan. Note Scanning takes longer than usual when you enable this function. (2) Save Settings Area • File Name Enter the file name of - Canon PIXMA MX392 | Manual - Page 62
Note Specify the application or folder in the Select Application or Select Destination Folder dialog box displayed by selecting Add... from the pull-down menu. • Instructions Opens this guide. • Defaults You can restore the settings in the displayed screen to the default settings. - Canon PIXMA MX392 | Manual - Page 63
Settings Area (3) Application Settings Area (1) Scan Options Area • Paper Size Set from the operation panel. • Resolution Set from the operation panel. • Compress scanned images upon transfer Compresses scanned images when transferring them to a computer. This is useful when your scanner or printer - Canon PIXMA MX392 | Manual - Page 64
Windows 7: My Documents folder Windows Vista: Documents folder Windows XP: My Documents folder (3) Application Settings to save the scanned images to a folder other than the one specified in Save Instructions Opens this guide. • Defaults You can restore the settings in the displayed screen - Canon PIXMA MX392 | Manual - Page 65
as documents after scanning them from the operation panel. (1) Scan Options Area (2) Save Settings Area (3) Application Settings Area (1) Scan Options Area • Paper Size Set from the operation panel. • Resolution Set from the operation panel. • Document Scan Orientation Settings... Click to display - Canon PIXMA MX392 | Manual - Page 66
scanned images when transferring them to a computer. This is useful when your scanner or printer and computer are connected with a slow interface such as USB1.1. • Image Processing Settings Click (Plus) to set photos or pictures printed with fine dots are scanned. Note Scanning takes longer than - Canon PIXMA MX392 | Manual - Page 67
Send to a folder Select this when you also want to save the scanned images to a folder other than the one specified in Save in. You can specify the folder from the pull- pull-down menu. • Instructions Opens this guide. • Defaults You can restore the settings in the displayed screen to the default - Canon PIXMA MX392 | Manual - Page 68
is currently set to use. If the displayed product is not the one you want to use, select the desired product from the list. • E-mail Attachment Size You can restrict the size of scanned images to be attached to an e-mail. You can select Small (Suitable for 640 x 480 Windows), Medium (Suitable - Canon PIXMA MX392 | Manual - Page 69
can specify the image quality of JPEG files. Important Available only when the Compress scanned images upon transfer checkbox is not selected in Scan Options of the Settings dialog box. • Create a PDF file that supports keyword search Select this checkbox to convert text in images into text data and - Canon PIXMA MX392 | Manual - Page 70
Right 90°). Important The preview operation buttons do not appear when the Enable large image scans checkbox is selected in the Settings (ScanGear) dialog box. (2) Scan Results Area Displays the thumbnails of the scanned images. You can change the save order of images via drag-anddrop. The file - Canon PIXMA MX392 | Manual - Page 71
the Settings (Document Scan), Settings (Custom Scan), or Settings (ScanGear) dialog box You cannot select JPEG/Exif when Color Mode is Black and White. • Settings... Click to display the Data Format Settings dialog box in which you can set the quality of the images to be saved, keyword search of PDF - Canon PIXMA MX392 | Manual - Page 72
main screen to display the Image Stitch window. You can scan the left and right halves of an item larger than the platen and combine the images back into one image. You can scan items up to approximately twice as large as the platen. (1) Settings and Operation Buttons (2) Toolbar (3) Thumbnail View - Canon PIXMA MX392 | Manual - Page 73
scan area in preview. If no area is specified, the image of the size selected in Select Output Size will be saved. If an area is specified, only the image in the cropping frame will be scanned and saved. Adjusting Cropping Frames (IJ Scan Utility) • Save • Save Saves the two scanned images as one - Canon PIXMA MX392 | Manual - Page 74
the preview image 90 degrees clockwise. • (Open Guide) Opens this page. (3) Thumbnail View Area • Thumbnail View Area Displays the thumbnails of the scanned images. Appears blank if none has been scanned. (4) Preview Area • Preview Area Displays the scanned images. You can adjust the layout by - Canon PIXMA MX392 | Manual - Page 75
the first item by clicking Start Scanning Image 1 The image is scanned in the direction specified in Scan Direction, and 2 appears next to it. • After scanning the second item by clicking Start Scanning Image 2 The two scanned images appear. Related Topic Scanning Items Larger than the Platen (Image - Canon PIXMA MX392 | Manual - Page 76
with Application Software that You are Using (ScanGear) What Is ScanGear (Scanner Driver)? Scanning with Advanced Settings Using ScanGear (Scanner Driver) Starting ScanGear (Scanner Driver) Scanning in Basic Mode Scanning in Advanced Mode Scanning Multiple Documents from the ADF (Auto Document - Canon PIXMA MX392 | Manual - Page 77
interface called TWAIN. (ScanGear is a TWAINcompatible driver.) What You Can Do with This Software This software enables you to preview scan results or set document type and output size, etc. when scanning documents. It is useful when you want to scan in a specific color tone, as it allows you to - Canon PIXMA MX392 | Manual - Page 78
- Canon PIXMA MX392 | Manual - Page 79
Advanced Settings Using ScanGear (Scanner Driver) Starting ScanGear (scanner driver) Starting ScanGear (Scanner Driver) Scanning documents after making simple image corrections Scanning in Basic Mode Scanning documents after making advanced image corrections and brightness/color adjustments Scanning - Canon PIXMA MX392 | Manual - Page 80
(scanner driver) to make image corrections and color adjustments when scanning. ScanGear can be started from My Image Garden or an application. Note Set up the network environment if you have more than one scanner or have a network compatible model and changed the connection from USB connection to - Canon PIXMA MX392 | Manual - Page 81
Scanner Driver) 2. Set Select Source according to the document placed on the Platen or ADF. Important Some applications do not support continuous scanning from the ADF. For details, refer to the application's manual. Note To scan magazines containing many color photos, select Magazine (Color). When - Canon PIXMA MX392 | Manual - Page 82
Scan Tab 3. Click Preview. Preview image appears in the Preview area. Important Preview is not displayed when an ADF type is selected for Select Source. Note Colors are adjusted based on the document type selected in Select Source. 4. Set Destination. Note Skip ahead to Step 7 when an ADF type is - Canon PIXMA MX392 | Manual - Page 83
Related Topic Basic Mode Tab - Canon PIXMA MX392 | Manual - Page 84
Use the Advanced Mode tab to specify the color mode, output resolution, image brightness, color tone, etc. when scanning. See "Scanning Multiple Documents at One Time with ScanGear (Scanner Driver)" to scan multiple documents at one time. See "Scanning Multiple Documents from the ADF (Auto Document - Canon PIXMA MX392 | Manual - Page 85
Adjusting Cropping Frames (ScanGear) Image Settings Color Adjustment Buttons 7. Click Scan. Scanning starts. Note Click (Information) to open a dialog box in which you can check the current scan settings (document type, etc.). A response of ScanGear after scanning can be specified in Status of - Canon PIXMA MX392 | Manual - Page 86
with Auto Duplex ADF, you can specify how to output the paper upon scanning both sides from the ADF in ADF Duplex Paper Output Settings on the Scan tab of the Preferences dialog box. Scan Tab 4. Set Output Settings. Output Settings 5. Make image corrections and color adjustments as required. - Canon PIXMA MX392 | Manual - Page 87
Settings Color Adjustment Buttons 6. Click Scan. Scanning starts. Note Click (Information) to open a dialog box in which you can check the current scan settings (document type, etc.). A response of ScanGear after scanning can be specified in Status of ScanGear dialog after scanning on the Scan - Canon PIXMA MX392 | Manual - Page 88
scan multiple documents at one time from the Advanced Mode tab. Use the Advanced Mode tab to make advanced scan settings such as the color mode, output resolution, image brightness, and color scanner driver). Placing Items (When Scanning from a Computer) Starting ScanGear (Scanner Driver) 2. Set - Canon PIXMA MX392 | Manual - Page 89
frames and set Image corrections as required. Note You can correct each image separately. Select the frame you want to correct. In thumbnail view, you can only create one cropping frame per image. To create multiple cropping frames in an image, scan in whole image view. Scanning Multiple Documents - Canon PIXMA MX392 | Manual - Page 90
is specified, only the portion in the specified area will be scanned. Adjusting Cropping Frames (ScanGear) 5. Set Image corrections as required. 6. Click Scan. Areas framed by broken lines are scanned. Note A response of ScanGear after scanning can be specified in Status of ScanGear dialog after - Canon PIXMA MX392 | Manual - Page 91
(Scanner Driver) Sharpening out-of-focus photos, reducing dust and scratches, and correcting faded colors Correcting Images (Unsharp Mask, Reduce Dust and Scratches, Fading Correction, etc.) Previewing and changing the color tone of the entire image to scan Adjusting Colors Using a Color Pattern - Canon PIXMA MX392 | Manual - Page 92
and Scratches, Fading Correction, etc.) The Image Settings functions on the Advanced Mode tab of ScanGear (scanner driver) allow you to enhance the outline of the subjects, reduce dust/scratches, and correct faded colors when scanning images. Setting Items Click (Arrow) of a function and select - Canon PIXMA MX392 | Manual - Page 93
the base color in recycled paper, newspapers, etc. when scanning documents Set Reduce Show-through to ON. OFF ON Sharpening slightly out-of-focus images Set Unsharp Mask to ON. OFF ON Reducing gradations and stripe patterns Set Descreen to ON. OFF ON Note Printed photos and pictures - Canon PIXMA MX392 | Manual - Page 94
degree of fading or colorcast. None Medium Reducing graininess Set Grain Correction to Low, Medium, or High according to the degree of graininess. None Medium Correcting shadows that appear between pages when scanning open booklets Set Gutter Shadow Correction to Low, Medium, or High according - Canon PIXMA MX392 | Manual - Page 95
Colors Using a Color Pattern You can preview color changes and reproduce natural colors by using the color pattern function in ScanGear (scanner driver)'s Basic Mode tab. Color Adjustment Correct colors that have faded with time or due to colorcast. "Colorcast" is a phenomenon where a specific color - Canon PIXMA MX392 | Manual - Page 96
image. Since Blue and Green are too strong, click the Yellow and Magenta arrows to correct. Before After Note Color adjustments are applied only to the cropping frames (scan areas) or the frame selected in thumbnail view. You can select multiple frames or cropping frames by clicking them while - Canon PIXMA MX392 | Manual - Page 97
Adjusting Saturation and Color Balance In ScanGear (scanner driver)'s Advanced Mode tab, click (Saturation/Color Balance). Note Click Defaults to reset all adjustments in the current window. Saturation Adjust the image's saturation (vividness). You can brighten colors that have faded with time, - Canon PIXMA MX392 | Manual - Page 98
produces a shade of gray when mixed). You can reproduce the natural colors of the scene by reducing the cast color and increasing the complementary color. It is usually difficult to correct the image completely by adjusting only one color pair. It is recommended that you find a portion in the image - Canon PIXMA MX392 | Manual - Page 99
) to return to the previous view. Click Defaults to reset all adjustments in the current window. Channel Each dot of an image is a mixture of Red, Green, and Blue in various proportions (gradation). These colors can be adjusted individually as a "channel." • Master Adjust the Red, Green, and Blue - Canon PIXMA MX392 | Manual - Page 100
shadows may be lost if you darken the image too much. Contrast "Contrast" is the degree of difference between the brighter and darker parts of an image. Increasing contrast will increase the difference, thus sharpening the image. Decreasing contrast will decrease the difference, thus softening the - Canon PIXMA MX392 | Manual - Page 101
Histogram In ScanGear (scanner driver)'s Advanced Mode tab, click (Histogram). Note Click Defaults to reset all adjustments in the current window. Channel Each dot of an image is a mixture of Red, Green, and Blue in various proportions (gradation). These colors can be adjusted individually as - Canon PIXMA MX392 | Manual - Page 102
a Channel, then move (Black-point Slider) or set as the shadow or highlight. (White-point Slider) to specify the level to be - All parts to the left of (Black-point Slider) will be black (level 0). - The parts at (Mid-point Slider) will turn to the color exactly between the black-point and white - Canon PIXMA MX392 | Manual - Page 103
to a dropper. Click a Dropper displayed below the histogram to change the setting. - The point clicked with to 245). (Black-point Dropper) will be the area you want to adjust the color in the preview image. The clicked point will be set as the achromatic color reference, and the rest of the - Canon PIXMA MX392 | Manual - Page 104
Curve In ScanGear (scanner driver)'s Advanced Mode tab, click (Tone Curve Settings). Note Click Defaults to reset all adjustments in the current window. Channel Each dot of an image is a mixture of Red, Green, and Blue in various proportions (gradation). These colors can be adjusted individually - Canon PIXMA MX392 | Manual - Page 105
Adjusting Tone Curve In Select Tone Curve, select a tone curve from No correction, Overexposure, Underexposure, High contrast, Reverse the negative/positive image, and Edit custom curve. No correction (No adjustment) Overexposure (Convex curve) The midtone data of the input side is stretched toward - Canon PIXMA MX392 | Manual - Page 106
Edit custom curve You can drag specific points on the Tone Curve to freely adjust the brightness of the corresponding areas. - Canon PIXMA MX392 | Manual - Page 107
reduce show-through in newspapers. This function is available when Color Mode is Black and White. In ScanGear (scanner driver)'s Advanced Mode tab, click (Threshold). Note Click Defaults to reset all adjustments in the current window. Adjusting Threshold Move (Slider) to the right to increase the - Canon PIXMA MX392 | Manual - Page 108
ScanGear (Scanner Driver) Screens Basic Mode Tab Advanced Mode Tab Input Settings Output Settings Image Settings Color Adjustment Buttons Preferences Dialog Box Scanner Tab Preview Tab Scan Tab Color Settings Tab - Canon PIXMA MX392 | Manual - Page 109
type and view. (1) Settings and Operation Buttons • Select Source • Photo (Color) Scan color photos. • Magazine (Color) Scan color magazines. • Document (Color) Scan documents in color. • Document (Grayscale) Scan documents in black and white. • Document (Color) ADF Simplex Scan documents from the - Canon PIXMA MX392 | Manual - Page 110
to do with the scanned image. • Print Select this to print the scanned image on a printer. • Image display Select this to view the scanned image on a monitor. • OCR Select this to use the scanned image with OCR software. "OCR software" is software that converts text scanned as an image into text - Canon PIXMA MX392 | Manual - Page 111
within the cropping frame will be scanned. You can drag the cropping and save them at one time. Saved items will select inches or mm when Destination is Print but you can only select pixels when error message appears when you enter a value outside the setting range. Enter a value within the setting - Canon PIXMA MX392 | Manual - Page 112
. and reproduce natural colors while previewing color changes. Adjusting Colors Using a Color Pattern Important This setting is not available when you select Color Matching on the Color Settings tab of the Preferences dialog box. • Perform Scan • Scan Starts scanning. Note When scanning starts, the - Canon PIXMA MX392 | Manual - Page 113
current scan settings (document type, etc.). • (Open Guide) Opens settings (image corrections, color adjustments, etc.) made in "Settings and Operation Buttons." When (Thumbnail) is displayed on the Toolbar Cropping frames are specified according to the document size, and thumbnails of scanned - Canon PIXMA MX392 | Manual - Page 114
by clicking them while pressing the Ctrl key. Unselected (no outline): The settings will not be applied. Double-click a frame to zoom in on the frames will be scanned. Note You can specify the cropping frame on the displayed image. In thumbnail view, you can only create one cropping frame per - Canon PIXMA MX392 | Manual - Page 115
Advanced Mode Tab This mode allows you to make advanced scan settings such as the color mode, output resolution, image brightness, and color tone. This section describes the settings and functions available on the Advanced Mode tab. When scanning from the ADF (Auto Document Feeder), documents are - Canon PIXMA MX392 | Manual - Page 116
as the document type and size. Input Settings • Output Settings Specify the output settings such as the output resolution and size. Output Settings • Image Settings Enable/disable various image correction functions. Image Settings • Color Adjustment Buttons Fine corrections to the image brightness - Canon PIXMA MX392 | Manual - Page 117
in whole image view. • Preferences... Opens the Preferences dialog box in which you can make scan/preview settings. Preferences Dialog Box • Close Closes ScanGear (scanner driver). (2) Toolbar • Toolbar You can adjust or rotate preview images. The buttons displayed on the Toolbar vary by view. In - Canon PIXMA MX392 | Manual - Page 118
color adjustment settings. • (Crop) Allows you to specify the scan area by dragging the mouse. • (Move Image) Allows you to drag the image until the part be reflected in the scanned image. - The image reflected in the scanned image. - The Preview area. The scan area is reduced the settings to - Canon PIXMA MX392 | Manual - Page 119
, color adjustments, etc.) made in "Settings and Operation Buttons." When (Thumbnail) is displayed on the Toolbar Cropping frames are specified according to the document size, and thumbnails of scanned images are displayed. Only the images with the checkbox selected will be scanned. Note - Canon PIXMA MX392 | Manual - Page 120
Related Topic Scanning in Advanced Mode Scanning Multiple Documents from the ADF (Auto Document Feeder) in Advanced Mode - Canon PIXMA MX392 | Manual - Page 121
ADF (Auto Document Feeder), select Document (ADF Simplex) or Document (ADF Duplex). Important Some applications do not support continuous scanning from the ADF. For details, refer to the application's manual. Note You can select Document (ADF Duplex) when using a model equipped with Auto Duplex ADF - Canon PIXMA MX392 | Manual - Page 122
(ADF Simplex). • Color Mode Select how to scan the document. • Color Select this mode to scan color documents or to create color images. This mode renders level) into black and white and is rendered in two colors. The threshold level can be set with (Threshold). • Input Size In thumbnail view, - Canon PIXMA MX392 | Manual - Page 123
Select the resolution to scan at. The higher the resolution (value), the more detail in your image. Select a resolution from the options displayed by clicking the button, or enter a value in 1 dpi increments. Refer to "Resolution" for your model from Home of the Online Manual for details. • When - Canon PIXMA MX392 | Manual - Page 124
the cropping frame will be scanned at the size of the selected multiple output sizes and save them at one time. Saved items will be registered inches or mm when Destination is Print but you can only select pixels when . An error message appears when you enter a value outside the setting range. Enter - Canon PIXMA MX392 | Manual - Page 125
reflected in the preview image. Note Selectable settings depend on Color Mode settings. Scanning may take longer than usual when you use Image Settings. Image Settings allows you to set the following items: • Image Adjustment When Image Adjustment is set, the brightness of the specified portion of - Canon PIXMA MX392 | Manual - Page 126
set Image Adjustment to None. • Reduce Show-through Use this function to reduce show-through in duplex documents or lighten the base color in recycled paper and other colored paper when scanning scratches. Large ones may remain. • Medium It is recommended that you normally select this setting. • High - Canon PIXMA MX392 | Manual - Page 127
can affect the tone of the image. Important You can set Fading Correction after preview. You can set this setting when Recommended is selected on the Color Settings tab of the Preferences dialog box. Correction may not be applied properly if the scan area is too small. • Grain Correction Use this - Canon PIXMA MX392 | Manual - Page 128
used to preview the scan. If the binding part is not even, the shadow will not be corrected properly. How to place the document depends on your model and the document to be scanned. Note Cover the document with black cloth if white spots, streaks, or colored patterns appear in scan results due to - Canon PIXMA MX392 | Manual - Page 129
Adjustment Buttons are not available when you select Color Matching on the Color Settings tab of the Preferences dialog box. Note Selectable settings depend on Color Mode settings. When you adjust the image via the Color Adjustment Buttons, the results will be reflected in the preview image. Click - Canon PIXMA MX392 | Manual - Page 130
Adjusting Tone Curve • (Final Review) Make a final check of color adjustments. The final synthesized Setting Threshold • Custom You can name and save a set of tone curve and threshold settings of the Color Adjustment Buttons. Select Add/Delete... from the pull-down menu; when Color Mode is set - Canon PIXMA MX392 | Manual - Page 131
Reset all adjustments (saturation/color balance, brightness/contrast, histogram, and tone curve). - Canon PIXMA MX392 | Manual - Page 132
Click Preferences... in the ScanGear (scanner driver) screen to open the Preferences dialog box. In the Preferences dialog box, you can make advanced settings to ScanGear functions via the Scanner, Preview, Scan, and Color Settings tabs. Scanner Tab Allows you to set the quiet mode, folder in which - Canon PIXMA MX392 | Manual - Page 133
you wish to reduce the operating noise such as when scanning or printing at nights. Click Settings... to set the quiet mode. Note You can set the quiet mode from the operation panel of the machine, the printer driver, or ScanGear. No matter how the setting is made, it applies to operations from the - Canon PIXMA MX392 | Manual - Page 134
wav, *.aif, *.aiff) - MP3 file (*.mp3) • Calibration Settings When you set Execute at Every Scan to ON, the scanner will be calibrated every time before previewing and scanning, to reproduce correct color tones in scanned images. Note Even when Execute at Every Scan is set to OFF, the scanner may be - Canon PIXMA MX392 | Manual - Page 135
driver) is started. • Automatically Execute Preview ScanGear will automatically start previewing at startup. • Display Saved Preview Image The previously previewed image will be displayed. The Color Adjustment Button settings, the Toolbar settings The cropping frame (scan area) will automatically - Canon PIXMA MX392 | Manual - Page 136
width and height) of the area displayed for the standard size. Note When you change the Cropping Size for Thumbnail View setting, the preview images will be refreshed and cropped to the new size. As the preview images are refreshed, the color adjustments and other settings applied to them are reset. - Canon PIXMA MX392 | Manual - Page 137
not support it. • ADF Duplex Paper Output Settings (Auto Duplex ADF models only) Specify how to output the paper when scanning both sides of multiple documents at one time from the ADF (Auto Document Feeder). Output by back/front(Fast) is set when scanning into applications such as OCR software that - Canon PIXMA MX392 | Manual - Page 138
• Output by page Outputs the scanned documents in the correct page order. - Canon PIXMA MX392 | Manual - Page 139
. It is recommended that you normally select this setting. • Color Matching Select this to automatically match the scanner, monitor, and color printer colors, thus reducing time and trouble to manually match the monitor and printer colors. Color Adjustment Buttons will be disabled. This function is - Canon PIXMA MX392 | Manual - Page 140
may fall into your scanner or printer, resulting in malfunction. Close the document cover when scanning. Do not touch the operation PDF files. To save in a format other than PDF, scan by specifying the data format. Important Refer to "Loading Originals" for your model from Home of the Online Manual - Canon PIXMA MX392 | Manual - Page 141
when the Compress scanned images upon transfer checkbox is selected in the Settings dialog box of IJ Scan Utility. Positions Online Manual for details on supported document sizes when scanning from the ADF. 1. Open the document tray 2. Place the documents on the ADF, then adjust the document guides - Canon PIXMA MX392 | Manual - Page 142
- Canon PIXMA MX392 | Manual - Page 143
Cropping Frames (IJ Scan Utility)" for your model from Home of the Online Manual for how to adjust cropping frames with IJ Scan Utility. Initial Preview area to specify the area. Note You can change the auto crop setting in the Preferences dialog box. See Cropping Frame on Previewed Images in " - Canon PIXMA MX392 | Manual - Page 144
. Input Settings You can rotate a cropping frame 90 degrees by clicking (Switch Aspect Ratio). However, (Switch Aspect Ratio) is not available when Output Size is Flexible. Creating Multiple Cropping Frames In thumbnail view You can only create one cropping frame per image. In whole image view - Canon PIXMA MX392 | Manual - Page 145
be applied to all the selected cropping frames. When you create a new cropping frame, it retains the settings of the latest cropping frame. Note Create up to 12 cropping frames. Scanning takes longer than usual when multiple cropping frames are selected. Deleting Cropping Frames In thumbnail view To - Canon PIXMA MX392 | Manual - Page 146
and Windows XP Media Center Edition 2005. Scan with other applications such as IJ Scan Utility. • Some applications may not display the TWAIN user interface. In that case, refer to the application's manual and change the settings accordingly. • Some applications do not support continuous scanning of - Canon PIXMA MX392 | Manual - Page 147
in some applications. In that case, increase the operating system's virtual memory and retry. • When image size is too large (such as when scanning large images at high resolution), your computer may not respond or the progress bar may remain at 0 % depending on the application. In that case - Canon PIXMA MX392 | Manual - Page 148
Useful Information on Scanning Adjusting Cropping Frames (IJ Scan Utility) Resolution Data Formats Color Matching - Canon PIXMA MX392 | Manual - Page 149
the rest when scanning it. In the Image Stitch window, you can specify a cropping frame on the image displayed in the Preview area. Note See "Adjusting Cropping Frames (ScanGear)" for your model from Home of the Online Manual for how to adjust cropping frames with ScanGear (scanner driver). Initial - Canon PIXMA MX392 | Manual - Page 150
ScanGear (Scanner Driver) Output Resolution in Output Settings on the Advanced Mode tab Appropriate Resolution Settings Set the resolution according to the use of the scanned image. Item Type Use Color photo Black and white photo Text document (document or magazine) Copying (Printing) Creating - Canon PIXMA MX392 | Manual - Page 151
When you will be printing the scanned image by enlarging it, scan by setting a higher resolution than the recommended one above. - Canon PIXMA MX392 | Manual - Page 152
scanned images. You should specify the most suitable data format according to how you want to use the image on which application. Available data formats vary by application and operating system (Windows Some TIFF files are incompatible. IJ Scan Utility supports the following TIFF file formats. - Canon PIXMA MX392 | Manual - Page 153
sRGB to the monitor's color space based on the operating system's monitor settings and the application's working space settings. When printing, the image's color space is converted from sRGB to the printer's color space based on the application's print settings and the printer driver's settings. - Canon PIXMA MX392 | Manual - Page 154
Other Scanning Methods Scanning with WIA Driver Scanning Using the Control Panel (Windows XP Only) - Canon PIXMA MX392 | Manual - Page 155
's manual. Scanning with WIA Driver 2.0 The following is an example of scanning using "Windows Fax and Scan." 1. Place the item on the platen or ADF. Placing Items (When Scanning from a Computer) 2. Select New on the File menu of "Windows Fax and Scan," then click Scan.... The scan setting screen - Canon PIXMA MX392 | Manual - Page 156
Preview to preview the image. The preview image appears on the right. 5. Click Scan. When scanning is completed, the scanned image appears in the application. Scanning with WIA Driver 1.0 The following is an example of scanning using "Paint." 1. Place the item on the platen or ADF. Placing Items - Canon PIXMA MX392 | Manual - Page 157
Selecting Document Feeder for Paper source enables you to select Page size. 4. Click Adjust the quality of the scanned picture and set the preferences as required. • Brightness Move the slider to adjust the brightness. Move it to the left to darken and right to brighten the image. - Canon PIXMA MX392 | Manual - Page 158
Using the Control Panel (Windows XP Only) You can scan images via the Control Panel of Windows XP using the WIA driver. 1. From the Start menu, select Control Panel. 2. Click Printers and Other Hardware > Scanners and Cameras, then double-click Canon XXX series (where "XXX" is the model name - Canon PIXMA MX392 | Manual - Page 159
(DPI) Enter the resolution. Specify a value between 50 dpi and 600 dpi. Resolution • Picture type Select the type of scan you want for your item. • Reset Click to restore the original settings. 6. Click Preview to preview the image. The preview image appears on the right. Drag to specify the - Canon PIXMA MX392 | Manual - Page 160
may fall into your scanner or printer, resulting in malfunction. Close the document cover when scanning. Do not touch the operation PDF files. To save in a format other than PDF, scan by specifying the data format. Important Refer to "Loading Originals" for your model from Home of the Online Manual - Canon PIXMA MX392 | Manual - Page 161
when the Compress scanned images upon transfer checkbox is selected in the Settings dialog box of IJ Scan Utility. Positions Online Manual for details on supported document sizes when scanning from the ADF. 1. Open the document tray. 2. Place the documents on the ADF, then adjust the document guides - Canon PIXMA MX392 | Manual - Page 162
- Canon PIXMA MX392 | Manual - Page 163
Scanning from the Operation Panel of the Machine Forwarding Scanned Data to the Computer Using the Operation Panel of the Machine Setting Items on the Operation Panel of the Machine Selecting a Response to Commands from the Operation Panel Using IJ Scan Utility Basic - Canon PIXMA MX392 | Manual - Page 164
the USB cable while the machine is in operation, or when the computer is in the sleep or standby mode. • The destination and the file name are specified in Canon IJ Scan Utility. You can specify the destination and the file name in Canon IJ Scan Utility. For details on settings of Canon IJ Scan - Canon PIXMA MX392 | Manual - Page 165
the button to select the scan resolution, then press the OK button. The Scan standby screen is displayed after all the settings have been specified. 6. Load the original document on the platen glass or in the ADF. Loading Originals 7. Press the Color button for color scanning, or the Black button - Canon PIXMA MX392 | Manual - Page 166
You can set My Image Garden to launch whenever pressing the Color or Black button. • If you are using Windows XP: The program selection screen may be displayed after pressing the Color or Black button for the first time. In this case, specify Canon IJ Scan Utility as the application software to use - Canon PIXMA MX392 | Manual - Page 167
you can specify the destination and file name using Canon IJ Scan Utility. Settings Dialog Box If you scan originals from the computer, you can scan with advanced settings. For details on scanning from the computer: Scanning Photos and Documents • Scan size Select the size of the original. Ex: If - Canon PIXMA MX392 | Manual - Page 168
as examples in the following descriptions. 1. Start IJ Scan Utility. Starting IJ Scan Utility 2. Click Settings.... The Settings dialog box appears. 3. Select a scan mode on the (Scanning from the Operation Panel) tab. Note See the section below for details. Settings (Save to PC (Auto)) Dialog Box - Canon PIXMA MX392 | Manual - Page 169
4. Specify image corrections in Scan Options. 5. Specify the file name and other settings in Save Settings. 6. Select the application you want to start after scanning in Application Settings. - Canon PIXMA MX392 | Manual - Page 170
7. Click OK. The responses will be executed according to the specified settings when you start scanning from the operation panel.
-
 1
1 -
 2
2 -
 3
3 -
 4
4 -
 5
5 -
 6
6 -
 7
7 -
8
-
9
-
10
-
11
-
12
-
13
-
14
-
15
-
16
-
17
-
18
-
19
-
20
-
21
-
22
-
23
-
24
-
25
-
26
-
27
-
28
-
29
-
30
-
31
-
32
-
33
-
34
-
35
-
36
-
37
-
38
-
39
-
40
-
41
-
42
-
43
-
44
-
45
-
46
-
47
-
48
-
49
-
50
-
51
-
52
-
53
-
54
-
55
-
56
-
57
-
58
-
59
-
60
-
61
-
62
-
63
-
64
-
65
-
66
-
67
-
68
-
69
-
70
-
71
-
72
-
73
-
74
-
75
-
76
-
77
-
78
-
79
-
80
-
81
-
82
-
83
-
84
-
85
-
86
-
87
-
88
-
89
-
90
-
91
-
92
-
93
-
94
-
95
-
96
-
97
-
98
-
99
-
100
-
101
-
102
-
103
-
104
-
105
-
106
-
107
-
108
-
109
-
110
-
111
-
112
-
113
-
114
-
115
-
116
-
117
-
118
-
119
-
120
-
121
-
122
-
123
-
124
-
125
-
126
-
127
-
128
-
129
-
130
-
131
-
132
-
133
-
134
-
135
-
136
-
137
-
138
-
139
-
140
-
141
-
142
-
143
-
144
-
145
-
146
-
147
-
148
-
149
-
150
-
151
-
152
-
153
-
154
-
155
-
156
-
157
-
158
-
159
-
160
-
161
-
162
-
163
-
164
-
165
-
166
-
167
-
168
-
169
-
170
 |
 |

MX390 series
Online Manual
Scanning
English