Canon PIXMA MX392 Manual - Page 139
Color Settings Tab
 |
View all Canon PIXMA MX392 manuals
Add to My Manuals
Save this manual to your list of manuals |
Page 139 highlights
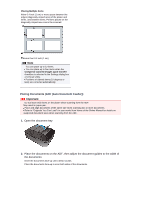
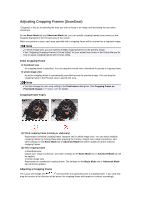
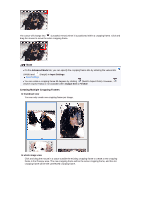
Color Settings Tab On the Color Settings tab, you can specify the following settings. • Color Adjustment Select one of the following. You can select one when Color Mode is Color or Grayscale. • Recommended Select this to vividly reproduce the tone of a document on the screen. It is recommended that you normally select this setting. • Color Matching Select this to automatically match the scanner, monitor, and color printer colors, thus reducing time and trouble to manually match the monitor and printer colors. Color Adjustment Buttons will be disabled. This function is available when Color Mode is Color. - Source(Scanner): Select scanner profile. - Target: Select target profile. - Monitor: Select this checkbox to display preview image with optimum correction for monitor. - Defaults: Returns to the default Color Matching settings. • None Select this to disable color correction provided by ScanGear (scanner driver). Note Color Matching is available when ScanGear, monitor, color management-compliant application (such as Adobe Photoshop), and printer are set up correctly. Refer to the corresponding manual for the monitor, printer, and application settings. • Monitor Gamma By setting the gamma value of a monitor, you can adjust the input data to the brightness characteristics of the monitor. Adjust the value if your monitor's gamma value does not match the default value set in ScanGear, and the colors of the original image are not accurately reflected in the monitor. Click Defaults to return to the default Monitor Gamma value (2.20). Note Refer to the manual of your monitor to check its gamma value. If it is not written in the manual, contact the manufacturer.
-
 1
1 -
2
-
3
-
4
-
5
-
6
-
7
-
8
-
9
-
10
-
11
-
12
-
13
-
14
-
15
-
16
-
17
-
18
-
19
-
20
-
21
-
22
-
23
-
24
-
25
-
26
-
27
-
28
-
29
-
30
-
31
-
32
-
33
-
34
-
35
-
36
-
37
-
38
-
39
-
40
-
41
-
42
-
43
-
44
-
45
-
46
-
47
-
48
-
49
-
50
-
51
-
52
-
53
-
54
-
55
-
56
-
57
-
58
-
59
-
60
-
61
-
62
-
63
-
64
-
65
-
66
-
67
-
68
-
69
-
70
-
71
-
72
-
73
-
74
-
75
-
76
-
77
-
78
-
79
-
80
-
81
-
82
-
83
-
84
-
85
-
86
-
87
-
88
-
89
-
90
-
91
-
92
-
93
-
94
-
95
-
96
-
97
-
98
-
99
-
100
-
101
-
102
-
103
-
104
-
105
-
106
-
107
-
108
-
109
-
110
-
111
-
112
-
113
-
114
-
115
-
116
-
117
-
118
-
119
-
120
-
121
-
122
-
123
-
124
-
125
-
126
-
127
-
128
-
129
-
130
-
131
-
132
-
133
-
 134
134 -
 135
135 -
 136
136 -
 137
137 -
 138
138 -
 139
139 -
 140
140 -
 141
141 -
 142
142 -
 143
143 -
 144
144 -
145
-
146
-
147
-
148
-
149
-
150
-
151
-
152
-
153
-
154
-
155
-
156
-
157
-
158
-
159
-
160
-
161
-
162
-
163
-
164
-
165
-
166
-
167
-
168
-
169
-
170
 |
 |
