Canon PIXMA MX392 Manual - Page 44
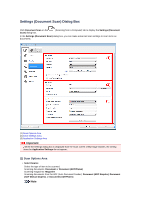
Document Scan Orientation Settings
 |
View all Canon PIXMA MX392 manuals
Add to My Manuals
Save this manual to your list of manuals |
Page 44 highlights
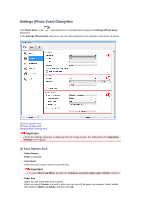
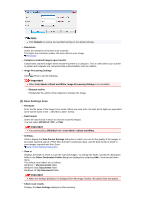
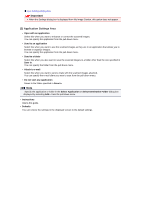
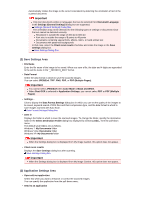
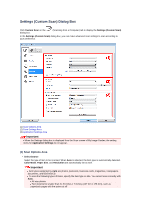
When Document (ADF/Platen) is selected and documents are placed both on the platen and ADF, those placed on the ADF will be scanned. • Color Mode Select the color mode in which to scan the item. Important To select Black and White, deselect the Compress scanned images upon transfer checkbox. • Paper Size Select the size of the item to be scanned. When you select Custom, a screen in which you can specify the paper size appears. Select a Unit, then enter the Width and Height, and then click OK. Note Click Defaults to restore the specified settings to the default settings. • Resolution Select the resolution of the item to be scanned. The higher the resolution (value), the more detail in your image. Resolution • Document Scan Orientation Settings... This appears when you select ADF for Select Source. Click to display the Document Scan Orientation Settings dialog box in which you can set the orientation and binding side of the documents to be scanned from the ADF. Important Binding Side cannot be specified when scanning only the front side of each document. • Compress scanned images upon transfer Compresses scanned images when transferring them to a computer. This is useful when your scanner or printer and computer are connected with a slow interface such as USB1.1. • Image Processing Settings Click (Plus) to set the following.
-
 1
1 -
2
-
3
-
4
-
5
-
6
-
7
-
8
-
9
-
10
-
11
-
12
-
13
-
14
-
15
-
16
-
17
-
18
-
19
-
20
-
21
-
22
-
23
-
24
-
25
-
26
-
27
-
28
-
29
-
30
-
31
-
32
-
33
-
34
-
35
-
36
-
37
-
38
-
 39
39 -
 40
40 -
 41
41 -
 42
42 -
 43
43 -
 44
44 -
 45
45 -
 46
46 -
 47
47 -
 48
48 -
 49
49 -
50
-
51
-
52
-
53
-
54
-
55
-
56
-
57
-
58
-
59
-
60
-
61
-
62
-
63
-
64
-
65
-
66
-
67
-
68
-
69
-
70
-
71
-
72
-
73
-
74
-
75
-
76
-
77
-
78
-
79
-
80
-
81
-
82
-
83
-
84
-
85
-
86
-
87
-
88
-
89
-
90
-
91
-
92
-
93
-
94
-
95
-
96
-
97
-
98
-
99
-
100
-
101
-
102
-
103
-
104
-
105
-
106
-
107
-
108
-
109
-
110
-
111
-
112
-
113
-
114
-
115
-
116
-
117
-
118
-
119
-
120
-
121
-
122
-
123
-
124
-
125
-
126
-
127
-
128
-
129
-
130
-
131
-
132
-
133
-
134
-
135
-
136
-
137
-
138
-
139
-
140
-
141
-
142
-
143
-
144
-
145
-
146
-
147
-
148
-
149
-
150
-
151
-
152
-
153
-
154
-
155
-
156
-
157
-
158
-
159
-
160
-
161
-
162
-
163
-
164
-
165
-
166
-
167
-
168
-
169
-
170
 |
 |
