Canon PIXMA MX870 MX870 series Getting Started - Page 19
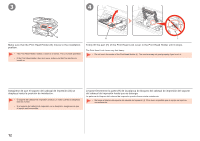
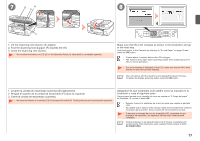
Fold the Scanning Unit Support F towards the left., Lift the Scanning Unit Cover E slightly.
 |
UPC - 013803119015
View all Canon PIXMA MX870 manuals
Add to My Manuals
Save this manual to your list of manuals |
Page 19 highlights
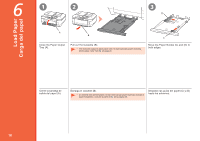
7 G H E 8 F 1. Lift the Scanning Unit (Cover) (E) slightly. 2. Fold the Scanning Unit Support (F) towards the left. 3. Close the Scanning Unit (Cover). • Do not touch the buttons or LCD (G) on the Operation Panel (H). May result in unintended operation. Make sure that the LCD changes as shown in the illustration and go to the next step. Load plain paper in the Cassette by referring to "6 Load Paper" on page 18 and press the OK button. • It takes about 4 minutes before the LCD changes. • The machine may make some operating noises when preparing to print. This is normal operation. • If an error message is displayed on the LCD, make sure that the Print Head and the ink tanks are correctly installed. • The LCD will turn off if the machine is not operated for about 5 minutes. To restore the display, press any button except the ON button. 1. Levante la unidad de escaneado (cubierta) (E) ligeramente. 2. Pliegue el soporte de la unidad de escaneado (F) hacia la izquierda. 3. Cierre la unidad de escaneado (cubierta). • No toque los botones ni la pantalla LCD (G) del panel de control (H). Podría producirse un funcionamiento imprevisto. Asegúrese de que la pantalla LCD cambie como se muestra en la ilustración y vaya al siguiente paso. Cargue papel normal en el cassette tal como se explica en "6 Carga del papel" de la página 18 y pulse el botón OK. • Deberán transcurrir alrededor de 4 minutos para que cambie la pantalla LCD. • Es posible que el equipo emita ciertos ruidos de funcionamiento mientras se prepara para imprimir. Esto es parte del funcionamiento normal. • Si aparece un mensaje de error en la pantalla LCD, asegúrese de que el cabezal de impresión y los depósitos de tinta estén correctamente instalados. • Cuando el equipo no se utiliza durante unos 5 minutos, la pantalla LCD se desconecta. Para reactivarla, pulse cualquier botón excepto el botón ACTIVADO (ON). 17
-
 1
1 -
2
-
3
-
4
-
5
-
6
-
7
-
8
-
9
-
10
-
11
-
12
-
13
-
 14
14 -
 15
15 -
 16
16 -
 17
17 -
 18
18 -
 19
19 -
 20
20 -
 21
21 -
 22
22 -
 23
23 -
 24
24 -
25
-
26
-
27
-
28
-
29
-
30
-
31
-
32
-
33
-
34
-
35
-
36
-
37
-
38
-
39
-
40
-
41
-
42
-
43
-
44
-
45
-
46
-
47
-
48
-
49
-
50
-
51
-
52
-
53
-
54
-
55
-
56
-
57
-
58
-
59
-
60
-
61
-
62
-
63
-
64
-
65
-
66
-
67
-
68
-
69
-
70
-
71
-
72
-
73
-
74
-
75
-
76
-
77
-
78
-
79
-
80
-
81
-
82
-
83
-
84
-
85
-
86
-
87
-
88
-
89
-
90
-
91
 |
 |
