Canon PowerShot A2500 Black User Guide - Page 13
Choose [Date/Time]., Change the date and time., Finish the setup process., Changing the Date
 |
View all Canon PowerShot A2500 Black manuals
Add to My Manuals
Save this manual to your list of manuals |
Page 13 highlights
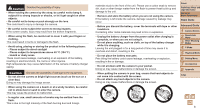
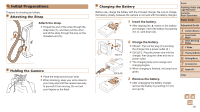
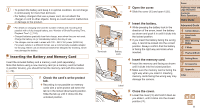
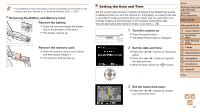
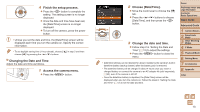
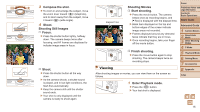
4 Finish the setup process. zzPress the button to complete the setting. The setting screen is no longer displayed. zzOnce the date and time have been set, the [Date/Time] screen is no longer displayed. zzTo turn off the camera, press the power button. • Unless you set the date and time, the [Date/Time] screen will be displayed each time you turn the camera on. Specify the correct information. • To set daylight saving time (1 hour ahead), choose [ ] in step 2 and then choose [ ] by pressing the buttons. Changing the Date and Time Adjust the date and time as follows. 1 Access the camera menu. zzPress the button. 2 Choose [Date/Time]. zzMove the zoom lever to choose the [3] tab. zzPress the buttons to choose [Date/Time], and then press the button. 3 Change the date and time. zzFollow step 2 in "Setting the Date and Time" (=12) to adjust the settings. zzPress the button to close the menu. • Date/time settings can be retained for about 3 weeks by the camera's built-in date/time battery (backup battery) after the battery pack is removed. • The date/time battery will be charged in about 4 hours once you insert a charged battery or connect the camera to an AC adapter kit (sold separately, =80), even if the camera is left off. • Once the date/time battery is depleted, the [Date/Time] screen will be displayed when you turn the camera on. Follow the steps in "Setting the Date and Time" (=12) to set the date and time. Cover Preliminary Notes and Legal Information Contents: Basic Operations Basic Guide Advanced Guide 1 Camera Basics 2 Smart Auto Mode 3 Other Shooting Modes 4 P Mode 5 Playback Mode 6 Setting Menu 7 Accessories 8 Appendix Index 13
-
 1
1 -
2
-
3
-
4
-
5
-
6
-
7
-
 8
8 -
 9
9 -
 10
10 -
 11
11 -
 12
12 -
 13
13 -
 14
14 -
 15
15 -
 16
16 -
 17
17 -
 18
18 -
19
-
20
-
21
-
22
-
23
-
24
-
25
-
26
-
27
-
28
-
29
-
30
-
31
-
32
-
33
-
34
-
35
-
36
-
37
-
38
-
39
-
40
-
41
-
42
-
43
-
44
-
45
-
46
-
47
-
48
-
49
-
50
-
51
-
52
-
53
-
54
-
55
-
56
-
57
-
58
-
59
-
60
-
61
-
62
-
63
-
64
-
65
-
66
-
67
-
68
-
69
-
70
-
71
-
72
-
73
-
74
-
75
-
76
-
77
-
78
-
79
-
80
-
81
-
82
-
83
-
84
-
85
-
86
-
87
-
88
-
89
-
90
-
91
-
92
-
93
-
94
-
95
-
96
-
97
-
98
-
99
-
100
-
101
-
102
-
103
-
104
-
105
-
106
-
107
-
108
-
109
 |
 |
