Canon PowerShot A2500 Black User Guide - Page 17
Using the Software
 |
View all Canon PowerShot A2500 Black manuals
Add to My Manuals
Save this manual to your list of manuals |
Page 17 highlights
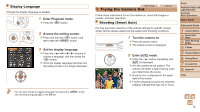
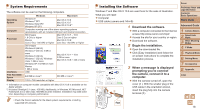
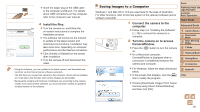
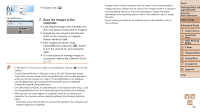
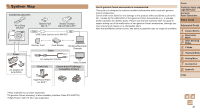
Still Images Accessing the Help Menu Movies Access on-screen descriptions of scenes detected by the camera, shooting advice, and playback instructions as follows. zzPress the < > button to access the Help menu. zzPress the < > button again to return to the original display. zzIn Shooting mode, a description of the scene detected by the camera is displayed. Shooting advice is also displayed depending on the scene. zzIn Playback mode, press the buttons and choose an item. The zoom lever and buttons are displayed overlaying the illustration of the camera. zzChoose an item and press the button. An explanation of the item is displayed. To continue reading the explanation, press the buttons to scroll up or down the screen. Press the button to return to the left hand screen. • The Help menu can also be used in shooting modes other than [ those modes it will display the same as when in Playback mode. ], and in Using the Software The software available for download from the Canon website is introduced below, with instructions for installation and saving images to a computer. Software Cover Preliminary Notes and Legal Information Contents: Basic Operations Basic Guide After downloading the software from the Canon website and installing it, you can do the following things on your computer. CameraWindow zzImport images and change camera settings ImageBrowser EX zzManage images: view, search, and organize zzPrint and edit images • Internet access is required, and any ISP account charges and access fees must be paid separately. Software Guide Refer to this guide when using the software. The guide can be accessed from the help system of software (some software excluded). Advanced Guide 1 Camera Basics 2 Smart Auto Mode 3 Other Shooting Modes 4 P Mode 5 Playback Mode 6 Setting Menu 7 Accessories 8 Appendix Index 17
-
 1
1 -
2
-
3
-
4
-
5
-
6
-
7
-
8
-
9
-
10
-
11
-
 12
12 -
 13
13 -
 14
14 -
 15
15 -
 16
16 -
 17
17 -
 18
18 -
 19
19 -
 20
20 -
 21
21 -
 22
22 -
23
-
24
-
25
-
26
-
27
-
28
-
29
-
30
-
31
-
32
-
33
-
34
-
35
-
36
-
37
-
38
-
39
-
40
-
41
-
42
-
43
-
44
-
45
-
46
-
47
-
48
-
49
-
50
-
51
-
52
-
53
-
54
-
55
-
56
-
57
-
58
-
59
-
60
-
61
-
62
-
63
-
64
-
65
-
66
-
67
-
68
-
69
-
70
-
71
-
72
-
73
-
74
-
75
-
76
-
77
-
78
-
79
-
80
-
81
-
82
-
83
-
84
-
85
-
86
-
87
-
88
-
89
-
90
-
91
-
92
-
93
-
94
-
95
-
96
-
97
-
98
-
99
-
100
-
101
-
102
-
103
-
104
-
105
-
106
-
107
-
108
-
109
 |
 |