Canon PowerShot A2500 Black User Guide - Page 18
Download the software., Begin the installation., When a message is displayed, prompting you
 |
View all Canon PowerShot A2500 Black manuals
Add to My Manuals
Save this manual to your list of manuals |
Page 18 highlights
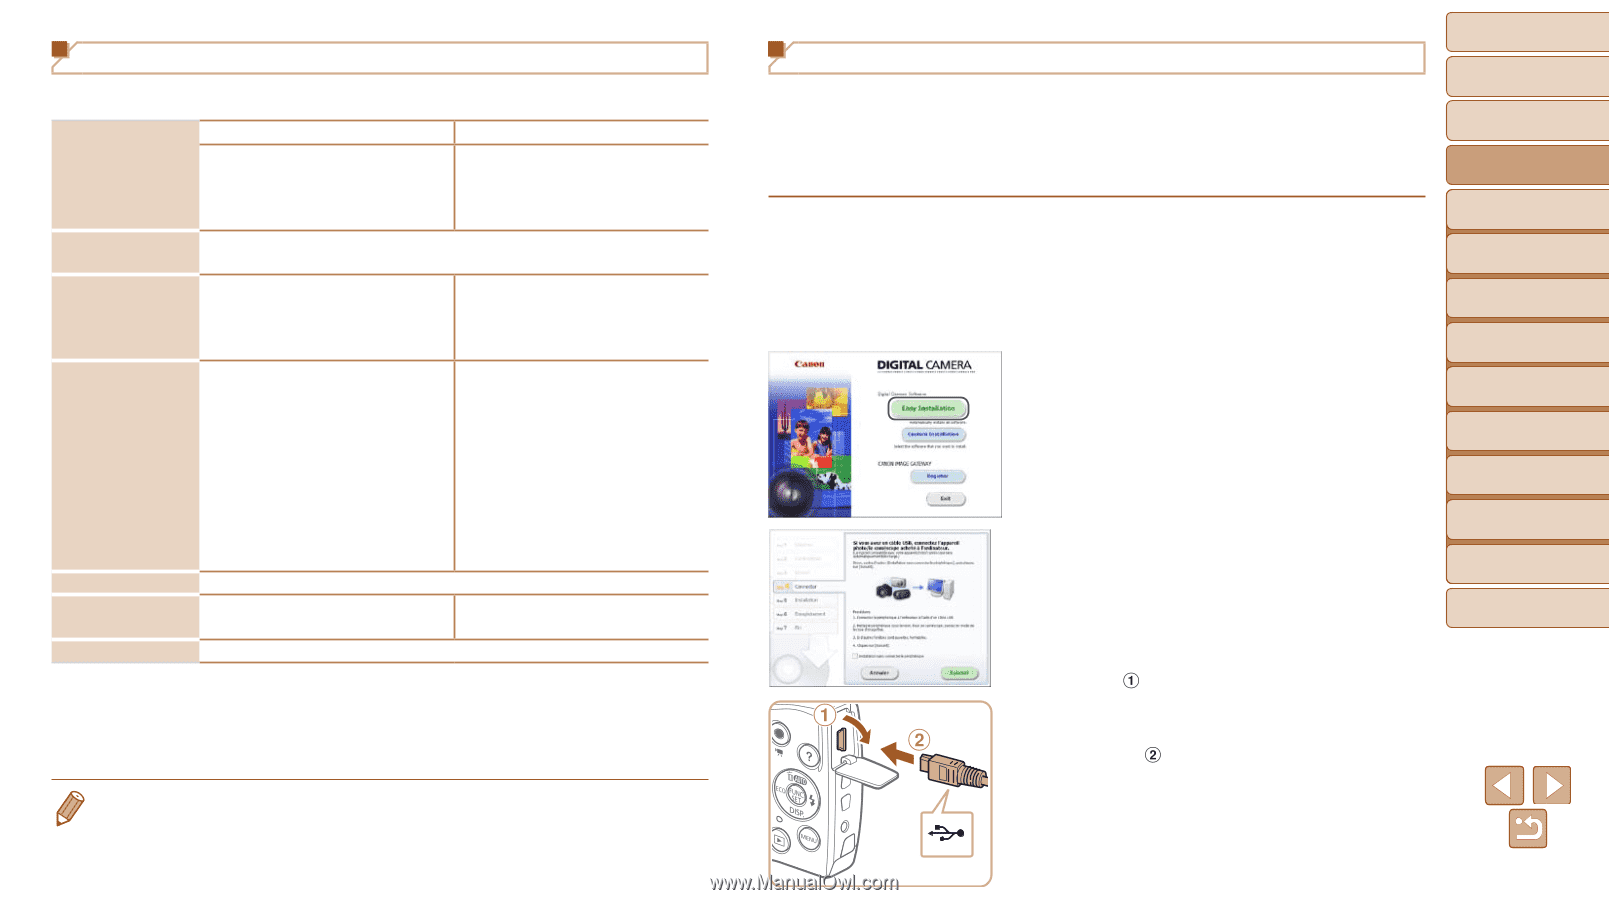
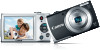
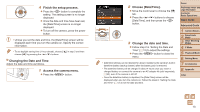
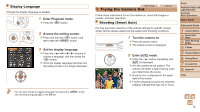
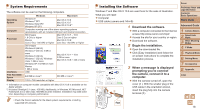
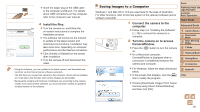
System Requirements The software can be used on the following computers. Operating System Computer Processor RAM Interfaces Free Hard Disk Space Display Windows Macintosh Windows 8 Windows 7 SP1 Windows Vista SP2 Windows XP SP3 Mac OS X 10.6 Mac OS X 10.7 Mac OS X 10.8*1 Computers running one of the above operating systems (preinstalled), with an included USB port and Internet connection Still images Mac OS X 10.7 - 10.8: 1.6 GHz or higher Core 2 Duo or higher Movies Mac OS X 10.6: Core 2 Duo 1.66 GHz or higher Core Duo 1.83 GHz or higher Still images Windows 8 (64 bit), Windows 7 (64 bit): 2 GB or more Windows 8 (32 bit), Windows 7 (32 bit), Windows Vista: 1 GB or more Mac OS X 10.7 - 10.8: 2 GB or more Mac OS X 10.6: 1 GB or more Windows XP: 512 MB or more Movies 1 GB or more USB 440 MB or more*2 550 MB or more*2 1024 x 768 resolution or higher *1 Information on computer models compatible with Mac OS X 10.8 is available on the Apple website. *2 Includes Silverlight 5.1 (max. 100 MB). Additionally, in Windows XP, Microsoft .NET Framework 3.0 or later (max. 500 MB) must be installed. Installation may take some time, depending on computer performance. • Check the Canon website for the latest system requirements, including supported OS versions. Installing the Software Windows 7 and Mac OS X 10.6 are used here for the sake of illustration. What you will need: zzComputer zzUSB cable (camera end: Mini-B) 1 Download the software. zzWith a computer connected to the Internet, access http://www.canon.com/icpd/. zzAccess the site for your country or region. zzDownload the software. 2 Begin the installation. zzOpen the downloaded file. zzClick [Easy Installation] and follow the on-screen instructions to complete the installation process. 3 When a message is displayed prompting you to connect the camera, connect it to a computer. zzWith the camera turned off, open the cover ( ). With the smaller plug of the USB cable in the orientation shown, insert the plug fully into the camera terminal ( ). Cover Preliminary Notes and Legal Information Contents: Basic Operations Basic Guide Advanced Guide 1 Camera Basics 2 Smart Auto Mode 3 Other Shooting Modes 4 P Mode 5 Playback Mode 6 Setting Menu 7 Accessories 8 Appendix Index 18
-
 1
1 -
2
-
3
-
4
-
5
-
6
-
7
-
8
-
9
-
10
-
11
-
12
-
 13
13 -
 14
14 -
 15
15 -
 16
16 -
 17
17 -
 18
18 -
 19
19 -
 20
20 -
 21
21 -
 22
22 -
 23
23 -
24
-
25
-
26
-
27
-
28
-
29
-
30
-
31
-
32
-
33
-
34
-
35
-
36
-
37
-
38
-
39
-
40
-
41
-
42
-
43
-
44
-
45
-
46
-
47
-
48
-
49
-
50
-
51
-
52
-
53
-
54
-
55
-
56
-
57
-
58
-
59
-
60
-
61
-
62
-
63
-
64
-
65
-
66
-
67
-
68
-
69
-
70
-
71
-
72
-
73
-
74
-
75
-
76
-
77
-
78
-
79
-
80
-
81
-
82
-
83
-
84
-
85
-
86
-
87
-
88
-
89
-
90
-
91
-
92
-
93
-
94
-
95
-
96
-
97
-
98
-
99
-
100
-
101
-
102
-
103
-
104
-
105
-
106
-
107
-
108
-
109
 |
 |