Canon PowerShot A85 PowerShot A85 Camera User Guide - Page 25
Set the date and, time., Press the SET button., Press the MENU button.
 |
View all Canon PowerShot A85 manuals
Add to My Manuals
Save this manual to your list of manuals |
Page 25 highlights
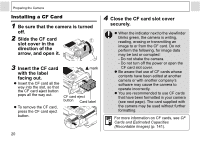
4 Set the date and time. z Press or to highlight another field. z Press or to change the value of the highlighted field. z The date can be set up to the year 2030. 5 Press the SET button. 6 Press the MENU button. z The date, time and other camera settings may reset to the default settings if the batteries have been removed for more than three weeks. If this happens, reset these settings. z For embedding the date on the image data, refer to page 54. z For printing images with the date and time on them without embedding the date and time on image data, refer to Setting the Print Style (p. 100) or the Direct Printer User Guide (separate from this guide). Preparing the Camera Charging the date/time battery z The camera has a built-in rechargeable lithium ion battery for saving settings such as the date and time. This battery is recharged by the AA-size batteries while it is in the camera. Right after purchasing the camera, leave fully charged batteries in the camera, or plug in the AC Adapter Kit ACK600 (sold separately), for about 4 hours to charge the date/time battery. It will charge even when the camera power is turned off. z If the Date/Time menu appears when the camera power is turned on, the date/ time battery charge is low. Use the above method to recharge it. 23
-
 1
1 -
2
-
3
-
4
-
5
-
6
-
7
-
8
-
9
-
10
-
11
-
12
-
13
-
14
-
15
-
16
-
17
-
18
-
19
-
 20
20 -
 21
21 -
 22
22 -
 23
23 -
 24
24 -
 25
25 -
 26
26 -
 27
27 -
 28
28 -
 29
29 -
 30
30 -
31
-
32
-
33
-
34
-
35
-
36
-
37
-
38
-
39
-
40
-
41
-
42
-
43
-
44
-
45
-
46
-
47
-
48
-
49
-
50
-
51
-
52
-
53
-
54
-
55
-
56
-
57
-
58
-
59
-
60
-
61
-
62
-
63
-
64
-
65
-
66
-
67
-
68
-
69
-
70
-
71
-
72
-
73
-
74
-
75
-
76
-
77
-
78
-
79
-
80
-
81
-
82
-
83
-
84
-
85
-
86
-
87
-
88
-
89
-
90
-
91
-
92
-
93
-
94
-
95
-
96
-
97
-
98
-
99
-
100
-
101
-
102
-
103
-
104
-
105
-
106
-
107
-
108
-
109
-
110
-
111
-
112
-
113
-
114
-
115
-
116
-
117
-
118
-
119
-
120
-
121
-
122
-
123
-
124
-
125
-
126
-
127
-
128
-
129
-
130
-
131
-
132
-
133
-
134
-
135
-
136
-
137
-
138
-
139
-
140
-
141
-
142
-
143
-
144
-
145
-
146
-
147
-
148
-
149
-
150
-
151
-
152
-
153
-
154
-
155
-
156
 |
 |
