Canon SELPHY CP-200 Canon Card Photo Printer CP-300/CP-200 User Guide - Page 7
Quick Start Continued
 |
View all Canon SELPHY CP-200 manuals
Add to My Manuals
Save this manual to your list of manuals |
Page 7 highlights
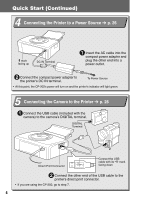
Quick Start (Continued) 4 Connecting the Printer to a Power Source p. 26 mark facing up DC IN Terminal 1 Insert the AC cable into the compact power adapter and plug the other end into a power outlet. 2 Connect the compact power adapter to the printer's DC IN terminal. To Power Source • At this point, the CP-200's power will turn on and the printer's indicator will light green. 5 Connecting the Camera to the Printer p. 26 1 Connect the USB cable (included with the camera) to the camera's DIGITAL terminal. DIGITAL Terminal Direct Print Connector Connect the USB cable with its mark facing down 2 Connect the other end of the USB cable to the printer's direct print connector. • If you are using the CP-200, go to step 7. 6
-
 1
1 -
 2
2 -
 3
3 -
 4
4 -
 5
5 -
 6
6 -
 7
7 -
 8
8 -
 9
9 -
 10
10 -
 11
11 -
 12
12 -
13
-
14
-
15
-
16
-
17
-
18
-
19
-
20
-
21
-
22
-
23
-
24
-
25
-
26
-
27
-
28
-
29
-
30
-
31
-
32
-
33
-
34
-
35
-
36
-
37
-
38
-
39
-
40
-
41
-
42
-
43
-
44
-
45
-
46
-
47
-
48
-
49
-
50
-
51
-
52
-
53
 |
 |

6
Quick Start (Continued)
4
Connecting the Printer to a Power Source
p. 26
Connect the compact power adapter to
the printer’s DC IN terminal.
2
•
At this point, the CP-200’s power will turn on and the printer’s indicator will light green.
Insert the AC cable into the
compact power adapter and
plug the other end into a
power outlet.
1
To Power Source
DC IN Terminal
mark
facing up
5
Connecting the Camera to the Printer
p. 26
Connect the USB cable (included with the
camera) to the camera’s DIGITAL terminal.
1
Connect the other end of the USB cable to the
printer’s direct print connector.
2
Direct Print Connector
DIGITAL
Terminal
Connect the USB
cable with its
mark
facing down
•
If you are using the CP-200, go to step 7.