Canon SELPHY ES30 SELPHY ES30 Printer User Guide - Page 26
Placing/Connecting the Printer - supplies
 |
View all Canon SELPHY ES30 manuals
Add to My Manuals
Save this manual to your list of manuals |
Page 26 highlights
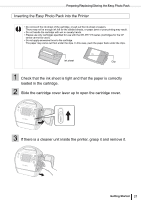
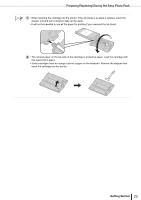
Placing/Connecting the Printer Set up and connect your SELPHY printer in the following manner for safe use. • Do not place the equipment on an unstable or tilted surface. There is risk that the equipment may fall and cause injury. • Be sure to select a safe place to avoid tripping over the power cord. • Do not block the air vents on the back of the printer. Leave more than 15 cm (6 in.) of clearance at the front and back of the equipment and 10 cm (4 in.) of clearance on both sides. To power outlet 15 cm (6 in.) 10 cm (4 in.) 15 cm (6 in.) 1 Place the printer on a flat surface. 2 Connect the supplied power cord to the printer. 3 Insert the plug into a power outlet. 26 Getting Started
-
 1
1 -
2
-
3
-
4
-
5
-
6
-
7
-
8
-
9
-
10
-
11
-
12
-
13
-
14
-
15
-
16
-
17
-
18
-
19
-
20
-
 21
21 -
 22
22 -
 23
23 -
 24
24 -
 25
25 -
 26
26 -
 27
27 -
 28
28 -
 29
29 -
 30
30 -
 31
31 -
32
-
33
-
34
-
35
-
36
-
37
-
38
-
39
-
40
-
41
-
42
-
43
-
44
-
45
-
46
-
47
-
48
-
49
-
50
-
51
-
52
-
53
-
54
-
55
-
56
-
57
-
58
-
59
-
60
-
61
-
62
-
63
-
64
-
65
-
66
-
67
-
68
-
69
-
70
-
71
-
72
-
73
-
74
-
75
-
76
-
77
-
78
-
79
-
80
-
81
-
82
-
83
-
84
-
85
-
86
-
87
-
88
-
89
-
90
-
91
-
92
-
93
-
94
-
95
-
96
-
97
-
98
-
99
-
100
-
101
-
102
 |
 |

26
Getting Started
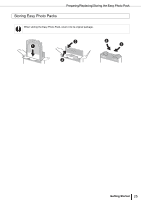
Placing/Connecting the Printer
Set up and connect your SELPHY printer in the following manner for safe use.
1
Place the printer on a flat surface.
2
Connect the supplied power cord to the printer.
3
Insert the plug into a power outlet.
•
Do not place the equipment on an unstable or tilted surface.
There is risk that the equipment may fall and cause injury.
•
Be sure to select a safe place to avoid tripping over the power cord.
•
Do not block the air vents on the back of the printer.
To power outlet
15 cm
(6 in.)
10 cm
(4 in.)
15 cm
(6 in.)
Leave more than 15 cm
(6 in.) of clearance at the
front and back of the
equipment and 10 cm (4
in.) of clearance on both
sides.