Canon VIXIA HF W10 HF W11 User Manual - Page 15
Clock Setting, Resetting the Clock
 |
View all Canon VIXIA HF W10 manuals
Add to My Manuals
Save this manual to your list of manuals |
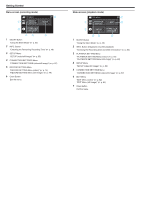
Page 15 highlights
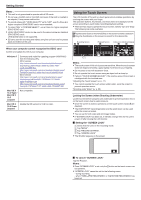
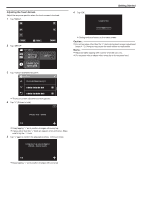
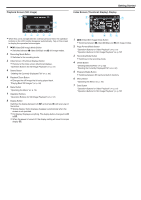
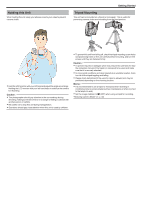
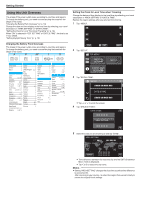
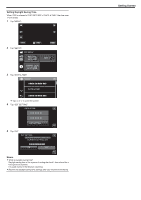
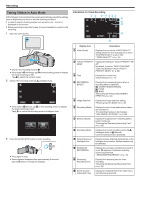
Clock Setting "SET DATE/TIME!" is displayed when you turn on the unit for the first time or when the unit has not been used for a prolonged period. Set the clock before recording. 1 Open the LCD monitor. Getting Started Resetting the Clock Set the clock with "DATE & TIME" from the menu. 1 Tap "MENU". . 0 The unit turns on. 0 When the LCD monitor is closed, the unit turns off. 2 Tap "OK" when "SET DATE/TIME!" is displayed. SET DATE/TIME! OK . 3 Set the date and time. DATE & TIME SETTING 24 DATE TIME 12 2019 AM 10 00 SAVE . 0 When the day, month, year, hour, or minute item is tapped, "3" and "2" will be displayed. 0 Tap 3 or 2 to adjust the year, month, day, hour, and minute. 4 After setting the date and time, tap "SAVE". 5 Select the region where you live and tap "SAVE". DATE & TIME/AREA GMT SAVE . 0 Time difference between the selected city and the GMT (Greenwich Mean Time) is displayed. 0 Tap 0 or 1 to select the city name. Memo : 0 The clock can be reset again later. "Resetting the Clock" (A p. 15) 0 When using this unit overseas, you can set it to the local time for recording. "Setting the Clock to Local Time when Traveling" (A p. 18) 0 The clock is reset about one month after the battery is depleted. "SET DATE/TIME!" is displayed the next time you turn on this unit. Set the clock again after charging the battery. ˻PLAY REC . 2 Tap "SETUP". TOP MENU RECORD OFF SETTING MENU SETUP CONNECTION SETTINGS . 3 Tap "DATE & TIME". SETUP DATE & TIME . 0 Tap 3 or 2 to scroll the screen. 4 Tap "CLOCK SETTING". DATE & TIME DATE & TIME SETTING . 5 Set the date and time. DATE & TIME SETTING 24 DATE TIME 12 2019 10 00 AM SET . 0 When the day, month, year, hour, or minute item is tapped, "3" and "2" will be displayed. 0 Tap 3 or 2 to adjust the year, month, day, hour, and minute. 6 After setting the date and time, tap "SET". 15
-
 1
1 -
2
-
3
-
4
-
5
-
6
-
7
-
8
-
9
-
 10
10 -
 11
11 -
 12
12 -
 13
13 -
 14
14 -
 15
15 -
 16
16 -
 17
17 -
 18
18 -
 19
19 -
 20
20 -
21
-
22
-
23
-
24
-
25
-
26
-
27
-
28
-
29
-
30
-
31
-
32
-
33
-
34
-
35
-
36
-
37
-
38
-
39
-
40
-
41
-
42
-
43
-
44
-
45
-
46
-
47
-
48
-
49
-
50
-
51
-
52
-
53
-
54
-
55
-
56
-
57
-
58
-
59
-
60
-
61
-
62
-
63
-
64
-
65
-
66
-
67
-
68
-
69
-
70
-
71
-
72
-
73
-
74
-
75
-
76
-
77
-
78
-
79
-
80
-
81
-
82
-
83
-
84
-
85
-
86
-
87
-
88
-
89
-
90
-
91
-
92
-
93
-
94
-
95
-
96
-
97
-
98
-
99
-
100
-
101
-
102
-
103
-
104
-
105
-
106
-
107
-
108
 |
 |
