Canon VIXIA HF W10 HF W11 User Manual - Page 5
Charging, Resetting this Unit
 |
View all Canon VIXIA HF W10 manuals
Add to My Manuals
Save this manual to your list of manuals |
Page 5 highlights
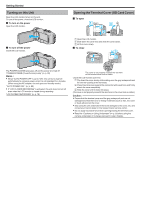
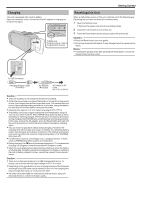
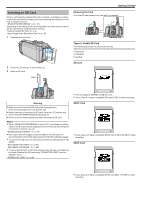
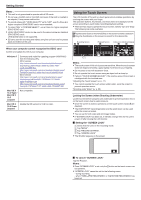
Charging This unit is equipped with a built-in battery. Open the connector cover, and connect the AC adapter for charging as shown in the figure. T ʴ VOL. W CHARGE POWER/ACCESS CHARGE Lamp Charging in progress: Lights up Charging finished: Goes out Getting Started Resetting this Unit When a malfunction occurs on this unit, reset the unit in the following way. (Resetting the unit does not erase the recorded data.) 1 Open the terminal cover. 0 Remove the power cord and all connecting cables. 2 Close the LCD monitor to turn off this unit. 3 Press the Reset button gently using an object with pointed tip. Caution : 0 Press the Reset button just once gently. 0 Do not use sharp pointed objects. It may damage the unit or cause electric shock. Memo : 0 If malfunction persists even after pressing the Reset button, consult the nearest Canon service center. To USB Connector Charging Adapter Cable (Provided) AC Adapter (Provided) AC Adapter to AC Outlet (AC 110 V to 240 V) . Caution : 0 The built-in battery is not charged at the time of purchase. 0 At the time of purchase or in case of the battery is not used for a long period of time, the charging time will be longer than usual. The camera does not turn on if the remaining battery power is low. In this case, charge the battery for more than 40 minutes before turning on the power. 0 Charging time: Approx. 6 h 10 m (when charging at 25°C (77°F)) 0 The battery cannot be charged outside the room temperature range of 10°C to 35°C (50°F to 95°F). The CHARGE lamp does not light up when the battery is not being charged. If the temperature increases or decreases during charging, the CHARGE lamp will blink slowly and charging will stop. In this case, remove the AC adapter, press the Reset button and wait until the room temperature is within the above stated range before charging again. 0 You can record or play back videos during charging. (However, the charging time will be longer than usual. In addition, the remaining battery power may decrease according to conditions.) If the internal temperature rises when using the unit, stop the charging temporarily. (The CHARGE lamp goes off.) 0 If malfunctions (such as overvoltage) occur, charging will stop. In these cases, CHARGE lamp blinks quickly as a notification. 0 During charging, the P icon on the screen changes to O to indicate that charging is in progress. (when the provided AC adapter is used) 0 When the recording time becomes extremely short even when the battery is fully charged, the battery needs to be replaced. For details on replacing the built-in battery (subject to a fee), consult the nearest Canon service center. Caution : 0 There are certain specifications for a USB rechargeable device. To charge, use a device with the output voltage of 5 V/1 A or more. 0 Depending on the specification of your charging device and the thickness and length of an USB cable used to connect to this unit, the charging time may be longer than usual, or it may not even start. 0 We shall not be held liable for malfunctions that are due to using non- standard device or a device with poor quality. 5
-
 1
1 -
 2
2 -
 3
3 -
 4
4 -
 5
5 -
 6
6 -
 7
7 -
 8
8 -
 9
9 -
 10
10 -
 11
11 -
12
-
13
-
14
-
15
-
16
-
17
-
18
-
19
-
20
-
21
-
22
-
23
-
24
-
25
-
26
-
27
-
28
-
29
-
30
-
31
-
32
-
33
-
34
-
35
-
36
-
37
-
38
-
39
-
40
-
41
-
42
-
43
-
44
-
45
-
46
-
47
-
48
-
49
-
50
-
51
-
52
-
53
-
54
-
55
-
56
-
57
-
58
-
59
-
60
-
61
-
62
-
63
-
64
-
65
-
66
-
67
-
68
-
69
-
70
-
71
-
72
-
73
-
74
-
75
-
76
-
77
-
78
-
79
-
80
-
81
-
82
-
83
-
84
-
85
-
86
-
87
-
88
-
89
-
90
-
91
-
92
-
93
-
94
-
95
-
96
-
97
-
98
-
99
-
100
-
101
-
102
-
103
-
104
-
105
-
106
-
107
-
108
 |
 |
