Canon imageCLASS 2300N Set-up Sheet for imageCLASS 2300N
Canon imageCLASS 2300N Manual
 |
View all Canon imageCLASS 2300N manuals
Add to My Manuals
Save this manual to your list of manuals |
Canon imageCLASS 2300N manual content summary:
- Canon imageCLASS 2300N | Set-up Sheet for imageCLASS 2300N - Page 1
for purchasing the Canon imageCLASS 2300. To get your machine ready for use, please follow the instructions in this sheet before referring to any other documentation. Unpack the machine and its components. Check that you have the following: G Machine with cabinet stand G Toner cartridge (in carton - Canon imageCLASS 2300N | Set-up Sheet for imageCLASS 2300N - Page 2
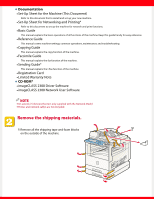
Guide* This manual explains the I-Fax function of the machine. G Registration Card G Limited Warranty Note G CD-ROM* G imageCLASS 2300 Driver Software G imageCLASS 2300 Network User Software NOTE G An asterisk (*) denotes the item only supplied with the Network Model. G Printer and network cables - Canon imageCLASS 2300N | Set-up Sheet for imageCLASS 2300N - Page 3
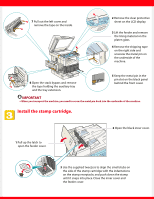
G When you transport the machine, you need to screw the metal pin back into the underside of the machine. Install the stamp cartridge. 1 Pull up the latch to open the feeder cover. 2 Open the black inner cover. 3 Use the supplied tweezers to align the small stubs on the side of the stamp - Canon imageCLASS 2300N | Set-up Sheet for imageCLASS 2300N - Page 4
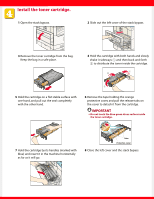
the other hand. 6 Remove the tape holding the orange protective cover, and pull the release tabs on the cover to detach it from the cartridge. IMPORTANT G Do not touch the blue-green drum surface inside the toner cartridge. 7 Hold the cartridge by its handles (marked with blue) and insert it in - Canon imageCLASS 2300N | Set-up Sheet for imageCLASS 2300N - Page 5
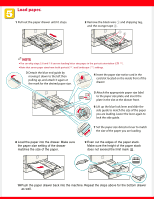
pulling up, and attach it again at the mark for the desired paper size. 4 Insert the paper size notice card in the card slot located on the inside front of the drawer. LTR Unlock Lock 5 Attach the appropriate paper size label to the paper size plate, and insert the plate in the slot at the drawer - Canon imageCLASS 2300N | Set-up Sheet for imageCLASS 2300N - Page 6
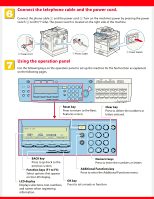
Saver Coded Pause/ Directory Dial Hook Redial Tone Line/Mail Direct TX Reset @. 1 Additional Functions GHI 4 ABC DEF Clear 2 3C JKL MNO 56 Start Stop 01 02 03 04 05 06 07 Interrupt PRS 7 TUV WXY 89 08 09 10 11 12 13 14 OPER SYMBOLS 0 ID In Use Memory Alarm - Canon imageCLASS 2300N | Set-up Sheet for imageCLASS 2300N - Page 7
the fax function, see Chapter 1,"Before You Use the Fax Functions," in the Facsimile Guide. G For details on how to input characters, see Chapter 2,"Basic Operations," in the Reference Guide. Setting the Current Date and Time: Additional Functions 1 Press [Additional Functions] ➝ [F3] ( ) or [F4 - Canon imageCLASS 2300N | Set-up Sheet for imageCLASS 2300N - Page 8
to set up the machine for network and printer functions. Part no. FA7-4556-020 ©2003 Canon Inc. Canon and imageCLASS are trademarks of Canon Inc. All other products and brand names are registered trademarks or trademarks of their respective owners. Specifications subject to change without notice
-
 1
1 -
 2
2 -
 3
3 -
 4
4 -
 5
5 -
 6
6 -
 7
7 -
8
 |
 |
Set-Up Sheet
Set-Up Sheet
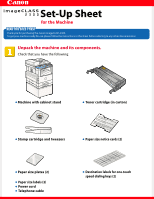
Thank you for purchasing the Canon imageCLASS 2300.
To get your machine ready for use,please follow the instructions in this sheet before referring to any other documentation.
Unpack the machine and its components.
Check that you have the following:
●
Machine with cabinet stand
●
Stamp cartridge and tweezers
●
Paper size notice cards (2)
●
Toner cartridge (in carton)
●
Paper size labels (2)
●
Power cord
●
Telephone cable
●
Paper size plates (2)
for the Machine
●
Destination labels for one-touch
speed dialing keys (2)