Canon imageCLASS MF5880dn imageCLASS MF5880dn/5850dn Basic Operation Guide - Page 211
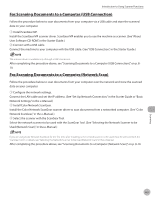
Scanning Documents to a USB Memory, B&W> or <USB MEMORY:COLOR>, then
 |
View all Canon imageCLASS MF5880dn manuals
Add to My Manuals
Save this manual to your list of manuals |
Page 211 highlights
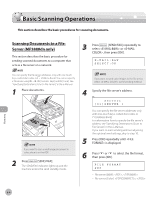
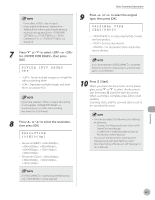
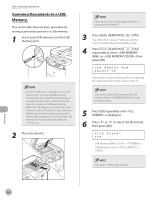
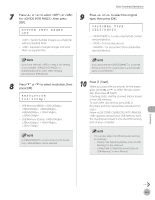
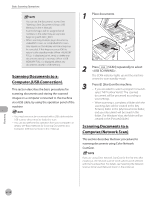
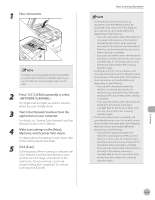
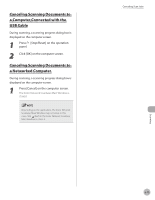
Basic Scanning Operations Scanning Documents to a USB Memory This section describes the basic procedure for storing scanned documents in a USB memory. 1 Insert your USB memory into the USB memory port. - Insert the USB memory straight into the USB memory port. You may damage the USB memory port if you insert the USB memory at an angle, or if you insert a USB memory that does not comply with USB specifications. - When the USB memory is inserted, the access indicator turns on. When the access indicator is blinking, the memory media is being read or used in other processes. Do not touch the USB memory or the area surrounding the USB memory port. 2 Place documents. If you want to scan a multi-page document in color, place it on the ADF. 3 Press [SEND/FAX]/ [FAX]. The SEND/FAX indicator lights up and the machine enters the send standby mode. 4 Press [SEND/FAX]/ [FAX] repeatedly to select or , then press [OK]. USB MEMORY:B&W SELECT:OK If you want to start scanning without adjusting the optional send settings, skip to step 10. If you want to store color images in the USB memory, select as the sending method. 5 Press [OK] repeatedly until is displayed. 6 Press or to select the file format, then press [OK]. FILE FORMAT PDF - USB Memory (B&W): , - USB Memory (Color): , If you select , skip to step 8. Scanning 8-8
-
 1
1 -
2
-
3
-
4
-
5
-
6
-
7
-
8
-
9
-
10
-
11
-
12
-
13
-
14
-
15
-
16
-
17
-
18
-
19
-
20
-
21
-
22
-
23
-
24
-
25
-
26
-
27
-
28
-
29
-
30
-
31
-
32
-
33
-
34
-
35
-
36
-
37
-
38
-
39
-
40
-
41
-
42
-
43
-
44
-
45
-
46
-
47
-
48
-
49
-
50
-
51
-
52
-
53
-
54
-
55
-
56
-
57
-
58
-
59
-
60
-
61
-
62
-
63
-
64
-
65
-
66
-
67
-
68
-
69
-
70
-
71
-
72
-
73
-
74
-
75
-
76
-
77
-
78
-
79
-
80
-
81
-
82
-
83
-
84
-
85
-
86
-
87
-
88
-
89
-
90
-
91
-
92
-
93
-
94
-
95
-
96
-
97
-
98
-
99
-
100
-
101
-
102
-
103
-
104
-
105
-
106
-
107
-
108
-
109
-
110
-
111
-
112
-
113
-
114
-
115
-
116
-
117
-
118
-
119
-
120
-
121
-
122
-
123
-
124
-
125
-
126
-
127
-
128
-
129
-
130
-
131
-
132
-
133
-
134
-
135
-
136
-
137
-
138
-
139
-
140
-
141
-
142
-
143
-
144
-
145
-
146
-
147
-
148
-
149
-
150
-
151
-
152
-
153
-
154
-
155
-
156
-
157
-
158
-
159
-
160
-
161
-
162
-
163
-
164
-
165
-
166
-
167
-
168
-
169
-
170
-
171
-
172
-
173
-
174
-
175
-
176
-
177
-
178
-
179
-
180
-
181
-
182
-
183
-
184
-
185
-
186
-
187
-
188
-
189
-
190
-
191
-
192
-
193
-
194
-
195
-
196
-
197
-
198
-
199
-
200
-
201
-
202
-
203
-
204
-
205
-
 206
206 -
 207
207 -
 208
208 -
 209
209 -
 210
210 -
 211
211 -
 212
212 -
 213
213 -
 214
214 -
 215
215 -
 216
216 -
217
-
218
-
219
-
220
-
221
-
222
-
223
-
224
-
225
-
226
-
227
-
228
-
229
-
230
-
231
-
232
-
233
-
234
-
235
-
236
-
237
-
238
-
239
-
240
-
241
-
242
-
243
-
244
-
245
-
246
-
247
-
248
-
249
-
250
-
251
-
252
-
253
-
254
-
255
-
256
-
257
-
258
-
259
-
260
-
261
-
262
-
263
-
264
-
265
-
266
-
267
-
268
-
269
-
270
-
271
-
272
-
273
-
274
-
275
-
276
-
277
-
278
-
279
-
280
-
281
-
282
-
283
-
284
-
285
-
286
-
287
-
288
-
289
-
290
-
291
-
292
-
293
-
294
-
295
-
296
-
297
-
298
-
299
-
300
-
301
-
302
 |
 |