Canon imageCLASS MF7280 imageCLASS MF7280 Easy Operation Guide - Page 4
The Control Panel
 |
View all Canon imageCLASS MF7280 manuals
Add to My Manuals
Save this manual to your list of manuals |
Page 4 highlights
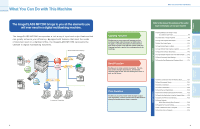
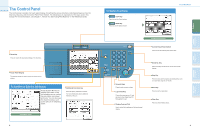
The Control Panel The control panel consists of a touch panel display, for setting the various functions, and physical keys such as the Start key, Stop key, and the Control Panel Power Switch. The following is an explanation of the keys used in this manual. For more information, see Chapter 1, "Before You Start Using This Machine," in the Reference Guide. Reset Key Press to restore the standard settings of the machine. COPY SEND Touch Panel Display The settings screen for each function is shown on this display. To Confirm or Edit the Job Status Press [System Monitor] to display the screen on the left, enabling you to confirm the job status, and cancel print jobs. You can also see the machine status, such as the amount of remaining paper. Additional Functions key Press to specify additional functions. For more information about additional functions, see p.27. System Monitor Screen 5 To Switch Functions COPY COPY key Press to use the Copy function. SEND SEND key Press to use the Send function. The Control Panel ON/OFF ABC DEF 123 Serial No. Reset GHI JKL MNO 456 PQRS 7 TUV WXYZ 89 Additional Functions Display Contrast 0 Log In/Out Clear Stop Start Processing/ Data Error Power Numeric Keys Press to enter numeric values. Log In/Out Key Press after entering your ID and password when Department ID Management is set. Display Contrast Dial Use to adjust the brightness of the touch panel display. Send Basic Features screen Control Panel Power Switch Press to turn the control panel ON or OFF. Serial No. Key Press to display the serial No. on the touch panel display. Stop Key Press to stop a job in progress (scanning only), such as a scan job, copy job, or fax job. Start Key Press to start an operation. Clear Key Press to clear entered values. 6 Other Useful Features Additional Functions Send Functions Copying Functions Preface
-
 1
1 -
 2
2 -
 3
3 -
 4
4 -
 5
5 -
 6
6 -
 7
7 -
 8
8 -
 9
9 -
 10
10 -
11
-
12
-
13
-
14
-
15
-
16
-
17
-
18
-
19
-
20
-
21
-
22
-
23
-
24
-
25
-
26
-
27
-
28
 |
 |
