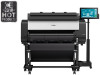
Canon imagePROGRAF TX-3000 MFP T36 imagePROGRAF SD-21 Printer Stand Setup Guid - Page 5
Prepare to Install the Printer
 |
View all Canon imagePROGRAF TX-3000 MFP T36 manuals
Add to My Manuals
Save this manual to your list of manuals |
Page 5 highlights
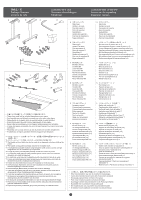
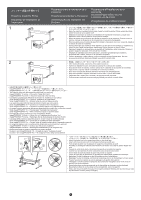
Prepare to Install the Printer Préparation de l'installation de l'imprimante 1 2 Preparación para la instalación de la impresora Prepare-se para instalar a impressora Vorbereitung für die Installation des Druckers Preparazione all'installazione della stampante Voorbereidingen treffen voor het installeren van de printer Przygotowanie do instalacji drukarki 4 • Move the stand to a location that will make it easy to install the printer. When moving the stand, switch the locks on all 4 casters to off. • Déplacez le socle dans un endroit où l'installation de l'imprimante sera facile. Lorsque vous déplacez le socle, déverrouillez les verrous des 4 roulettes. • Mueva el soporte a una ubicación que facilite la instalación de la impresora. Cuando mueva el soporte, coloque los bloqueos en las 4 ruedecitas en la posición de apagado. • Mova o suporte para um local onde seja fácil instalar a impressora. Ao mover o suporte, desative as travas de todas as 4 rodinhas. • Transportieren Sie das Gestell an einen Standort, an dem der Drucker einfach zu installieren ist. Wenn Sie das Gestell transportieren, deaktivieren Sie die Sperren an allen 4 Rollen. • Spostare il supporto in una posizione che semplifichi l'installazione della stampante. Quando si sposta il supporto, sbloccare i fermi di tutte e 4 le rotelle. • Verplaats de standaard naar een locatie waar u de printer gemakkelijk kunt installeren. Ontgrendel alle 4 wielen, wanneer u de standaard verplaatst. • Przesuń podstawkę w takie miejsce, w którym instalacja drukarki będzie łatwa. Na czas przesuwania podstawki deaktywuj blokady wszystkich czterech kółek. 4 After moving the stand, return all 4 of the caster locks to on. • Après avoir déplacé le socle, verrouillez à nouveau les 4 verrous des roulettes. • Después de mover el soporte, vuelva a colocar las 4 ruedecitas en la posición de encendido. • Após mover o suporte, reative novamente as 4 travas das rodinhas. • Nach dem Transport des Gestells aktivieren Sie wieder alle 4 Rollensperren. • Dopo aver spostato il supporto, bloccare di nuovo tutti e 4 i fermi delle rotelle. • Vergrendel alle 4 wielen weer, wanneer u de standaard hebt verplaatst. • Po przesunięciu podstawki ponownie aktywuj blokady wszystkich czterech kółek. imagePROGRAF TX imagePROGRAF Pro • The following steps will differ depending the model you are using. imagePROGRAF TX series -> Proceed to "Install the Printer". imagePROGRAF Pro series -> Attach the stand rod in the next step. • Les étapes suivantes sont différentes en fonction du modèle que vous utilisez. Série imagePROGRAF TX -> Passez à "Installation de l'imprimante". Série imagePROGRAF Pro -> Montez la tige du socle à l'étape suivante. • Los siguientes pasos diferirán dependiendo del modelo que esté usando. Serie imagePROGRAF TX -> Continúe con "Instalación de la impresora". Serie imagePROGRAF Pro -> Conecte la varilla del soporte en el siguiente paso. • As etapas a seguir apresentam diferenças dependendo do modelo que você estiver usando. Série imagePROGRAF TX -> Prossiga para "Instalação da impressora". Série imagePROGRAF Pro -> Afixe a haste do suporte na próxima etapa. • Die folgenden Schritte variieren je nach verwendetem Modell. imagePROGRAF TX-Serie -> Fahren Sie mit "Installation des Druckers" fort. imagePROGRAF Pro-Serie -> Befestigen Sie die Gestellstange im nächsten Schritt. • I passaggi della procedura seguente possono variare in base al modello utilizzato. Serie imagePROGRAF TX -> Continuare da "Installazione della stampante". Serie imagePROGRAF Pro -> Fissare l'asta del supporto attenendosi al passaggio seguente. • De volgende stappen zullen verschillend zijn afhankelijk van het model dat u gebruikt. imagePROGRAF TX-serie -> Ga door naar "De printer installeren". imagePROGRAF Pro-serie -> Bevestig de standaardstang in de volgende stap. • Kolejne kroki będą się różnić w zależności od modelu drukarki. Drukarki z serii imagePROGRAF TX -> Przejdź do części "Instalacja drukarki". Drukarki z serii imagePROGRAF Pro -> W następnym kroku dołącz pręt podstawki. 3 A A • Attach the basket rod to the supporting plates on the stand legs. Attach with the protrusions (A) on the basket rod facing towards you. • Fixez la tige du panier sur les plaques de support sur les jambes du socle. Procédez au montage à l'aide des excroissances (A) situées sur la tige du panier dirigée vers vous. • Conecte la varilla de la cesta a las placas de soporte en las patas del soporte. Conecte con las salientes (A) de la varilla de la cesta mirando hacia usted. • Fixe a haste da cesta às placas de apoio nas pernas do suporte. Fixe-a de forma que as protrusões (A) da haste da cesta estejam voltadas à sua direção. • Befestigen Sie die Korbstange an den Stützplatten an den Gestellbeinen. Befestigen Sie die Korbstange, während die Vorsprünge (A) an der Korbstange zu Ihnen weisen. • Fissare l'asta del raccoglitore ai piani di appoggio sulle gambe del supporto. Il fissaggio è corretto quando le sporgenze (A) sull'asta del raccoglitore sono rivolte verso la persona che la sta montando. • Bevestig de stang van de opvangmand op de steunplaten op de poten van de standaard. Bevestig de nokken (A) op de stang van de opvangmand, naar u toe gericht. • Dołącz pręt kosza do płytek mocujących na nogach podstawki.Występy (A) na pręcie kosza mają być skierowane w stronę osoby montującej. 4
-
 1
1 -
 2
2 -
 3
3 -
 4
4 -
 5
5 -
 6
6 -
 7
7 -
 8
8 -
 9
9 -
 10
10 -
 11
11 -
12
 |
 |
