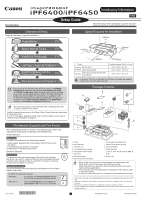
Canon imagePROGRAF iPF6400 Setup Guide - Page 3
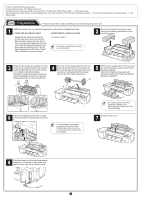
Attach the Ink Tanks
 |
View all Canon imagePROGRAF iPF6400 manuals
Add to My Manuals
Save this manual to your list of manuals |
Page 3 highlights
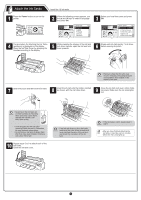
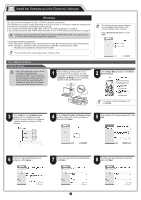
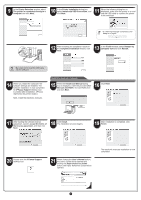
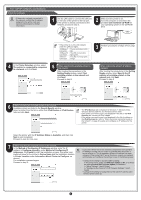
Attach the Ink Tanks 1 Press the Power button to turn on the printer. Install the 12 ink tanks. 2 When the following screen appears, use the ▲ and ▼ keys to select a language and press OK. Language 㪈㪆㪉 English ᣣᧄ⺆ Français Italiano Deutsch 3 Select your local time zone and press OK. Time Zone 㪈㪆㪌 0:London (GMT) +1:Paris,Rome +2:Athens,Cairo +3:Moscow +4:Eerevan,Baku 4 The procedure for attaching the Ink Tanks (guidance) is displayed on the display. Open the Ink Tank Cover by grasping the handles according to the display. 5 While pressing the stopper of the ink tank lock lever inwards, open the ink tank lock lever upwards. 6 Shake each ink tank gently 7 to 8 times before opening its pouch. • Failure to shake the ink tanks may result in reduced print quality because ink ingredients have settled on the bottom of the tank. 7 Open the pouch and remove the ink tank. 8 Insert the ink tank into the holder oriented as shown, with the ink holes down. 9 Close the ink tank lock lever until it clicks into place. Make sure the ink lamp lights red. • Never touch the ink holes (a) or metal contacts (b). Touching these parts may cause stains, damage the ink tank, and affect print quality. a b • Avoid dropping the ink tank after removing it from the pouch. Otherwise, ink may leak and cause stains. • Do not remove ink tanks to shake them after they have been installed. Doing so may cause ink to spill. 10 Repeat steps 5 to 9 to attach each of the Ink Tanks. Close the ink tank cover. • If the ink tank does not fit in the holder, make sure the color of the ink tank lock lever matches the color of the ink tank, and check the orientation of the ink tank. • If the ink lamp is not lit, repeat steps 5 and 9. • After you have finished attaching the MEMO ink tanks, it may take up to 2 minutes before the Ink Lamp lights up. 3
-
 1
1 -
 2
2 -
 3
3 -
 4
4 -
 5
5 -
 6
6 -
 7
7 -
 8
8 -
 9
9 -
10
-
11
-
12
 |
 |
