Casio EX FH20 Owners Manual - Page 33
To select the image size, In the REC mode, press - software
 |
UPC - 079767624217
View all Casio EX FH20 manuals
Add to My Manuals
Save this manual to your list of manuals |
Page 33 highlights
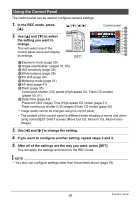
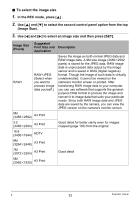
. To select the image size 1. In the REC mode, press [8] . 2. Use [8] and [2] to select the second control panel option from the top (Image Size). 3. Use [4] and [6] to select an image size and then press [SET]. Image Size (Pixels) Suggested Print Size and Application RAW+ RAW+JPEG (Select when you want to process image data yourself.) 9M (3456x2592) A3 Print 3:2 (3456x2304) A3 Print 16:9 (3456x1944) HDTV 8M (3264x2448) A3 Print 7M (3072x2304) A3 Print 5M (2560x1920) A3 Print Description Saves the image as both normal JPEG data and RAW image data. A 9M size image (3456x2592 pixels) is stored for the JPEG data. RAW image data is unprocessed data output by the image sensor and is saved in DNG (digital negative) format. Though the image of such data is virtually undeteriorated, it cannot be viewed on the camera's monitor screen or printed. After transferring RAW image data to your computer, you can use software that supports the generalpurpose DNG format to process the image and convert it to image data that suits your particular needs. Since both RAW image data and JPEG data are saved by the camera, you can view the JPEG version on the camera's monitor screen. Good detail for better clarity even for images cropped (page 103) from the original Good detail B 33 Snapshot Tutorial
-
 1
1 -
2
-
3
-
4
-
5
-
6
-
7
-
8
-
9
-
10
-
11
-
12
-
13
-
14
-
15
-
16
-
17
-
18
-
19
-
20
-
21
-
22
-
23
-
24
-
25
-
26
-
27
-
 28
28 -
 29
29 -
 30
30 -
 31
31 -
 32
32 -
 33
33 -
 34
34 -
 35
35 -
 36
36 -
 37
37 -
 38
38 -
39
-
40
-
41
-
42
-
43
-
44
-
45
-
46
-
47
-
48
-
49
-
50
-
51
-
52
-
53
-
54
-
55
-
56
-
57
-
58
-
59
-
60
-
61
-
62
-
63
-
64
-
65
-
66
-
67
-
68
-
69
-
70
-
71
-
72
-
73
-
74
-
75
-
76
-
77
-
78
-
79
-
80
-
81
-
82
-
83
-
84
-
85
-
86
-
87
-
88
-
89
-
90
-
91
-
92
-
93
-
94
-
95
-
96
-
97
-
98
-
99
-
100
-
101
-
102
-
103
-
104
-
105
-
106
-
107
-
108
-
109
-
110
-
111
-
112
-
113
-
114
-
115
-
116
-
117
-
118
-
119
-
120
-
121
-
122
-
123
-
124
-
125
-
126
-
127
-
128
-
129
-
130
-
131
-
132
-
133
-
134
-
135
-
136
-
137
-
138
-
139
-
140
-
141
-
142
-
143
-
144
-
145
-
146
-
147
-
148
-
149
-
150
-
151
-
152
-
153
-
154
-
155
-
156
-
157
-
158
-
159
-
160
-
161
-
162
-
163
-
164
-
165
-
166
-
167
-
168
-
169
-
170
-
171
-
172
-
173
-
174
-
175
-
176
 |
 |
