Chicco 00060796430070 User Guide - Page 17
Attach Carrier To Base - travel system
 |
UPC - 049796603385
View all Chicco 00060796430070 manuals
Add to My Manuals
Save this manual to your list of manuals |
Page 17 highlights
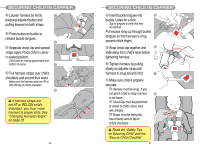
INSTALLATION USING VEHICLE BELT LATCH or Vehicle Belt? This Child Restraint can be safely installed using Vehicle Belts or LATCH. Use the method that results in the MOST SECURE installation in your vehicle. 1 Position Base in forward facing 1 vehicle seat with Recline Foot against seat back. 2 Adjust Base Angle by pushing Recline Buttons while lifting Base. Angle is correct when Bubble is 2 between arrows. Vehicle must be on a level surface for the Bubble to indicate correctly. 3 Route Vehicle Belt through 3 openings in Base and buckle the vehicle belt. (Do not put the shoulder belt in locked mode.) 4 Tighten Vehicle Belt while pushing Base firmly into vehicle 4 seat. 5 Secure Vehicle Shoulder Belt firmly into Shoulder Belt Lockoff, while keeping tension on Belt. Only use the lockoff on the opposite 5 side of the buckle. 32 INSTALLATION USING VEHICLE BELT If using Vehicle Lap Belt only (no Shoulder Belt), make sure that Lap Belt is LOCKED, and that free end of Lap Belt is neatly stored so it DOES NOT INTERFERE with attachment of Carrier to Base. 6 CHECK Installation: a Belts MUST be TIGHT. b Base MUST be STABLE. c Bubble MUST be between arrows. 6 d Belts & Buckles MUST NOT INTERFERE with attachment of Carrier to Base. 7 Attach Carrier To Base after properly securing child in Carrier. ALWAYS lift up on Carrier to verify it is properly attached to the Base. Uninstalling Base: 7 Remove Carrier from Base, unbuckle Vehicle Belt, and remove Base from vehicle. NEVER travel with Child Restraint unsecured in vehicle. Passengers may be injured during a sudden stop or crash. 33
-
 1
1 -
2
-
3
-
4
-
5
-
6
-
7
-
8
-
9
-
10
-
11
-
 12
12 -
 13
13 -
 14
14 -
 15
15 -
 16
16 -
 17
17 -
 18
18 -
 19
19 -
 20
20 -
 21
21
 |
 |
