Chicco 00060796430070 User Guide - Page 19
Roll LATCH Pull Strap
 |
UPC - 049796603385
View all Chicco 00060796430070 manuals
Add to My Manuals
Save this manual to your list of manuals |
Page 19 highlights
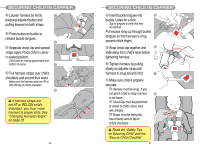
INSTALLATION USING LATCH Uninstalling Base 1 Remove Carrier from Base 1 Loosen LATCH by lifting the LATCH Release Lever and pulling Base away from vehicle seat back. 2 2 Detach LATCH Connectors by pressing the red button on each LATCH Connector, and remove Base from vehicle. Storing LATCH Insert LATCH Connectors into 1 storage pockets. a 1 Pull LATCH Pull Strap to secure LATCH Connectors. a a 2 2 Roll LATCH Pull Strap and store in Pull Strap Storage Pocket. NEVER travel with CHILD RESTRAINT unsecured in vehicle. Passengers may be injured during a sudden stop or crash. When not using LATCH, the LATCH Connectors and Pull Strap MUST be stored properly. 36 INSTALLATION WITHOUT BASE 1 Position Carrier rear facing on vehicle seat, with child properly secured in Carrier. 2 2 Route Vehicle Belt under both Belt Guides, and buckle the vehicle belt. 3 Tighten Vehicle Belt while pushing Carrier firmly into vehicle seat. Put the vehicle belt in the locked mode, 34 see vehicle owner's manual for more information. b A tightly rolled towel may be used under the front edge of the Carrier if needed to adjust the angle of the Carrier. Angle is correct when level line on Carrier is level with ground. 4 Check Installation: a Level Line on Carrier MUST a be LEVEL with ground. b Vehicle belt MUST be TIGHT. c Carrier MUST be STABLE and secure. NEVER install CARRIER without Base using a non-locking vehicle belt. The installation will NOT be secure. Refer to your vehicle owner's manual for detailed vehicle belt information. 37
-
 1
1 -
2
-
3
-
4
-
5
-
6
-
7
-
8
-
9
-
10
-
11
-
12
-
13
-
 14
14 -
 15
15 -
 16
16 -
 17
17 -
 18
18 -
 19
19 -
 20
20 -
 21
21
 |
 |
