Cisco 5505 Installation Guide - Page 7
Configuring the Adaptive Security Appliance, Step 2 - setup
 |
UPC - 882658082252
View all Cisco 5505 manuals
Add to My Manuals
Save this manual to your list of manuals |
Page 7 highlights
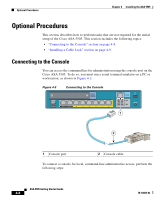
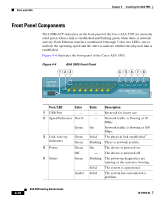
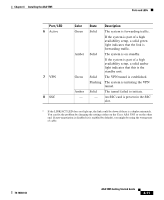
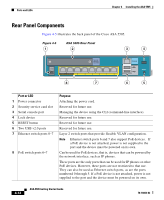
Chapter 4 Installing the ASA 5505 Setting Up a PC for System Administration Step 2 By default, the Cisco ASA 5505 automatically negotiates the inside interface speed. If autonegotiate is not an option for the PC interface, set the speed to either 10 or 100 Mbps half duplex. Do not set the interface to full duplex; this causes a duplex mismatch that significantly impacts the total throughput capabilities of the interface. Configure the PC to use DHCP (to receive an IP address automatically from the Cisco ASA 5505), which enables the PC to communicate with the Cisco ASA 5505 and the Internet as well as to run ASDM for configuration and management tasks. Alternatively, you can assign a static IP address to your PC by selecting an address in the 192.168.1.0 subnet. (Valid addresses are 192.168.1.2 through 192.168.1.254, with a mask of 255.255.255.0 and default route of 192.168.1.1.) When you connect other devices to any of the inside ports, make sure that they do not have the same IP address. Note The MGMT interface of the adaptive security appliance is assigned 192.168.1.1 by default, so this address is unavailable. Step 3 Step 4 Use an Ethernet cable to connect the PC to a switched inside port on the rear panel of the Cisco ASA 5505 (one of the ports numbered 1 through 7). Check the LINK LED to verify that the PC has basic connectivity to the Cisco ASA 5505. When connectivity is established, the LINK LED on the front panel of the Cisco ASA 5505 lights up solid green. You can now access the ASDM and the ASDM Startup Wizard. See Chapter 1, "Configuring the Adaptive Security Appliance" for information about how to perform initial setup and configuration of the Cisco ASA 5505. 78-18003-02 ASA 5505 Getting Started Guide 4-7
-
 1
1 -
 2
2 -
 3
3 -
 4
4 -
 5
5 -
 6
6 -
 7
7 -
 8
8 -
 9
9 -
 10
10 -
 11
11 -
 12
12 -
13
-
14
 |
 |