Cisco AIR-AP1010 Quick Start Guide - Page 19
Mounting the Access Points, Ceiling Mount Base - parts
 |
UPC - 882658154027
View all Cisco AIR-AP1010 manuals
Add to My Manuals
Save this manual to your list of manuals |
Page 19 highlights
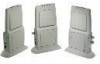
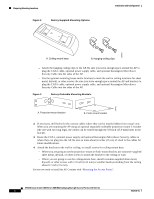
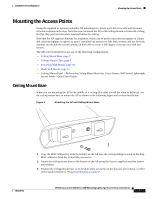
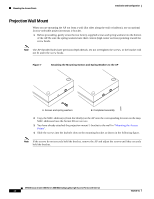
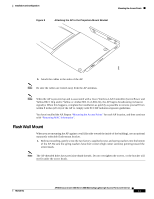
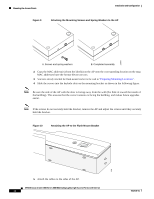
Installation and Configuration Mounting the Access Points Mounting the Access Points Using the supplied or optional orderable AP mounting kits, mount each AP in its indicated location, oriented as shown on the map. Note that you can mount the AP in the ceiling plenum or below the ceiling, but that they perform best when mounted below the ceiling. Note that the AP supports Antenna Sectorization, which can be used to increase the number of clients and client throughput in a given air space. Installers can mount two APs back-to-back and the Network operator can disable the second antenna in both APs to create a 360-degree coverage area with two sectors. The APs can be mounted in any one of the following configurations: • Ceiling Mount Base, page 7. • Ceiling-Mount Clips, page 8. • Projection Wall Mount, page 10. • Flush Wall Mount, page 11. • Ceiling-Mount Bezel -- Refer to the Ceiling Mount Bezels for Cisco Aironet 1000 Series Lightweight Access Points - Quick Start Guide. Ceiling Mount Base When you are mounting the AP in the middle of a ceiling (flat sides toward the room or hallway), use the ceiling-mount base to mount the AP as shown in the following figure and as described below: Figure 4 Attaching the AP and Ceiling-Mount Base 135664 1. Copy the MAC address(es) from the label(s) on the AP onto the corresponding location on the map. MAC addresses have the format 00xxxxxxxxxx. 2. Attach the ceiling-mount base to the bottom of the AP using the factory-supplied machine screws and washers. 3. Position the ceiling-mount base so its keyhole slots are partly on the drywall, sheet metal, or other screw heads installed in "Preparing Mounting Locations". 7817146-01 AP1010 Cisco Aironet 1000 Series IEEE 802.11a/b/g Lightweight Access Points with Internal 7
-
 1
1 -
2
-
3
-
4
-
5
-
6
-
7
-
8
-
9
-
10
-
11
-
12
-
13
-
 14
14 -
 15
15 -
 16
16 -
 17
17 -
 18
18 -
 19
19 -
 20
20 -
 21
21 -
 22
22 -
 23
23 -
 24
24 -
25
-
26
-
27
-
28
-
29
-
30
-
31
-
32
-
33
-
34
-
35
-
36
 |
 |
