Cisco E4200V2 User Manual - Page 42
How to con UPnP, How to use a router as an access point - bridge mode
 |
View all Cisco E4200V2 manuals
Add to My Manuals
Save this manual to your list of manuals |
Page 42 highlights
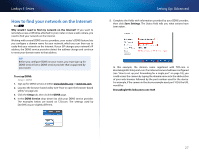
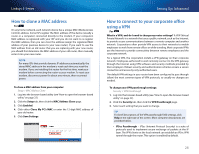
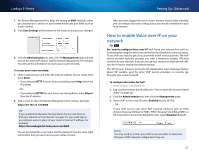
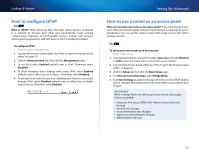
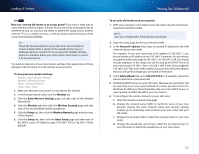
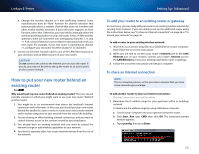
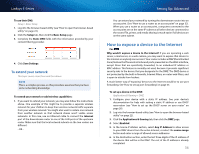
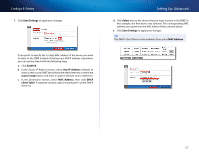
Linksys E-Series How to configure UPnP For ALL What is UPnP? UPnP (Universal Plug and Play) allows devices connected to a network to discover each other and automatically create working configurations. Examples of UPnP-capable devices include web cameras, online gaming applications, and VoIP devices. UPnP is enabled by default. To configure UPnP: Administration > Management 1. Log into the browser-based utility (see "How to open the browser-based utility" on page 22). 2. Click the Administration tab, then click the Management page. 3. To use UPnP, select Enabled (default) next to UPnP. Otherwise, select Disabled. 4. To allow changing router settings while using UPnP, select Enabled (default) next to Allow Users to Configure. Otherwise, select Disabled. 5. To prevent local network users from disabling your Internet connection through UPnP, select Disabled (default) next to Allow Users to Disable Internet Access. Otherwise, select Enabled. Setting Up: Advanced How to use a router as an access point How can I use this new router as an access point? If you have a large area to cover with your wireless signal, or if part of your home has weak signals due to interference, you can use this router to extend the range of your old router's wireless network. For ALL To set up your new router as an access point: Setup > Basic Setup 1. Use a network cable to connect this router's Internet port to the Ethernet or LAN port on the router that is connected to your modem. 2. Log into the browser-based utility (see "How to open the browser-based utility" on page 22). 3. Click the Setup tab, then click the Basic Setup page. 4. For Internet Connection Type, select Bridge Mode. 5. Click Save Settings to apply the changes.The new router's LAN IP address will be changed and obtained from the router that is connected to your modem. Important While in Bridge Mode, the following browser-based utility pages will be unavailable: •• Setup tab: IPv6 Setup, DDNS, MAC Address Clone, Advanced Routing •• Security tab: all pages •• Access Restrictions tab: all pages •• Applications & Gaming tab: all pages •• Administration tab: Log 32
-
 1
1 -
2
-
3
-
4
-
5
-
6
-
7
-
8
-
9
-
10
-
11
-
12
-
13
-
14
-
15
-
16
-
17
-
18
-
19
-
20
-
21
-
22
-
23
-
24
-
25
-
26
-
27
-
28
-
29
-
30
-
31
-
32
-
33
-
34
-
35
-
36
-
 37
37 -
 38
38 -
 39
39 -
 40
40 -
 41
41 -
 42
42 -
 43
43 -
 44
44 -
 45
45 -
 46
46 -
 47
47 -
48
-
49
-
50
-
51
-
52
-
53
-
54
-
55
-
56
-
57
-
58
-
59
-
60
-
61
-
62
-
63
-
64
-
65
-
66
-
67
-
68
-
69
-
70
-
71
-
72
-
73
-
74
-
75
-
76
-
77
-
78
-
79
-
80
-
81
-
82
-
83
 |
 |