Cisco PIX-515E Quick Start Guide
Cisco PIX-515E Manual
 |
View all Cisco PIX-515E manuals
Add to My Manuals
Save this manual to your list of manuals |
Cisco PIX-515E manual content summary:
- Cisco PIX-515E | Quick Start Guide - Page 1
Quick Start Guide Cisco PIX 515E Firewall 1 Check Items Included 2 Install the PIX 515E 3 Configure the PIX 515E 4 Example Configurations 5 Optional Maintenance and Upgrade Procedures - Cisco PIX-515E | Quick Start Guide - Page 2
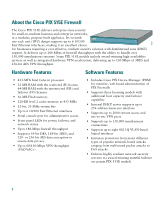
• 16-MB Flash memory • 128-KB level 2 cache memory at 433 MHz • 32-bit, 33-MHz system bus • Up to 6 10/100 Fast Ethernet interfaces • Serial console port for administrative access • Front panel LEDs for power, failover, and network status • Up to 188-Mbps firewall throughput • Supports 56-bit DES - Cisco PIX-515E | Quick Start Guide - Page 3
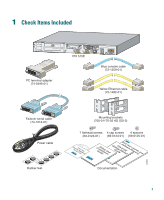
adapter (74-0495-01) PIX-515E DO NOT INSTALL INTERFACE CARDS WITH POWER APPLIED 100 Mbps Link FDX 100 Mbps Link FDX 10/100 ETHERNET 1 10/100 ETHERNET 0 PIX 515E FAILOVER CONSOLE Blue console cable (72-1259-01) Yellow Ethernet cable (72-1482-01) Failover serial cable (74-1213-01) Power - Cisco PIX-515E | Quick Start Guide - Page 4
. For rack-mounting and failover instructions, refer to the Cisco PIX Firewall Hardware Installation Guide. Step 2 Step 3 Step 4 Step 5 Use the yellow Ethernet cable (72-1482-01) provided to connect the outside 10/100 Ethernet interface, Ethernet 0, to a DSL modem, cable modem, or switch. Use the - Cisco PIX-515E | Quick Start Guide - Page 5
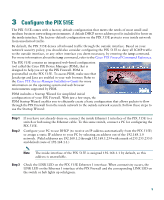
-based configuration tool called the Cisco PIX Device Manager (PDM), that is designed to help you set up the PIX Firewall. PDM is preinstalled on the PIX 515E. To access PDM, make sure that JavaScript and Java are enabled in your web browser. Refer to the Cisco PIX Device Manager Installation Guide - Cisco PIX-515E | Quick Start Guide - Page 6
to add the "s" in "https" or the connection fails. HTTPS (HTTP over SSL) provides a secure connection between your browser and the PIX 515E. Step 5 Step 6 Leave both the username and password boxes empty. Press Enter. Select Yes to accept the certificates and follow the instructions in the Startup - Cisco PIX-515E | Quick Start Guide - Page 7
HTTP client PIX 515E Inside 10.10.10.0 Outside 209.165.156.10 10.10.10.10 DMZ 30.30.30.0 Internet HTTP client HTTP client 97999 Web server 30.30.30.30 Step 1 Manage IP Pools for Network Translations For an inside HTTP client (10.10.10.10) to access the web server on the DMZ network (30.30. - Cisco PIX-515E | Quick Start Guide - Page 8
appears, allowing you to add or edit global address pools. Note For most configurations, global pools are added to the less secure, or public, interfaces. In the Manage Global Address Pools window: a. Select the dmz interface. b. Click the Add button. In the Add Global Pool Item window: a. Select - Cisco PIX-515E | Quick Start Guide - Page 9
public IP addresses available, with one reserved for the DMZ server, all traffic initiated by the inside HTTP client exits the PIX 515E using the outside interface IP address. This allows traffic from the inside client to be routed to and from the Internet. In the Manage Global Address Pools window - Cisco PIX-515E | Quick Start Guide - Page 10
) using the IP address of the interface radio button. c. Assign the same Pool ID for this pool as in Step d above (200). d. Click the OK button. Once the pools are configured, confirm their values before applying the rules to the PIX 515E. Confirm the configurations: a. Click the OK button. b. Click - Cisco PIX-515E | Quick Start Guide - Page 11
Configure Address Translations on Private Networks Network Address Translation (NAT) replaces the source IP addresses of network traffic traversing between two PIX interfaces available to them. To configure NAT between the inside and the DMZ interfaces for the inside HTTP client, complete the - Cisco PIX-515E | Quick Start Guide - Page 12
255.255.255.255 from the Mask drop-down menu. Note You can select the inside host by clicking on the Browse button. f. Select the DMZ interface on which the translation is required. g. Click the Dynamic radio button in the Translate Address to section. h. Select 200 from the Address Pools drop-down - Cisco PIX-515E | Quick Start Guide - Page 13
Note Enter the entire network range (10.10.10.0) or select the network using the Browse button and select the Pool ID if there are multiple HTTP clients. 13 - Cisco PIX-515E | Quick Start Guide - Page 14
. l. Click the Apply button to configure the PIX Firewall. Repeat the steps to configure interface PAT between the inside and outside interfaces. The procedure remains the same, except the interface on which the translation is required is now the outside interface and the Dynamic address pool should - Cisco PIX-515E | Quick Start Guide - Page 15
Configure External Identity for the DMZ Web Server The DMZ server is easily accessible by all hosts on the Internet. This configuration requires translating the DMZ server IP address so that it appears to be located on the Internet, enabling outside HTTP clients to access it unaware of the firewall - Cisco PIX-515E | Quick Start Guide - Page 16
The configurations should display as shown below: 16 - Cisco PIX-515E | Quick Start Guide - Page 17
Step 4 Provide HTTP Access to the DMZ Web Server In addition to configuring address translations, you must configure the PIX 515E to allow the specific traffic types from the public networks. To configure access lists for HTTP traffic originating from any client on the Internet to the DMZ web server - Cisco PIX-515E | Quick Start Guide - Page 18
, allowing you to select the ACL rules to permit/deny traffic. a. Under Action, select permit from the drop-down menu to allow traffic through the firewall. b. Under Source Host/Network, click the IP Address radio button. c. Select outside from the Interface drop-down menu. 18 - Cisco PIX-515E | Quick Start Guide - Page 19
IP Address radio button. f. Select dmz from the Interface drop-down menu. g. Enter 30 Protocol and Service. j. Select "=" (equal to) from the Service drop-down menu DMZ web server (30.30.30.30), HTTP traffic from any host on the Internet destined for 209.165.156.11 is permitted through the PIX 515E - Cisco PIX-515E | Quick Start Guide - Page 20
HTTP clients on the private and public networks can now securely access the DMZ web server. Site-to-Site VPN Configuration Site-to-site VPN (Virtual Private Networking) features provided by the PIX 515E enable businesses to securely extend their networks across low-cost public Internet connections - Cisco PIX-515E | Quick Start Guide - Page 21
Note The Site to Site VPN option connects two IPSec security gateways, which can include PIX Firewalls, VPN concentrators, or other devices that support site-to-site IPSec connectivity. b. Select outside from the drop-down menu as the enabled interface for the current VPN tunnel. c. Click the Next - Cisco PIX-515E | Quick Start Guide - Page 22
Step 2 Configure the VPN Peer a. Enter the Peer IP Address (PIX 2) and select an authentication key (for example,"CisCo"), which is shared for IPSec negotiations between both PIX 515E units. Note To configure PIX 2, enter the IP address for PIX 1 (1.1.1.1) and the same Pre-shared Key (CisCo). b. To - Cisco PIX-515E | Quick Start Guide - Page 23
23 - Cisco PIX-515E | Quick Start Guide - Page 24
Configure the IKE negotiation parameters. In most cases, the default values are sufficient to establish secure VPN tunnels between two peers. a. Select the Encryption (DES/3DES/AES), Authentication algorithms (MD5/SHA), and the Diffie-Hellman group (1/2/5) used by the PIX 515E during an IKE security - Cisco PIX-515E | Quick Start Guide - Page 25
). Confirm all values before continuing to the next window. Note When configuring PIX 2, enter the exact same values for each of the options that you selected for PIX 1. Encryption and algorithm mismatches are a common cause of VPN tunnel failures and can slow down the process. b. Click the Next - Cisco PIX-515E | Quick Start Guide - Page 26
Step 4 Configure Internal Traffic This step is comprised of two windows: 1. Select network traffic on the local PIX 515E encrypted through the VPN tunnel. a. Select the Local Host/Network based on the IP Address, Name, or Group. Note Use the Browse button to select from preconfigured groups. Add or - Cisco PIX-515E | Quick Start Guide - Page 27
permitted from the remote PIX Firewall. a. In the second window, select VPN traffic for remote network configuration. For PIX 1, the remote network is Network B (20.20.20.0) so traffic encrypted from this tunnel is permitted through the tunnel. Note When configuring PIX 2, ensure that the values - Cisco PIX-515E | Quick Start Guide - Page 28
and check the Preview commands before sending to firewall box. Check the configuration to ensure that all values are entered correctly. Click the Send button to enable PIX 1 for site-to-site VPN communication with PIX 2. This concludes configuration for PIX 1. When configuring PIX 2, enter the exact - Cisco PIX-515E | Quick Start Guide - Page 29
in the show version command output. Note You will receive the new activation key for your PIX 515E within two hours (or less) on requesting the license upgrade. For more information on activation key examples or upgrading software, refer to the Cisco PIX Firewall and VPN Configuration Guide. 29 - Cisco PIX-515E | Quick Start Guide - Page 30
3 Step 4 Step 5 Step 6 Command Description show version Shows the PIX Firewall software version, hardware configuration, license key, and related uptime data. configure terminal Starts configuration mode. activation-key Updates the PIX Firewall activation key by replacing the activation-key - Cisco PIX-515E | Quick Start Guide - Page 31
network. Enables an HTTP server for PDM access to the PIX 515E. Takes a data sample and stores the sample data in the PDM history buffer. Specifies the type and number of syslog messages displayed. Saves the modified configuration to permanent memory. Exits the current configuration mode. Refer to - Cisco PIX-515E | Quick Start Guide - Page 32
configuration commands. Locate the blue console cable from the accessory kit. The blue console cable assembly consists of a null-modem cable with RJ-45 connectors and a DB-9 connector. Step 2 Connect the RJ-45 connector to the PIX 515E console port, and connect the other end to the serial port - Cisco PIX-515E | Quick Start Guide - Page 33
interface is activated.) Note If you need to install an optional circuit board, refer to the "Installing a Circuit Board in the PIX 515E" section in the Cisco PIX Firewall Hardware Installation Guide. If you have a second PIX 515E to use as a failover unit, install the failover feature and cable - Cisco PIX-515E | Quick Start Guide - Page 34
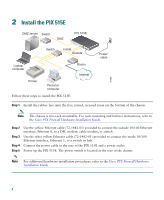
circuit board because the maximum number of allowed interfaces is six. Step 4 Power on the unit from the switch at the rear to start the PIX 515E. Do not power on the failover units until the active unit is configured. Check the LEDs POWER ACT NETWORK 97779 Table 1 PIX 515E Front Panel LEDs LED - Cisco PIX-515E | Quick Start Guide - Page 35
PIX-515 97784 100 Mbps LED ACT LED DO NOT INSTALL INTERFACE CARDS WITH POWER APPLIED 100 Mbps LED LINK ACT LED LED USB LINK LED 100 Mbps ACT LINK 100 Mbps ACT LINK 10/100 ETHERNET 1 10/100 ETHERNET 0 FAILOVER USB CONSOLE 10/100BaseTX 10/100BaseTX Console Power switch ETHERNET 1 ETHERNET 0 - Cisco PIX-515E | Quick Start Guide - Page 36
Cisco Systems. Cisco.com You can access the most current Cisco documentation on the World Wide Web at this URL: http://www.cisco.com/univercd/home/home.htm You can access the Cisco website at this URL: http://www.cisco.com International Cisco websites can be accessed from this URL: http://www.cisco - Cisco PIX-515E | Quick Start Guide - Page 37
website is located at this URL: http://www.cisco.com/tac Accessing all the tools on the Cisco TAC website requires a Cisco.com user ID and password. If you have a valid service contract but do not have a login ID or password, register at this URL: http://tools.cisco.com/RPF/register/register.do 37 - Cisco PIX-515E | Quick Start Guide - Page 38
Open Tool is located at this URL: http://www.cisco.com/tac/caseopen For P1 or P2 cases (P1 and P2 cases are those in which your production network is down or severely degraded) or if you do not have Internet access, contact Cisco TAC by telephone. Cisco TAC engineers are assigned immediately to P1 - Cisco PIX-515E | Quick Start Guide - Page 39
networking deployment and troubleshooting tips, configuration examples, customer case studies, tutorials and training, certification information, and links to numerous in-depth online resources. You can access Packet magazine at this URL: http://www.cisco.com/packet • Internet Protocol Journal is - Cisco PIX-515E | Quick Start Guide - Page 40
40 - Cisco PIX-515E | Quick Start Guide - Page 41
are service marks of Cisco Systems, Inc.; and Aironet, ASIST, BPX, Catalyst, CCDA, CCDP, CCIE, CCNA, CCNP, Cisco, the Cisco Certified Internetwork Expert logo, Cisco IOS, the Cisco IOS logo, Cisco Press, Cisco Systems, Cisco Systems Capital, the Cisco Systems logo, Empowering the Internet Generation - Cisco PIX-515E | Quick Start Guide - Page 42
42
-
 1
1 -
 2
2 -
 3
3 -
 4
4 -
 5
5 -
 6
6 -
 7
7 -
8
-
9
-
10
-
11
-
12
-
13
-
14
-
15
-
16
-
17
-
18
-
19
-
20
-
21
-
22
-
23
-
24
-
25
-
26
-
27
-
28
-
29
-
30
-
31
-
32
-
33
-
34
-
35
-
36
-
37
-
38
-
39
-
40
-
41
-
42
 |
 |

Quick Start Guide
Cisco PIX 515E Firewall
1
Check Items Included
2
Install the PIX 515E
3
Configure the PIX 515E
4
Example Configurations
5
Optional Maintenance and Upgrade Procedures