Cisco PIX-515E Quick Start Guide - Page 12
Manage Pools, inside, Browse, Dynamic, button.
 |
View all Cisco PIX-515E manuals
Add to My Manuals
Save this manual to your list of manuals |
Page 12 highlights
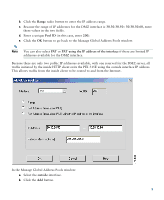
b. Right click in the gray area below the Manage Pools button and select Add. c. In the new window, select the inside interface. d. Enter the IP address of the client (10.10.10.10). e. Select 255.255.255.255 from the Mask drop-down menu. Note You can select the inside host by clicking on the Browse button. f. Select the DMZ interface on which the translation is required. g. Click the Dynamic radio button in the Translate Address to section. h. Select 200 from the Address Pools drop-down menu for the appropriate Pool ID. i. Click the OK button. 12
-
 1
1 -
2
-
3
-
4
-
5
-
6
-
 7
7 -
 8
8 -
 9
9 -
 10
10 -
 11
11 -
 12
12 -
 13
13 -
 14
14 -
 15
15 -
 16
16 -
 17
17 -
18
-
19
-
20
-
21
-
22
-
23
-
24
-
25
-
26
-
27
-
28
-
29
-
30
-
31
-
32
-
33
-
34
-
35
-
36
-
37
-
38
-
39
-
40
-
41
-
42
 |
 |

12
b.
Right click in the gray area below the
Manage Pools
button and select
Add
.
c.
In the new window, select the
inside
interface.
d.
Enter the IP address of the client (10.10.10.10).
e.
Select
255.255.255.255
from the Mask drop-down menu.
Note
You can select the
inside
host by clicking on the
Browse
button.
f.
Select the DMZ interface on which the translation is required.
g.
Click the
Dynamic
radio button in the Translate Address to section.
h.
Select
200
from the Address Pools drop-down menu for the appropriate Pool ID.
i.
Click the
OK
button.