Cisco PIX-515E Quick Start Guide - Page 15
Step 3 Con External Identity for the DMZ Web Server, Translation Rules, IP address, Browse - features
 |
View all Cisco PIX-515E manuals
Add to My Manuals
Save this manual to your list of manuals |
Page 15 highlights
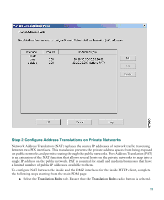
Step 3 Configure External Identity for the DMZ Web Server The DMZ server is easily accessible by all hosts on the Internet. This configuration requires translating the DMZ server IP address so that it appears to be located on the Internet, enabling outside HTTP clients to access it unaware of the firewall. Complete the following steps to map the DMZ IP address (30.30.30.30) statically to a public IP address (209.165.156.11): a. Right click in the gray area under the Translation Rules tab. b. Select Add. c. Select dmz from the drop-down menu of interfaces. d. Enter the server IP address (30.30.30.30) or select the server by clicking on the Browse button. e. Select 255.255.255.255 from the Mask drop-down menu. f. Click the Static radio button. g. Enter the external IP address (209.165.156.11). The Advanced button allows you to configure features such as limiting the number of connections per static entry and DNS rewrites. h. Click the OK button. i. Confirm the values that you entered. Click the Apply button. 15
-
 1
1 -
2
-
3
-
4
-
5
-
6
-
7
-
8
-
9
-
 10
10 -
 11
11 -
 12
12 -
 13
13 -
 14
14 -
 15
15 -
 16
16 -
 17
17 -
 18
18 -
 19
19 -
 20
20 -
21
-
22
-
23
-
24
-
25
-
26
-
27
-
28
-
29
-
30
-
31
-
32
-
33
-
34
-
35
-
36
-
37
-
38
-
39
-
40
-
41
-
42
 |
 |
