Cisco WUSB600N User Guide - Page 31
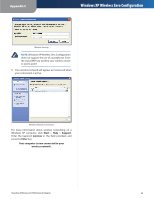
Appendix C: Windows XP Wireless Zero Configuration, Connect, Connect Anyway
 |
View all Cisco WUSB600N manuals
Add to My Manuals
Save this manual to your list of manuals |
Page 31 highlights
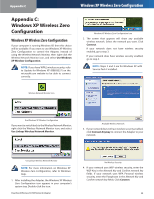
Appendix C Windows XP Wireless Zero Configuration Appendix C: Windows XP Wireless Zero Configuration Windows XP Wireless Zero Configuration If your computer is running Windows XP, then this choice will be available. If you want to use Windows XP Wireless Zero Configuration to control the Adapter, instead of using the Wireless Network Monitor, then right-click the Wireless Network Monitor icon, and select Use Windows XP Wireless Configuration. NOTE: If you have WPA2 wireless security, refer to Update for Windows XP (KB893357) on the microsoft.com website to be able to connect correctly. Windows XP Wireless Zero Configuration Icon 2. The screen that appears will show any available wireless network. Select the network you want. Click Connect. If your network does not have wireless security enabled, go to step 3. If your network does have wireless security enabled, go to step 4. NOTE: Steps 2 and 3 are for Windows XP with Service Pack 2 installed. Wireless Network Monitor Icon Use Windows XP Wireless Configuration If you want to switch back to the Wireless Network Monitor, right-click the Wireless Network Monitor icon, and select Use Linksys Wireless Network Monitor. Available Wireless Network 3. If your network does not have wireless security enabled, click Connect Anyway to connect the Adapter to your network. Use Linksys Wireless Network Monitor NOTE: For more information on Windows XP Wireless Zero Configuration, refer to Windows Help. 1. After installing the Adapter, the Windows XP Wireless Zero Configuration icon appears in your computer's system tray. Double-click the icon. Dual-Band Wireless-N USB Network Adapter No Wireless Security 4. If your network uses WEP wireless security, enter the WEP Key in the Network Key and Confirm network key fields. If your network uses WPA Personal wireless security, enter the Passphrase in the Network Key and Confirm network key fields. Click Connect. 28
-
 1
1 -
2
-
3
-
4
-
5
-
6
-
7
-
8
-
9
-
10
-
11
-
12
-
13
-
14
-
15
-
16
-
17
-
18
-
19
-
20
-
21
-
22
-
23
-
24
-
25
-
 26
26 -
 27
27 -
 28
28 -
 29
29 -
 30
30 -
 31
31 -
 32
32 -
 33
33 -
 34
34 -
 35
35 -
 36
36 -
37
-
38
-
39
-
40
-
41
 |
 |