Coby dvd-537 User Manual - Page 13
Getting, Started
 |
UPC - 716829995372
View all Coby dvd-537 manuals
Add to My Manuals
Save this manual to your list of manuals |
Page 13 highlights
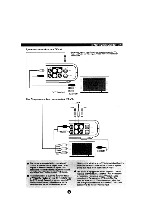
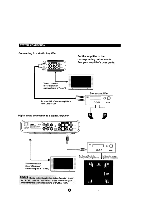
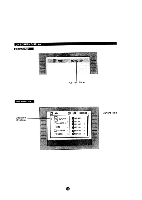
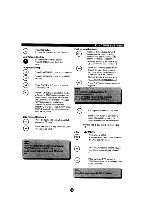
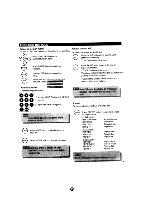
• Unpack the unit. • Read through this owner's manual before Installation and use. • Loading batteries in the remote control. • Connect the system, make sure the connections are secure. • Connect the power plug to the AC power outlet. Loading batteries in the remote control • Remove the battery compartment cover. • Load two AAA (UM-4 or R03) batteries into the battery compartment. • Make sure that the batteries have been inserted in the correct polarities matching to the symbols+,marked in the battery compartment. Close the battery compartment cover. • When replacing batteries, replace both batteries. Do not mix new and used batteries operating together, otherwise,the operation lifetime will be much shorter than normal. • Remove the batteries if the unit will not be used for a prolonged period of time. GETTING STARTED Switch on the player Press the main power switch on the DVD player. Power on the TV set, and the amplifier is connected. Set up the system Select the corresponding setting of the TV set (AV1, AV2, S-Video, DVD etc ). If connected to a RF modulator,select the appropriate channel until the DVD screen appears. If amplifier has been connected, select the corresponding output mode. Load a disc Press OPEN button Q on the Front panel to open the disc door. Load a disc with label facing up and then close the door by hand. Automatic playback The unit will take a few seconds to load the disc's initial data, display the disc type logo on the left upper corner on screen, and then start playing back automatically. NOTE Normally ,when a MP3 disc is loaded, the player II will take longer time to load. Battery compartment cover "illk 2 x "AAA" 1.5V batteries If a DVD disc menu appears on screen Press PLAY button on the remote (or on the unit) to start playing. 0,8 Press the CURSOR buttons to select the desired feature in the menu. And then press ENTER button to confirm. (O 11 OVD f The remote control transmits a directional infrared beam. Be sure to aim the remote control: directly at the infrared sensor of the unit during operation. If the sensor has been covered or there is a large object between the remote control and the sensor, the sensor will not respond. The sensor may not beable to receive the remote signal when it is exposed to direct sunlight or a strong artificial light (fluorescent or strobe light). In this case, change the direction of the light or reposition the unit to avoid direct lighting. Remo e sensor Within 6 meter (20 feet) 00
-
 1
1 -
2
-
3
-
4
-
5
-
6
-
7
-
 8
8 -
 9
9 -
 10
10 -
 11
11 -
 12
12 -
 13
13 -
 14
14 -
 15
15 -
 16
16 -
 17
17 -
 18
18 -
19
-
20
-
21
-
22
-
23
-
24
-
25
-
26
-
27
-
28
 |
 |