Compaq Armada 110 Compaq Armada 110 and Compaq Evo N110 Maintenance and Servic - Page 96
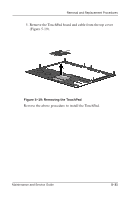
Removing the Diskette Drive, Reverse the above procedure to install the diskette drive.
 |
View all Compaq Armada 110 manuals
Add to My Manuals
Save this manual to your list of manuals |
Page 96 highlights
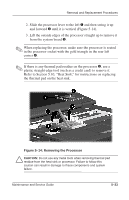
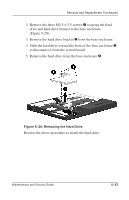
Removal and Replacement Procedures 3. Remove the two M2.5 × 4.5 screws securing the diskette drive to the top cover 1 (Figure 5-17). 4. Remove the tape adhering the diskette drive and TouchPad cables to the top cover 2. 5. Remove the diskette drive from the top cover 3. Figure 5-17: Removing the Diskette Drive Reverse the above procedure to install the diskette drive. ✎ When installing the diskette drive in the top cover, make sure the tab in the front right corner of the diskette drive fits into the slot in the front right corner of the top cover. 5-28 Maintenance and Service Guide
-
 1
1 -
2
-
3
-
4
-
5
-
6
-
7
-
8
-
9
-
10
-
11
-
12
-
13
-
14
-
15
-
16
-
17
-
18
-
19
-
20
-
21
-
22
-
23
-
24
-
25
-
26
-
27
-
28
-
29
-
30
-
31
-
32
-
33
-
34
-
35
-
36
-
37
-
38
-
39
-
40
-
41
-
42
-
43
-
44
-
45
-
46
-
47
-
48
-
49
-
50
-
51
-
52
-
53
-
54
-
55
-
56
-
57
-
58
-
59
-
60
-
61
-
62
-
63
-
64
-
65
-
66
-
67
-
68
-
69
-
70
-
71
-
72
-
73
-
74
-
75
-
76
-
77
-
78
-
79
-
80
-
81
-
82
-
83
-
84
-
85
-
86
-
87
-
88
-
89
-
90
-
 91
91 -
 92
92 -
 93
93 -
 94
94 -
 95
95 -
 96
96 -
 97
97 -
 98
98 -
 99
99 -
 100
100 -
 101
101 -
102
-
103
-
104
-
105
-
106
-
107
-
108
-
109
-
110
-
111
-
112
-
113
-
114
-
115
-
116
-
117
-
118
-
119
-
120
-
121
-
122
-
123
-
124
-
125
-
126
-
127
-
128
-
129
-
130
-
131
-
132
-
133
-
134
-
135
-
136
-
137
-
138
-
139
-
140
-
141
-
142
-
143
-
144
-
145
-
146
-
147
-
148
-
149
-
150
-
151
-
152
-
153
 |
 |

5–28
Maintenance and Service Guide
Removal and Replacement Procedures
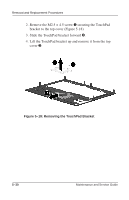
3. Remove the two M2.5 × 4.5 screws securing the diskette
drive to the top cover
1
(Figure 5-17).
4. Remove the tape adhering the diskette drive and TouchPad
cables to the top cover
2
.
5. Remove the diskette drive from the top cover
3
.
Figure 5–17: Removing the Diskette Drive
Reverse the above procedure to install the diskette drive.
✎
When installing the diskette drive in the top cover, make sure the
tab in the front right corner of the diskette drive fits into the slot in
the front right corner of the top cover.