Compaq LA2405x LCD Monitors Reference Guide - Page 14
Optimizing Image Performance (Analog Input), Save and Return, Cancel, Clock, Clock Phase
 |
View all Compaq LA2405x manuals
Add to My Manuals
Save this manual to your list of manuals |
Page 14 highlights
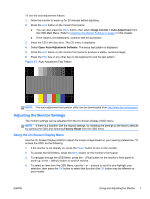
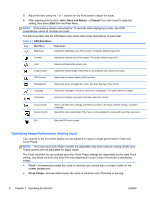
5. Adjust the item using the + or - buttons on the front panel to adjust the scale. 6. After adjusting the function, select Save and Return, or Cancel if you don't want to save the setting, then select Exit from the Main Menu. NOTE: If the buttons remain untouched for 10 seconds while displaying a menu, the OSD automatically saves all changes and exits. The following table lists the OSD Main menu items with a brief descriptions of each item. Table 3-1 OSD Main Menu Icon Main Menu Description Brightness Adjusts the brightness level of the screen. The factory default range is 90. Contrast Adjusts the contrast level of the screen. The factory default range is 80. Color Selects and adjusts the screen color. Image Control Adjusts the screen image. (This menu is only available when using VGA input.) OSD Control Adjusts the on-screen display (OSD) controls. Management Selects the power management, audio, and timer features of the monitor. Language Selects the language in which the OSD menu is displayed. The factory default is English. Information Selects and displays important information about the monitor. Factory Reset Source Control Returns all OSD menu settings and DDC/CI controls to the factory default settings, except the Language. Selects the video input signal. (This menu is only available for models with more than one input.) Exit Exits the OSD menu screen. Optimizing Image Performance (Analog Input) Two controls in the on-screen display can be adjusted to improve image performance: Clock and Clock Phase. NOTE: The Clock and Clock Phase controls are adjustable only when using an analog (VGA) input. These controls are not adjustable for digital inputs. The Clock must first be set correctly since the Clock Phase settings are dependent on the main Clock setting. Use these controls only when the auto-adjustment function does not provide a satisfactory image. ● Clock-Increases/decreases the value to minimize any vertical bars or stripes visible on the screen background. ● Clock Phase-Increases/decreases the value to minimize video flickering or blurring. 8 Chapter 3 Operating the Monitor ENWW
-
 1
1 -
2
-
3
-
4
-
5
-
6
-
7
-
8
-
 9
9 -
 10
10 -
 11
11 -
 12
12 -
 13
13 -
 14
14 -
 15
15 -
 16
16 -
 17
17 -
 18
18 -
 19
19 -
20
-
21
-
22
-
23
-
24
-
25
-
26
-
27
 |
 |
