Compaq Presario 1900 Presario 1900 Series Maintenance and Service Guide - Page 43
Removing the, Keyboard, continued
 |
View all Compaq Presario 1900 manuals
Add to My Manuals
Save this manual to your list of manuals |
Page 43 highlights
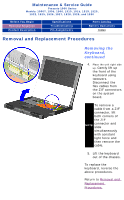
Maintenance & Service Guide Presario 1900 Series Models: 1900T, 1905, 1906, 1910, 1915, 1919, 1920, 1922, 1925, 1926, 1927, 1928, 1929, and 1930 Before You Begin Removal Sequence Product Description Specifications Troubleshooting Pin Assignments Parts Catalog Battery Operations Index Removal and Replacement Procedures Removing the Keyboard, continued 4. Place the unit right side up. Gently lift up the front of the keyboard using tweezers. Disconnect the flex cables from the ZIF connectors on the system board. To remove a cable from a ZIF connector, lift both corners of the ZIF connector and NOTE: slide simultaneously with constant light force and then remove the cable. 5. Lift the keyboard out of the chassis. To replace the keyboard, reverse the above procedures. Return to Removal and Replacement Procedures.
-
 1
1 -
2
-
3
-
4
-
5
-
6
-
7
-
8
-
9
-
10
-
11
-
12
-
13
-
14
-
15
-
16
-
17
-
18
-
19
-
20
-
21
-
22
-
23
-
24
-
25
-
26
-
27
-
28
-
29
-
30
-
31
-
32
-
33
-
34
-
35
-
36
-
37
-
 38
38 -
 39
39 -
 40
40 -
 41
41 -
 42
42 -
 43
43 -
 44
44 -
 45
45 -
 46
46 -
 47
47 -
 48
48 -
49
-
50
-
51
-
52
-
53
-
54
-
55
-
56
-
57
-
58
-
59
-
60
-
61
-
62
-
63
-
64
-
65
-
66
-
67
-
68
-
69
-
70
-
71
-
72
-
73
-
74
-
75
-
76
-
77
-
78
-
79
-
80
-
81
-
82
-
83
-
84
-
85
-
86
-
87
-
88
-
89
-
90
-
91
-
92
-
93
-
94
 |
 |
