Craftsman 16639 Owners Manual - Page 6
& Assembly - manual
 |
View all Craftsman 16639 manuals
Add to My Manuals
Save this manual to your list of manuals |
Page 6 highlights
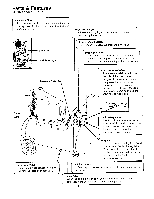
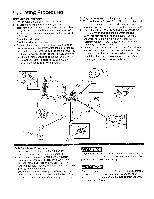
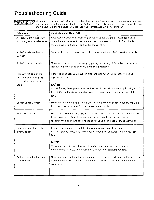
Installation & Assembly The air compressor shouid be turned off, unplugged from the power source, the air bled from the tank and the unit allowed time to cool before any maintenance is performed. Personal injuries could occur from moving parts, electrical sources, compressed air or hot surfaces. The quick connect assembly must be attached before use. Failure to assemble correctly could result in leaks and possible injury. If unsure of assembly instructions or you experience difficulty in the assembly please call our toll free number for assistance. Installing Wheels The wheels and handle do not provide adeguate clearance, stability or support for pulling the unit up and down stairs or steps. The unit must be lifted or pushed up a ramp. Getting Started-Location of the Air Compressor The air compressor should always be located in a clean, dry, and well ventilated environment. The unit should have at minimum, 12 inches of space on each side. The air intake filter should be free of any debris or obstructions. Check the air filter on a daily basis to be sure it is clean and in working order. Grounding Instructions This product must be grounded. In the event of an electrical short circuit, grounding reduces the dsk of electric shock by providing an escape route for the electric current. This product is equipped with a cord having a grounding wire with an appropriate grounding plug. (See the figure below.) The piug must be plugged into an outlet that is property installed and grounded in accordance with all local codes and ordinances. Check with a qualified electrician or service personnel if these instructions are not completely understood or if in doubt as to whether the toot is properly grounded. It may be necessary to brace or support one end of the air compressor when attaching the wheels, because it will have a tendency to tip. , I .. r_.-_FS:> " . /// ]*_l-_._I Grounding Pin c ... , "% Grounded ,f.Outlet Improper installation of the grounding plug wil! result in a risk of electric shock. If repair or replacement of the cord Items Needed For Assembly 1gram or adjustable wrench for shoulder bolt • 17mm er adiustable wrench for nylon lock nut Install one shoulder bolt, washer, and one nut for each wheel using bolt hales provided in the wheel bracket. The shoulder bolt will install from the outside of the wheel through the top hole in the wheel bracket. Tighten securely with the washer and nut positioned on the inside of the wheel bracket. Assembly 1. Remove air compressor, manual, air filter assembly, and accessories from packaging. 2. Remove the plastic plug from the compressor intake port. (seediagrambelow) 3. Install the filter in the compressor intake port. (see diagram below) 4. Remove the oil fill cap from the crankcase and fill until the oil reaches the top of the red dot in the sight glass. Oil capacity is 3 oz. (seebelow)Use SAE-30 non-detergent (API CG/CD heavy duty motor oil). Under extreme cold weather conditions use SAE-t 0 weight oil. 5. Replace the oil cap. or plug is necessary, do not connect the grounding wire to either fiat blade terminals. Check with a qualified electrician or serviceman if the grounding instructions are not completely understood, or if in doubt as to whether the product is properly grounded Do not modify the plug provided; if it will not fit the outlet, have the proper outlet installed by a qualified electrician. This product is for use on a circuit having a nominal rating of 120 volts and is factory-equipped with a specific electric cord and plug to permit connection to a proper electric circuit. Make sure that the product is connected to an outlet having the same configuration as the plug. No adapter should be used with this product If the product must be reconnected for use on a different type of electric circuit, qualified service personnel should make the reconnection. Extension Cords Use only s 3-wire extension cord that has a 3-blade grounding plug, end a 3-slot receptacle that will accept the plug on the product. Make sure your extension cord is in good condition. When using an extension cord, be sure to use one heavy enough to carry the current your product will draw. Cords must not exceed 25 feet and No. 12 AWG size must be used. An undersized cord will \ [ cause a drop in line voltage resulting in toss of power and overheating. Break In Procedures No break in procedure is required by the user. This Estimated AssembtyTime: Approximately5 minutes product is factory tested to ensure proper operation and pedormance. 4
-
 1
1 -
 2
2 -
 3
3 -
 4
4 -
 5
5 -
 6
6 -
 7
7 -
 8
8 -
 9
9 -
 10
10 -
 11
11 -
 12
12 -
13
-
14
-
15
-
16
-
17
-
18
-
19
-
20
 |
 |