Craftsman 21154 Owners Manual - Page 10
Restshaveaflat,smooth
 |
View all Craftsman 21154 manuals
Add to My Manuals
Save this manual to your list of manuals |
Page 10 highlights
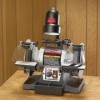
TheBenchGrindeisrprovidewditha leftandrightwo pieceTooRl estB. othTooRl estshaveaflat,smooth Fig. E surfacteo layyourworkpiecaegainsAt.naccessory E DrillBitSharpeniPnglateisincludeTd.hisplategoes onovertherighTt ooRl esot nlyandisusedtosharpen twistdrillbits. 1. DONOTassembtlheeBenchGrindeurntiyl ouare surethetoolISNOTpluggeidn. 2. DONOTassembtlheeBenchGrindeurntiyl ouare surethepowesrwitchisinthe"OFFp" osition. 3. DONOTassembtlheeBenchGrindeurntiyl ouare surethegrindinwgheelasrefirmlytightenetdothe BenchGrinder. TOOL RESTS (Figs. D and E) The Bench Grinder is provided with two different Tool Rests assemblies. The Left Side Tool Rest is entirely flat. The Right Side Tool Rest is also flat. 1, Assemble the Tool Rest Supports (A) to the inside surface of the Wheel Covers (B) with the flat washers (C) and hex head screws (D) as shown. See Figure D. 2. Assemble the Tool Rests (E) to the Supports (F) with the flat washers (G) and Adjustment Knobs (H) as shown. See Figure E. 3, Adjust each Tool Rest until its inside edge (I) is 1/16" from the grinding wheel. Firmly tighten the hex head screws holding the supports. See Figure E. Fig. D H G 4, Install the Drill Bit Sharpening Plate by loosening the Right Side Adjustment Knob until there is approximately a 1/4" of threads visible. Place the Plate onto the Right Side Tool Rest and over the visible threads. The Flat Washer must be placed between the Plate and the Adjustment Knob. Tighten the Adjustment Knob. See Figure E IMPORTANT: The Drill Bit Sharpening Plate should ONLY be used when sharpening twist drill bits. Fig. F A D lO
-
 1
1 -
2
-
3
-
4
-
 5
5 -
 6
6 -
 7
7 -
 8
8 -
 9
9 -
 10
10 -
 11
11 -
 12
12 -
 13
13 -
 14
14 -
 15
15 -
16
-
17
-
18
-
19
-
20
-
21
-
22
-
23
-
24
-
25
-
26
-
27
-
28
-
29
-
30
-
31
-
32
-
33
-
34
-
35
-
36
 |
 |
