Craftsman 21154 Owners Manual - Page 13
Grinding, Speed, Chart
 |
View all Craftsman 21154 manuals
Add to My Manuals
Save this manual to your list of manuals |
Page 13 highlights
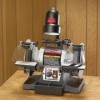
Fig. L \ The Bench Grinder is designed for hand held grinding, sharpening, and cleaning operations. ALWAYS WEAR EYE PROTECTION! Hot sparks are produced during grinding operations. Sharpening and removal of metal can be done on the right side of the Bench Grinder using the grinding wheel. Cleaning of metal surfaces can be done using the wire wheel on the left side of the Bench Grinder. GRINDING SPEED CHART Low Speed2000 RPM Light Duty Operations High Speed 3400 RPM Heavy Duty/Norma/ Operations Light Grinding Sharpening Rustand paint removal Loweredgrinding temperature Heavy grinding Stock Removal Deburring Buffing 1, The Power Switch must be in the "OFF" position (see Fig. L) and the Variable Speed Switch must be turned to its slowest setting by being turned all the way to the left until solid resistance is felt. 2, Stand to the side of the Bench Grinder and plug in the power cord to a suitable power source. 3. Remain to the side of the Bench Grinder and turn it "ON" by moving the power switch to the up position. 4, Allow the grinding wheels to come up to a steady speed for at least one minute. The R.EM.'s of the Bench Grinder can be now increased to the desired speed for the particular grinding operation by rotating the Variable Speed Switch clockwise. 5, The Flexible Work Light may be turned "ON" if desired. 6. Adjust the eyeshields. Place the workpiece on the appropriate tool rest for the desired operation. 7, Move the workpiece towards the grinding wheel until it lightly touches. Move the workpiece back and forth across the front surface of the grinding wheel removing the amount of material desired. To avoid serious injury, never grind on the sides of the grinding wheels. 8, If the Drill Bit Sharpening Plate was installed earlier, lay the drill bit flat in the "V" groove. Firmly hold on to the drill bit shank. Slide the drill bit towards the grinding wheel until it lightly touches. Keep the drill bit flat to the plate and rotate the drill bit. 9. The operator may place the hot end of the workpiece into the water in the quench tray to cool it. 10. After completing the grinding operations, turn "OFF" the Bench Grinder by pushing down on the Power Switch. CAUTION: It will take a few minutes for the grinding wheels to come to a complete stop. 11. Turn the Variable Speed Switch counterclockwise to return it to its slowest setting. 12. Turn "OFF" the Flexible Work Light. CAUTION: The Flexible Work Light housing will remain hot for a few minutes after turning it "OFF". 13. Avoid contact with housing until it is cool. Unplug the Bench Grinder from the power source. NOTE: To prevent unauthorized use of the Bench Grinder, the power switch has a removable locking key. With the power switch in the "OFF" position, pull the locking key out. The Bench Grinder cannot be turned "ON" with the key removed. Insert the locking key to resume grinding operations. 13
-
 1
1 -
2
-
3
-
4
-
5
-
6
-
7
-
 8
8 -
 9
9 -
 10
10 -
 11
11 -
 12
12 -
 13
13 -
 14
14 -
 15
15 -
 16
16 -
 17
17 -
 18
18 -
19
-
20
-
21
-
22
-
23
-
24
-
25
-
26
-
27
-
28
-
29
-
30
-
31
-
32
-
33
-
34
-
35
-
36
 |
 |
