Craftsman 25cc Operation Manual - Page 5
Assembly - trimmer
 |
View all Craftsman 25cc manuals
Add to My Manuals
Save this manual to your list of manuals |
Page 5 highlights
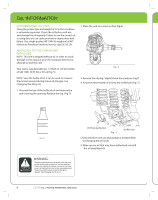
ASSEMBLY INSTALLING CUTTING ATTACHMENT SHIELD Use the following instructions if the cutting attachment shield on your unit is not installed. Use only the instructions that apply to the type of shaft and shield that your unit is equipped with. FOR CURVED SHAFT TRIMMERS Place the cutting attachment shield and spacer against tube as shown in (Fig. 1). Use the 2 screws provided to clamp the cap and shield onto the tube. Tighten the screws evenly. Make sure the shield does not touch any rotating parts. CuttingAttachment Shield Spacer INSTALLING THE D-HANDLE AND LOWER HANDLE STRAIGHT SHAFT AND ACCESSORY READY TRIMMERS 1.Locate the 4 screws included in the tool kit. 2.Assemble the upper and lower handle parts and 4 screws as shown in (Fig. 3), positioning the handle parts evenly over the rubber sleeve on shaft. Do not completely tighten. 3.While holding the unit in the operating position (Fig. 14), position the D-handle to the location that pro vides you the best grip. 4.Tighten the clamp screws evenly, until the D-Handle is secure. Attaching Screws D-Handle Cap Washer Fig. 1 Attaching Screws FOR STRAIGHT SHAFT TRIMMERS Place the cutting attachment shield onto the shaft mount. Install using provided hardware in the sequence as shown (Fig.2). Shaft Mount Lower Handle Fig. 3 CURVED SHAFT TRIMMERS 1. Installing the D-Handle (non detachable model). 2. Installing D-Handle over the tube in desired position. 3. Install the fasteners as shown (Fig. 4). 4.Tighten until D-Handle is secure. Cutting Attachment Shield Plate Washer Washer Lock W asher Attaching Screws Fig. 2 D-Handle Fasteners Fig. 4 WARNING: To prevent serious injury, never operate the trimmer without the cutting attachment in place. LEHR | ALL RIGHTS RESERVED 2008-2009 5
-
 1
1 -
 2
2 -
 3
3 -
 4
4 -
 5
5 -
 6
6 -
 7
7 -
 8
8 -
 9
9 -
 10
10 -
 11
11 -
12
-
13
-
14
-
15
-
16
-
17
-
18
-
19
-
20
-
21
-
22
 |
 |
