Craftsman 26302 Operation Manual - Page 23
a5/16-in.
 |
UPC - 009263020008
View all Craftsman 26302 manuals
Add to My Manuals
Save this manual to your list of manuals |
Page 23 highlights
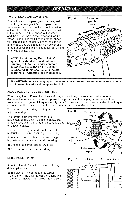
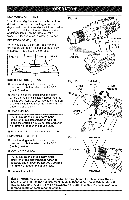
CHUCRKEMOV(AFLig1. 7-19) Thechucckanberemovaenddreplacbeya newone. mLoctkhetriggesrwitcbhyplacinthge directionfrotatiosnelectioncr enteprosition. ! Openthechucjkaws. mInseart5/16-ionr.largehrexkeyintothe chucokfthedrilal ndtightetnhechucjkaws securely. mTapthehexkeysharpwlyithamalleint aclockwidseirectioTnh.iswilloosetnhe screwinthechucfkoreasyremoval. mOpenthechucjkawsandremovtheehex keyU. sinagscrewdrivreemr,ovtheechuck screwbyturninigtinaclockwidseirection. tNhrOeTaEds: , The chuck screw has left handed Fig. t8 J m Insert the hex key into the chuck and tighten the chuck jaws securely. Tap sharply with a mallet in a counterclockwise direction. This will loosen the chuck on the spindle. It can now be unscrewed by hand. TO RETIGHTEN A LOOSE CHUCK Screwdriver The chuck may become loose on the spindle and develop a wobble. Also, the chuck screw may become loose, causing the chuck jaws to bind and prevent them from closing. To tighten a loose chuck or chuck screw: m Lock the trigger switch by placing the direction of rotation selector in center position. m Open the chuck jaws. m Insert the hex key into the chuck and tighten the chuck jaws securely. Tap the hex key sharply with a mallet in a clockwise direction. This will tighten the chuck oil the spindle. m Open the chuck jaws and remove the hex key. % m Using a screwdriver, tighten the chuck screw by turning the chuck screw in a counterclockwise direction. Hex key Ratcheting keyless chuck Chuck Jaws AWARNING: Always wear safety glasses with side shields during maintenance. i J A_WARN|NG: To ensure safety and reliability, all repairs should be performed by a i qualified service technician at Sears Service Center. J WmAtRheN|NtoGo:l andTo uanvpoluidg stehreiouCsharpgeerrs/Aodnaapl terinjuryw, haelwn aycsleanreinmgoveor thpeerfboartmteirnyg paancyk maintenance. ] 23
-
 1
1 -
2
-
3
-
4
-
5
-
6
-
7
-
8
-
9
-
10
-
11
-
12
-
13
-
14
-
15
-
16
-
17
-
 18
18 -
 19
19 -
 20
20 -
 21
21 -
 22
22 -
 23
23 -
 24
24 -
 25
25 -
 26
26 -
 27
27 -
 28
28 -
29
-
30
-
31
-
32
-
33
-
34
-
35
-
36
 |
 |
