Craftsman 30084N Operation Manual - Page 14
Threading Welding Wire
 |
UPC - 055249070420
View all Craftsman 30084N manuals
Add to My Manuals
Save this manual to your list of manuals |
Page 14 highlights
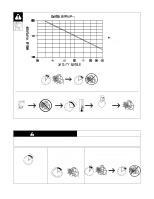
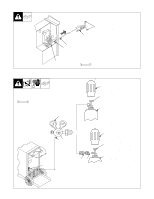
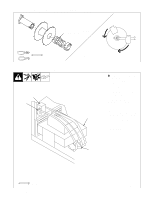
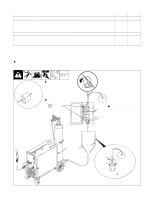
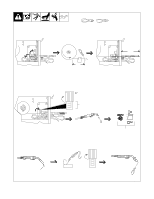
2-13. Threading Welding Wire Tools Needed: Open pressure assembly. 4 in (102 mm) 6 in (150 mm) Pull and hold wire; cut off end. Push wire thru guides into gun; continue to hold wire. Tighten 1 2 3 4 . Use pressure indicator scale to set a desired drive roll pressure. Pressure Indicator Scale Close and tighten pressure assembly, and let go of wire. Remove gun nozzle and contact tip. Turn On. Press gun trigger until wire comes out of gun. Reinstall contact tip and nozzle. OM-194 199 Page 11 Tighten 1 2 3 WOOD 4 Feed wire to check drive roll pressure. Tighten knob enough to prevent slipping. Cut off wire. Close and latch door. Ref. ST-801 570-A / ST-801 083 / S-0627-A
-
 1
1 -
2
-
3
-
4
-
5
-
6
-
7
-
8
-
 9
9 -
 10
10 -
 11
11 -
 12
12 -
 13
13 -
 14
14 -
 15
15 -
 16
16 -
 17
17 -
 18
18 -
 19
19 -
20
-
21
-
22
-
23
-
24
-
25
-
26
-
27
-
28
-
29
-
30
-
31
-
32
-
33
-
34
-
35
-
36
-
37
-
38
-
39
-
40
-
41
-
42
-
43
-
44
-
45
-
46
-
47
-
48
-
49
-
50
-
51
-
52
-
53
-
54
-
55
-
56
-
57
-
58
-
59
-
60
-
61
-
62
-
63
-
64
-
65
-
66
-
67
-
68
 |
 |
OM-194 199 Page 11
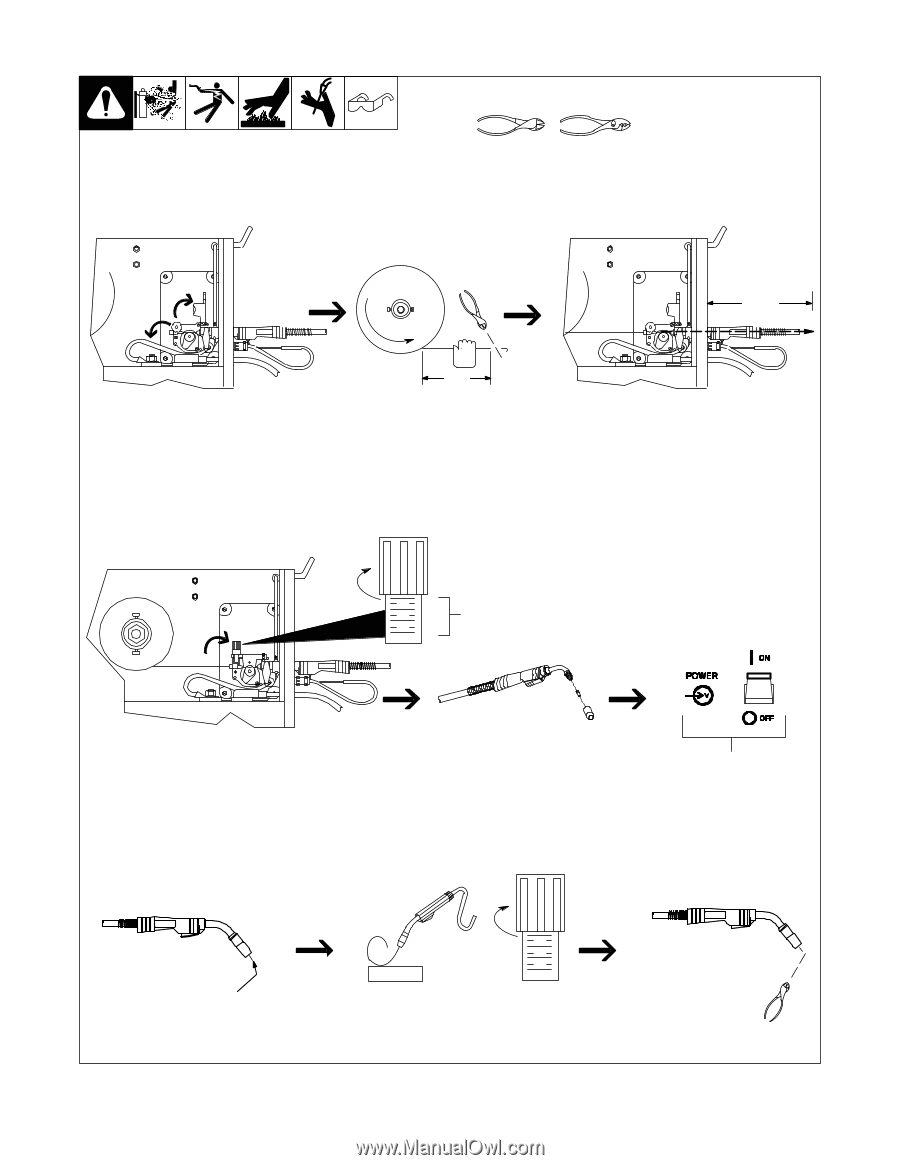
2-13.
Threading Welding Wire
Ref. ST-801 570-A / ST-801 083 / S-0627-A
6 in
(150 mm)
4 in
(102 mm)
WOOD
Open pressure assembly.
Pull and hold wire; cut off end.
Push wire thru guides into gun;
continue to hold wire.
Close and tighten pressure
assembly, and let go of wire.
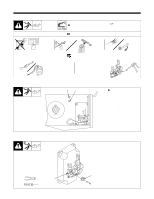
Remove gun nozzle and contact tip.
Turn On.
Press gun trigger until wire
comes out of gun. Reinstall
contact tip and nozzle.
Feed wire to check drive roll pressure.
Tighten knob enough to prevent slipping.
Cut off wire. Close
and latch door.
Tools Needed:
Tighten
1
2
3
4
.
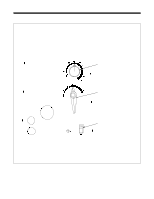
Use pressure indicator
scale to set a desired
drive roll pressure.
Pressure
Indicator
Scale
Tighten
1
2
3
4