Craftsman 32724611 Owners Manual - Page 10
Maintenance
 |
View all Craftsman 32724611 manuals
Add to My Manuals
Save this manual to your list of manuals |
Page 10 highlights
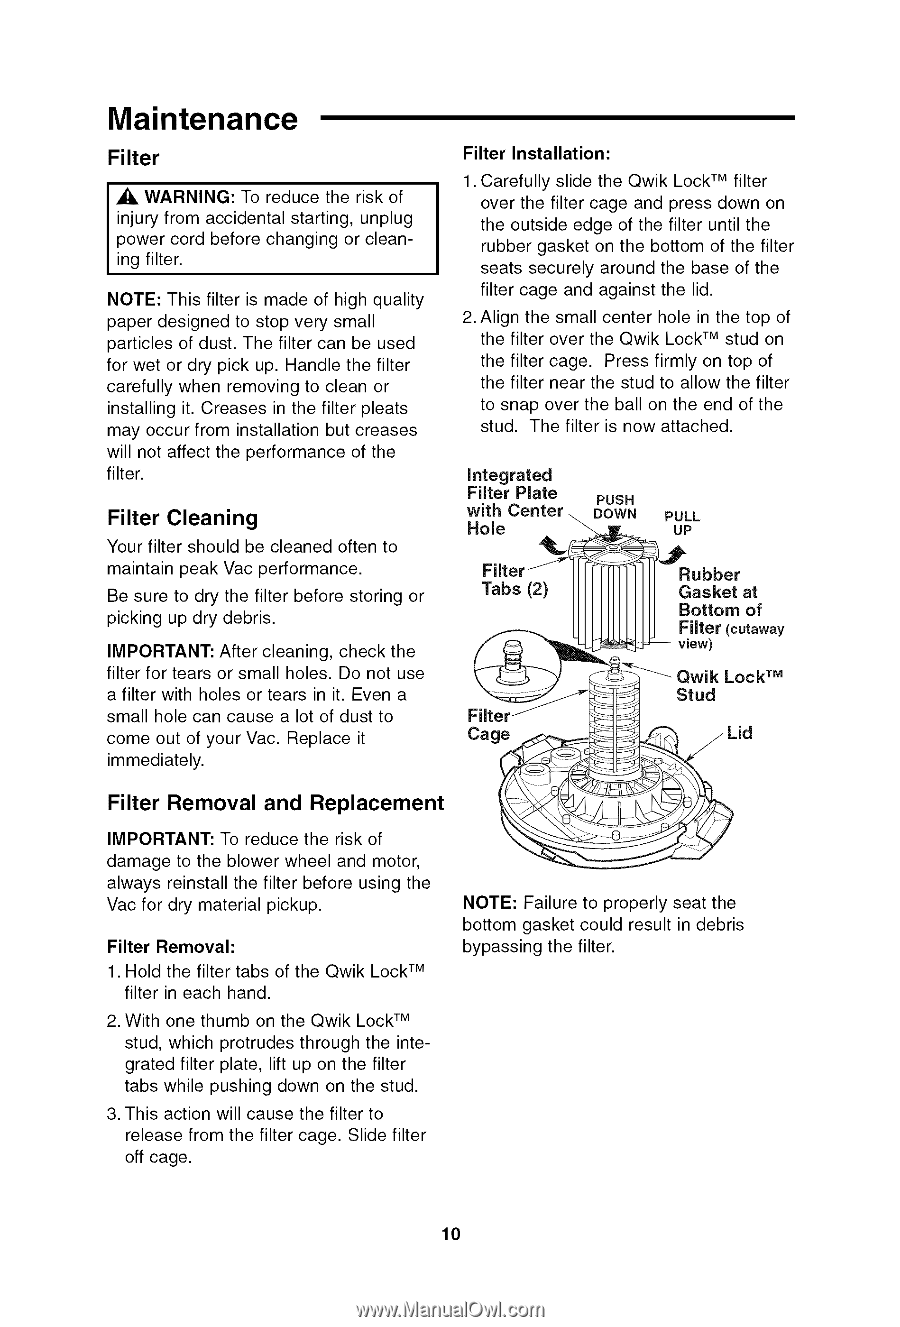
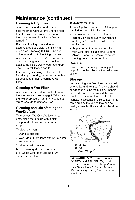
Maintenance Filter WARNING: To reduce the risk of injury from accidental starting, unplug power cord before changing or cleaning filter. NOTE: This filter is made of high quality paper designed to stop very small particles of dust. The filter can be used for wet or dry pick up. Handle the filter carefully when removing to clean or installing it. Creases in the filter pleats may occur from installation but creases will not affect the performance of the filter. Filter Cleaning Your filter should be cleaned often to maintain peak Vac performance. Be sure to dry the filter before storing or picking up dry debris. IMPORTANT: After cleaning, check the filter for tears or small holes. Do not use a filter with holes or tears in it. Even a small hole can cause a lot of dust to come out of your Vac. Replace it immediately. Filter Removal and Replacement IMPORTANT: To reduce the risk of damage to the blower wheel and motor, always reinstall the filter before using the Vac for dry material pickup. Filter Removal: 1. Hold the filter tabs of the Qwik Lock TM filter in each hand. 2. With one thumb on the Qwik Lock TM stud, which protrudes through the integrated filter plate, lift up on the filter tabs while pushing down on the stud. 3. This action will cause the filter to release from the filter cage. Slide filter off cage. Filter Installation: 1. Carefully slide the Qwik Lock TM filter over the filter cage and press down on the outside edge of the filter until the rubber gasket on the bottom of the filter seats securely around the base of the filter cage and against the lid. 2. Align the small center hole in the top of the filter over the Qwik Lock TM stud on the filter cage. Press firmly on top of the filter near the stud to allow the filter to snap over the ball on the end of the stud. The filter is now attached. Integrated Filter Plate PUSH wHiothle Center _DOWH PULL UP % Tabs (2) Rubber Gasket at Bottom of Filter (cutaway view) Filter Cage wik Lock TM Stud _ _Lid NOTE: Failure to properly seat the bottom gasket could result in debris bypassing the filter. 10
-
 1
1 -
2
-
3
-
4
-
 5
5 -
 6
6 -
 7
7 -
 8
8 -
 9
9 -
 10
10 -
 11
11 -
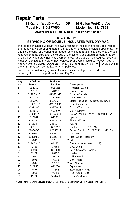 12
12 -
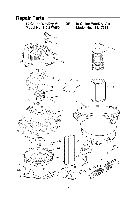 13
13 -
 14
14 -
 15
15 -
16
-
17
-
18
-
19
-
20
-
21
-
22
-
23
-
24
-
25
-
26
-
27
-
28
 |
 |