Craftsman 88830 Operation Manual - Page 23
ofremoval.
 |
View all Craftsman 88830 manuals
Add to My Manuals
Save this manual to your list of manuals |
Page 23 highlights
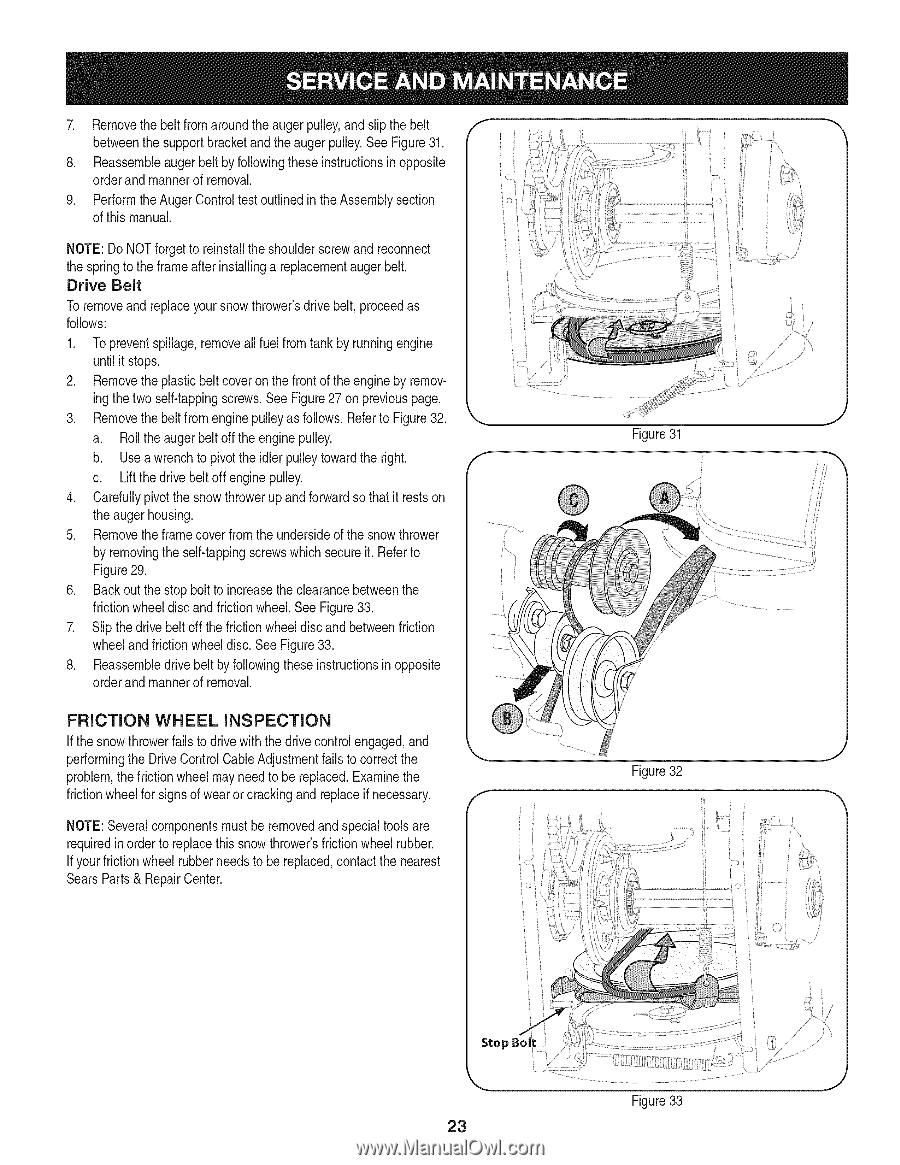
7. Remotvheebelftromarountdheaugeprulleya,ndslipthebelt betweethnesuppobrrtackaent dtheaugeprulleyS.eeFigur3e1. 8. Reassemabulegebrelbt yfollowinthgeseinstructioinospposite ordearndmannoefrremoval. 9. PerfortmheAugeCr ontrtoelsot utlineindtheAssembsleyction iO i ofthismanual. NOTED:oNOTforgetot reinstathlleshouldsecrrewandreconnect thesprintgotheframeafteirnstallinagreplacemaeungt ebrelt. Drive Belt Toremoveand replaceyoursnow thrower'sdrivebelt, proceedas follows: 1. Topreventspillage,removeall fuel fromtank by runningengine untilit stops. 2. Removetheplasticbelt coveron the front of the engineby removing the two self-tappingscrews.See Figure27 on previouspage. 3. Removethebelt from enginepulleyas follows. Referto Figure32. a. Rollthe auger beltoff theengine pulley. b. Use a wrenchto pivotthe idlerpulleytowardthe right. c. Lift the drivebelt off enginepulley. 4. Carefullypivotthe snowthrowerup and forwardsothat itrestson the augerhousing. 5. Removetheframe coverfrom the undersideof the snowthrower by removingthe self-tappingscrewswhich secureit. Referto Figure29. 6. Back outthe stop bolt to increasethe clearancebetweenthe frictionwheeldisc and frictionwheel.See Figure33. 7. Slip the drivebelt off the frictionwheeldisc and betweenfriction wheeland frictionwheeldisc.See Figure33. 8. Reassembledrive beltby followingthese instructionins opposite orderand mannerof removal. Figure31 FRICTION WHEEL INSPECTION If the snowthrowerfails to drivewith thedrivecontrolengaged,and performingthe DriveControlCableAdjustmentfails to correctthe problem,the frictionwheelmay needto be replaced.Examinethe frictionwheelfor signsof wearor crackingand replaceif necessary. f NOTE:Severalcomponentsmustbe removedand specialtools are requiredin order to replacethis snowthrower'sfrictionwheelrubber. If yourfrictionwheel rubberneedsto be replaced,contact the nearest SearsParts& RepairCenter. J Figure32 Stop Bol 23 Figure33
-
 1
1 -
2
-
3
-
4
-
5
-
6
-
7
-
8
-
9
-
10
-
11
-
12
-
13
-
14
-
15
-
16
-
17
-
 18
18 -
 19
19 -
 20
20 -
 21
21 -
 22
22 -
 23
23 -
 24
24 -
 25
25 -
 26
26 -
 27
27 -
 28
28 -
29
-
30
-
31
-
32
-
33
-
34
-
35
-
36
-
37
-
38
-
39
-
40
-
41
-
42
-
43
-
44
-
45
-
46
-
47
-
48
-
49
-
50
-
51
-
52
-
53
-
54
-
55
-
56
-
57
-
58
-
59
-
60
-
61
-
62
-
63
-
64
-
65
-
66
-
67
-
68
-
69
-
70
-
71
-
72
 |
 |