Creative SB0400 User Guide - Page 21
Step 2: Install the Sound Blaster Audigy 2 card, slot as shown
 |
View all Creative SB0400 manuals
Add to My Manuals
Save this manual to your list of manuals |
Page 21 highlights
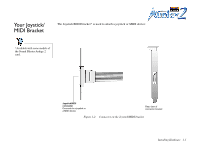
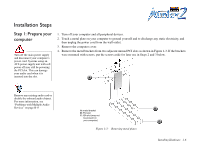
Step 2: Install the Sound Blaster Audigy 2 card 1. Align the Sound Blaster Audigy 2 card with the PCI slot and press the card gently but firmly into the slot as shown in Figure 1-4. 2 Do not force the audio card into the slot. Make sure that the gold finger PCI connector on the Sound Blaster Audigy 2 card is aligned with the PCI bus connector on the motherboard before you insert the card into the PCI expansion slot. If it does not fit properly, gently remove it and try again. 1 Figure 1-4: Securing the audio card to the expansion slot. 2. Secure the card with a screw if necessary. Installing Hardware 1-7
-
 1
1 -
2
-
3
-
4
-
5
-
6
-
7
-
8
-
9
-
10
-
11
-
12
-
13
-
14
-
15
-
 16
16 -
 17
17 -
 18
18 -
 19
19 -
 20
20 -
 21
21 -
 22
22 -
 23
23 -
 24
24 -
 25
25 -
 26
26 -
27
-
28
-
29
-
30
-
31
-
32
-
33
-
34
-
35
-
36
-
37
-
38
-
39
-
40
-
41
-
42
-
43
-
44
-
45
-
46
-
47
-
48
-
49
-
50
-
51
-
52
-
53
-
54
-
55
-
56
-
57
-
58
-
59
-
60
-
61
-
62
-
63
-
64
-
65
-
66
-
67
-
68
-
69
-
70
 |
 |

Installing Hardware
1-7
Step 2: Install the
Sound Blaster
Audigy 2 card
1.
Align the Sound Blaster Audigy 2 card with the PCI slot and press the card gently but firmly into the
slot as shown in Figure 1-4.
2.
Secure the card with a screw if necessary.
Do not force the audio card into
the slot. Make sure that the gold
finger PCI connector on the
Sound Blaster Audigy 2 card is
aligned with the PCI bus
connector on the motherboard
before you insert the card into
the PCI expansion slot.
If it does not fit properly, gently
remove it and try again
.
Figure 1-4:
Securing the audio card to the expansion slot.
2
1