Cub Cadet 3X 30 inch HD Operation Manual - Page 19
LED Light Bar If Equipped
 |
View all Cub Cadet 3X 30 inch HD manuals
Add to My Manuals
Save this manual to your list of manuals |
Page 19 highlights
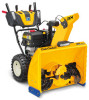
Snow thrower controls and features are described below and illustrated in Figure 3-1. NOTE: This Operator's Manual covers several models. Snow thrower features may vary by model. Not all features in this manual are applicable to all snow thrower models and the snow thrower depicted may differ from yours. NOTE: All references to the left or right side of the snow thrower are from the operator's position. Any exceptions will be noted. Engine Controls Refer to your Engine Operator's Manual for location and description of engine controls pertaining to your engine. Yours may differ slightly from the one pictured in Figure 3-2. Primer Choke Lever Safety Key Throttle Control Electric Starter Outlet Electric Starter Button Figure 3-2 Choke Lever Activating the choke control closes the choke plate on carburetor and aids in starting engine. The choke lever slides between the RUN and CHOKE positions. Primer Pressing the primer, making sure to cover the vent hole when pushing, forces fuel directly into the engine's carburetor to aid in coldweather starting. Safety Key The safety key is a safety device. It must be fully inserted in order for the engine to start. Remove the safety key when the snow thrower is not in use. Electric Starter Outlet Requires the use of a grounded, three-prong outdoor extension cord and a 120V power source/wall outlet. Electric Starter Button Pressing the electric starter button engages the engine's electric starter when plugged into a 120V power source. Throttle Control The throttle control regulates the speed of the engine and will shut OFF the engine when moved into the STOP position. Shift Lever (6-Speed Transmission) (If Equipped) The shift lever is located on the handle panel and is used to determine ground speed and direction of travel. Forward There are six forward (F) speeds. Position one (1) is the slowest and position six (6) is the fastest. Reverse There are two reverse (R) speeds. Position one (1) is the slower and position two (2) is the faster. Shift Lever (Hydro Transmission) (If Equipped) The shift lever is located on the handle panel and is used to determine ground speed and direction of travel. The further forward the lever is the faster the unit will travel. Moving past the detent position to the reverse direction will move the unit in reverse. Chute Assembly/E-Z Chute™ Snow drawn into the auger housing is discharged out the chute assembly. Skid Shoes Position skid shoes based on surface conditions. Adjust upward for hard-packed snow. Adjust downward when operating on gravel or crushed rock surfaces. See Skid Shoe Adjustment section on page 15. Augers When engaged, the augers rotate and draw snow into the auger housing. Headlight (Single or Double) (If Equipped) The headlight is located on the front of the handle panel and is automatically turned ON when the engine is started. LED Light Bar (If Equipped) The LED headlight is located on top of the auger housing and is automatically turned ON when the engine is started. Drift Cutters (If Equipped) The drift cutters are designed for use in deep snow. Their use is optional for normal snow conditions. Maneuver unit so that the cutters penetrate a high standing snow drift to assist snow falling into the augers for throwing. Heated Grips (If Equipped) CAUTION It is recommended that you wear gloves when using the heated grip. If the heated grips become too hot, turn it OFF. To activate the heated grips, move switch found on top (a) of or on the rear (b) of dash panel into the ON position. See Figure 3-3. To turn OFF heated grips, move switch to the OFF position. (a) (b) Switch ON (a) Switch OFF (b) Switch ON Switch OFF Figure 3-3 Auger Control Lever (If Equipped) The auger control lever is located on the left handle. Squeeze the control lever against the handle to engage the augers and start snow throwing action. Release to stop. See Figure 3-4. Figure 3-4 IMPORTANT: Refer to the Auger Control information in the Assembly & Set-Up section prior to operating your snow thrower. Read and follow all instructions carefully and perform all adjustments to verify your snow thrower is operating safely and properly. Section 3 - Controls & Operation 19
-
 1
1 -
2
-
3
-
4
-
5
-
6
-
7
-
8
-
9
-
10
-
11
-
12
-
13
-
 14
14 -
 15
15 -
 16
16 -
 17
17 -
 18
18 -
 19
19 -
 20
20 -
 21
21 -
 22
22 -
 23
23 -
 24
24 -
25
-
26
-
27
-
28
-
29
-
30
-
31
-
32
-
33
-
34
-
35
-
36
-
37
-
38
-
39
-
40
-
41
-
42
-
43
-
44
-
45
-
46
-
47
-
48
-
49
-
50
-
51
-
52
-
53
-
54
-
55
-
56
 |
 |
