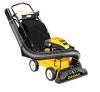
Cub Cadet CSV 070 Operation Manual - Page 8
Product Care
 |
View all Cub Cadet CSV 070 manuals
Add to My Manuals
Save this manual to your list of manuals |
Page 8 highlights
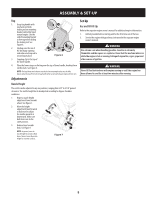
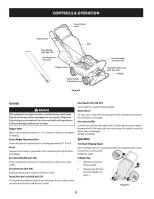
PRODUCT CARE Maintenance General Recommendations • Always observe safety rules when performing any maintenance. • The warranty on this chipper/shredder vacuum does not cover items that have been subjected to operator abuse or negligence. To receive full value from warranty, operator must maintain the equipment as instructed here. • Changing of engine-governed speed will void engine warranty. • All adjustments should be checked at least once each season. • Periodically check all fasteners and make sure these are tight. WARNING Always stop engine, disconnect spark plug and ground against engine before performing any type of maintenance on your machine. Lubrication 1. Lubricate each wheel shoulder screw (rear wheel) and pivot arm axle (front wheel) once per season with light oil. 2. Lubricate the pivot points of the nozzle height adjustment levers once a season with light oil. 3. Lubricate the locking rod with light oil to ease the application of attaching or removing bag. 4. Lubricate the nozzle/hose Figure 14 vac lever on top of the nozzle once a season with light oil. See Figure 14. 5. Follow the separate engine manual packed with your unit for lubrication instructions. Equipment Care • Clean the chipper/shredder vacuum thoroughly after each use. • Wash bag periodically with water. Allow to dry thoroughly in shade. • If the flail screen becomes clogged, remove and clean as instructed below. NOTE: Cleaning with a forceful spray of water is not recommended as it could contaminate the fuel system. Engine Care Refer to the Engine Operator's Manual packed with your chipper/shredder vacuum for all engine maintenance. WARNING Before performing any type of maintenance on the machine, wait for all parts to stop moving and disconnect the spark plug wire. Failure to follow this instruction could result in personal injury or property damage. Removing the Flail Screen If the discharge area becomes clogged, remove the flail screen and clean area as follows: 1. Stop the engine. Make certain the chipper/shredder vacuum has come to a complete stop. 2. Before unclogging the discharge chute, disconnect and ground the spark plug wire to retaining post. 3. Remove the vacuum bag from the unit as instructed in the CONTROLS & OPERATION section to obtain access to flail screen. 4. If equipped with a drive control, remove the three self-tapping screws securing the belt cover and remove belt cover. See Figure 15. 5. Remove self tapping screw on right side of unit that attaches to the flail screen. It may be necessary to remove the hose bracket hanger (if equipped) to get access to the screw. See Figure 16. 6. Remove hex screw on top of rear housing near mounting bracket and the flange lock nut that secures flail screen. See Figure 16. 7. Remove and clean the screen by scraping or washing with water. See Figure 17. 8. Reinstall the screen. Figure 15 Figure 16 Adjustments Drive Control Cable (If Equipped) Adjust the drive control Figure 17 cable if the chipper/shredder vacuum does not self propel with the drive control engaged, or if the unit hesitates while the engine maintains the same speed after approximately 20 hours of use. To move the z-fitting of the drive control cable from its factory set position in the front hole of the drive control to the rear hole, proceed as follows: 1. Push the right side of the control out of the right hole in the upper handle. See 1 in Figure 18. 2. Pivot control down towards the lower handle. See 2 in Figure 18. 1 23 3. Pivot straight up to remove it from the left hole in the upper handle. See 3 in Figure 18. Figure 18 8
-
 1
1 -
2
-
 3
3 -
 4
4 -
 5
5 -
 6
6 -
 7
7 -
 8
8 -
 9
9 -
 10
10 -
 11
11 -
 12
12 -
 13
13 -
14
-
15
-
16
-
17
-
18
-
19
-
20
 |
 |
