Cub Cadet GTX 2100 GTX 2100 Operator's Manual - Page 18
Maintenance & Adjustments - oil filter
 |
View all Cub Cadet GTX 2100 manuals
Add to My Manuals
Save this manual to your list of manuals |
Page 18 highlights
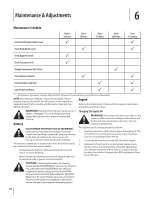
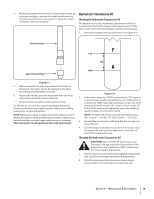
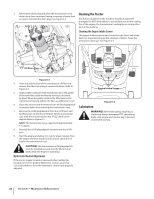
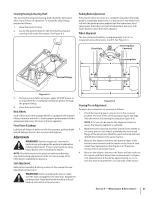
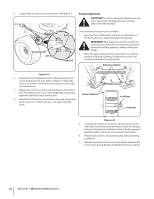
Maintenance & Adjustments 6 Maintenance Schedule Check/Clean Engine Intake Screen Before Each use P Every 10 Hours Every 25 Hours Every 200 Hours Prior to Storing P Clean Hood/Dash Louvers P P Check Engine Oil Level P Check Transmission Oil P Change Transmission Oil & Filter * P Clean Battery Terminals P P Lube Front Axles and Rims P P Lube Pedal Pivot Points P P * - For break-in operation, change after the first 50 hours of use and then every 200 hours thereafter. NOTE: This Operator's Manual covers several models. Tractor features may vary by model. Not all features in this manual are applicable to all tractor models and the tractor depicted may differ from yours. Engine Refer to the Kohler Owner's Manual for all engine maintenance procedures and instructions. WARNING! Before performing any maintenance or repairs, disengage PTO, set parking brake, stop engine and remove key to prevent unintended starting. Battery CALIFORNIA PROPOSITION 65 WARNING! Battery posts, terminals, and related accessories contain lead and lead compounds, chemicals known to the State of California to cause cancer and reproductive harm. Wash hands after handling. The battery is sealed and is maintenance-free. Acid levels cannot be checked and fluid can not be added. • Always keep the battery cables and terminals clean and free of corrosive build-up. • After cleaning the battery and terminals, apply a light coat of petroleum jelly or grease to both terminals. Changing the Engine Oil WARNING! If the engine has been recently run, the engine, muffler and surrounding metal surfaces will be hot and can cause burns to the skin. Exercise caution to avoid burns. To complete an oil change, proceed as follows: 1. Run the engine for a short time to warm the engine oil. The oil will flow more freely and carry away more impurities. Use care to avoid burns from hot oil. 2. Locate the oil drain hose on the left side of the engine. 3. Remove the hose from the retaining loop-clamp. Route the free end of the oil drain hose toward an appropriate oil collection container with at least a 2.5 quart capacity, to collect the used oil. Remove the oil fill cap/dipstick from the oil fill tube. CAUTION: If removing the battery for cleaning, disconnect the NEGATIVE (Black) wire from it's terminal first, followed by the POSITIVE (Red) wire. When reinstalling the battery, always connect the POSITIVE (Red) wire its terminal first, followed by the NEGATIVE (Black) wire. Be certain that the wires are connected to the correct terminals; reversing them could result in serious damage to your engine's alternating system. 18
-
 1
1 -
2
-
3
-
4
-
5
-
6
-
7
-
8
-
9
-
10
-
11
-
12
-
 13
13 -
 14
14 -
 15
15 -
 16
16 -
 17
17 -
 18
18 -
 19
19 -
 20
20 -
 21
21 -
 22
22 -
 23
23 -
24
-
25
-
26
-
27
-
28
-
29
-
30
-
31
-
32
 |
 |
