Cub Cadet GTX 2100 GTX 2100 Operator's Manual - Page 25
Headlights, Fuses - hood
 |
View all Cub Cadet GTX 2100 manuals
Add to My Manuals
Save this manual to your list of manuals |
Page 25 highlights
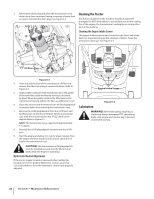
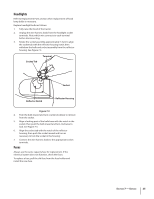
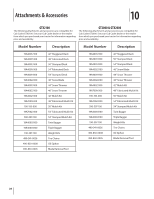
Headlights Refer to Replacement Parts section when replacement of head lamp bulbs is necessary. Replace headlight bulbs as follows: 1. Fully raise the hood of the tractor. 2. Unplug the wire harness leads from the headlight socket terminals. Note which wire connects to each terminal before disconnecting. 3. Rotate the socket assembly approximately 1⁄4 turn to align the socket tab with the reflector housing notch; then withdraw the bulb and socket assembly from the reflector housing. See Figure 7-3. Socket Tab Terminal Socket Reflector Notch Reflector Housing Figure 7-3 4. Push the bulb inward and turn counterclockwise to remove from the socket. 5. Align a locking post of the bulb base with the notch in the socket, then push the bulb inward and turn clockwise to lock. See Figure 7-3. 6. Align the socket tab with the notch of the reflector housing; then push the socket inward and turn as necessary to lock the socket in the housing: 7. Connect the wire harness leads to the appropriate socket terminals. Fuses Always use the same capacity fuse for replacement. If the electrical system does not function, check the fuses. To replace a fuse, pull the old fuse from the fuse holder and install the new fuse. Section 7 - Service 25
-
 1
1 -
2
-
3
-
4
-
5
-
6
-
7
-
8
-
9
-
10
-
11
-
12
-
13
-
14
-
15
-
16
-
17
-
18
-
19
-
 20
20 -
 21
21 -
 22
22 -
 23
23 -
 24
24 -
 25
25 -
 26
26 -
 27
27 -
 28
28 -
 29
29 -
 30
30 -
31
-
32
 |
 |
