Cub Cadet LGT 1054 LGT 1050 Operator's Manual - Page 27
Tires, Changing the Transmission Drive Belt, Changing the Deck Belt
 |
View all Cub Cadet LGT 1054 manuals
Add to My Manuals
Save this manual to your list of manuals |
Page 27 highlights
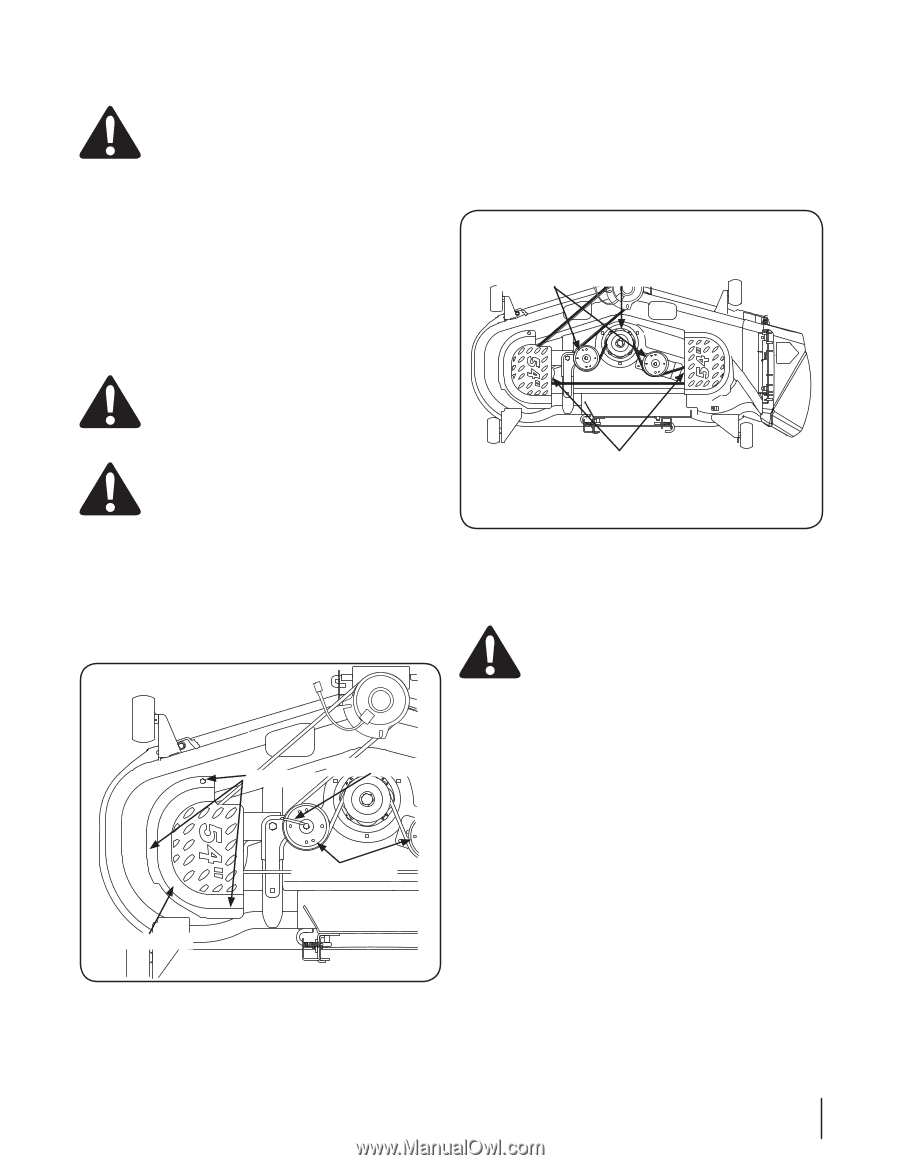
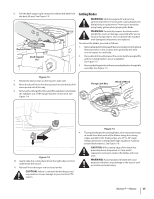
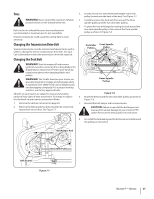
Tires 3. WARNING! Never exceed the maximum inflation 4. pressure shown on the sidewall of the tire. 5. Refer to the tire sidewall for exact tire manufacturer's recommended or maximum psi. Do not overinflate. Uneven tire pressure could cause the cutting deck to mow unevenly. Changing the Transmission Drive Belt Several components must be removed and special tools used in order to change the tractor's transmission drive belt. See your Cub Cadet dealer to have the transmission drive belt replaced. Changing the Deck Belt WARNING! Shut the engine off and remove ignition key before removing the cutting blade(s) for sharpening or replacement. Protect your hands by using heavy gloves when grasping blades and pulleys. WARNING! The V-belts found on your tractor are specially designed to engage and disengage safely. A substitute (non-OEM) V-belt can be dangerous by not disengaging completely. For a proper working machine, use factory approved belts. All belts on your tractor are subject to wear and should be replaced if any signs of wear are present. To change or replace 6. the deck belt on your tractor, proceed as follows: 1. Remove the deck as instructed on page 24. 7. 2. Remove the belt guards by removing the hex screws that fasten them to the deck. See Figure 7-7. Loosen, but do not remove the belt keeper rod on the pulley located near the back of the deck. See Figure 7-7. Carefully remove the deck belt from around the three spindle pulleys and the two deck idler pulleys. To place the new belt begin by routing the belt around the two outer spindle pulleys, then around the front spindle pulley as shown in Figure 7-8. Deck Idler Front Spindle Pulleys Pulley Outer Spindle Pulleys Figure 7-8 Route the belt around the two deck idler pulleys as shown in Figure 7-8. Reinstall the belt keeper rod loosened earlier. CAUTION: Failure to reinstall the belt keeper rod may result in serious damage to your tractor's PTO system.Remount the belt guards removed earlier. 8. Re-installthedeckmakingsurethebeltremainsroutedaround the pulleys as instructed. Belt Keeper Rod Hex Screws Deck Idler Pulley Belt Guards Figure 7-7 Section 7 - Service 27
-
 1
1 -
2
-
3
-
4
-
5
-
6
-
7
-
8
-
9
-
10
-
11
-
12
-
13
-
14
-
15
-
16
-
17
-
18
-
19
-
20
-
21
-
 22
22 -
 23
23 -
 24
24 -
 25
25 -
 26
26 -
 27
27 -
 28
28 -
 29
29 -
 30
30 -
 31
31 -
 32
32 -
33
-
34
-
35
-
36
-
37
-
38
-
39
-
40
-
41
-
42
-
43
-
44
-
45
-
46
-
47
-
48
-
49
-
50
-
51
-
52
-
53
-
54
-
55
-
56
-
57
-
58
-
59
-
60
-
61
-
62
-
63
-
64
-
65
-
66
-
67
-
68
-
69
-
70
-
71
-
72
 |
 |