Cuisinart SS-700 SS-700 Manual - Page 14
Stopping the Brew, Process, Adding Water, Purging the Brewer - lowes
 |
UPC - 086279028907
View all Cuisinart SS-700 manuals
Add to My Manuals
Save this manual to your list of manuals |
Page 14 highlights
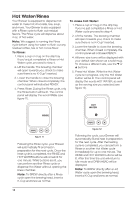
Stopping the Brew Process If for any reason you need to stop brewing after the process has started, press the power switch on the rear right side of the Brewer to turn the Brewer off. The flow of coffee, tea or hot cocoa will stop, the heater will shut off, and the blue lights illuminating the control panel and reservoir will turn off. Note: You may get less coffee, tea or hot cocoa in your cup during your next brew. In order for your next brew to be the volume you have selected, we recommend that you perform a rinse cycle after a terminated brew. Adding Water The Control Panel will indicate when the water level in your reservoir is low or if the Reservoir has been removed by displaying the words "ADD WATER". The blue light in the Reservoir will also blink when water needs to be added. When "ADD WATER" is displayed, the Brewer will not allow you to brew. Purging the Brewer If your Brewer has not been used for more than one week, we suggest purging the water from the inner tank. 1. If there is water in the reservoir, discard the water, then rinse and refill with fresh water. Place the reservoir back on the Brewer and replace the lid. (If there is no water in the reservoir, simply fill.) 2. Be sure the Brewer is turned on. Raise and lower the handle on the Brewer without inserting a K-Cup®. 3. When the control panel displays READY, dispense 12 oz. of hot water by selecting the 12-oz. cup size and hot water. 4. Repeat this process two more times to completely replace the water in the inner tank. The Water Reservoir can be filled in two ways: 1. Lift off the Reservoir Lid and pour water directly into the Reservoir while it is still attached to the Brewer, then replace the Lid. 2. Remove the Reservoir from Brewer by first removing the Lid from the Reservoir then lifting the Reservoir straight up and away from Brewer. Fill with water, place the Reservoir back on the Brewer, and replace the Lid. IMPORTANT: Do not remove the Water Reservoir during the brewing process. 14
-
 1
1 -
2
-
3
-
4
-
5
-
6
-
7
-
8
-
 9
9 -
 10
10 -
 11
11 -
 12
12 -
 13
13 -
 14
14 -
 15
15 -
 16
16 -
 17
17 -
 18
18 -
 19
19 -
20
-
21
-
22
-
23
-
24
-
25
 |
 |
