Cuisinart SS-700 SS-700 Manual - Page 17
Programming Brew, Temperature - water not coming out
 |
UPC - 086279028907
View all Cuisinart SS-700 manuals
Add to My Manuals
Save this manual to your list of manuals |
Page 17 highlights
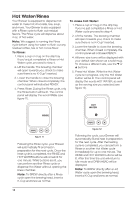
Set Hours Set Minutes figure 22 d. If you want to set an OFF TIME, Use the or buttons as above. If not, continue to Step e. e. To complete the process, press the Menu button to set the OFF TIME. Continue pressing to scroll through the remaining programming options to exit the programming mode. f. The ON TIME and OFF TIME functions operate independently from one another. The control panel will display ON TIME SET if the ON TIME has been set. The control panel will display OFF TIME SET if the OFF TIME has been set and the control panel will display ONOFF TIME SET if both the On and Off times have been set (see figure 23). ON OFF TIME SET in Ready Mode figure 23 Note: Depending upon the Brewer's current mode, other icons will be displayed as well. g. To turn off the ONOFF TIME SET feature, press the Menu button until ONOFF TIME SET flashes. Use the button to scroll through. The control panel will display OFF after 11 pm. Note: The AUTO OFF timer and the OFF TIME programming options operate independently. If both are set, the unit will turn off at whichever time comes first. Programming Brew Temperature The Brewer brews at a pre-set temperature of 192°F. If you prefer a cooler cup of coffee, hot water, tea, or cocoa, you may adjust this temperature down by 5 degrees. Simply follow the instructions below. 1. Press the Menu button until BREW TEMP flashes on the control panel (see figure 24). Decrease Temp Increase Temp figure 24 2. The initial set temperature of 192°F will be displayed at the top of the control panel. Use the to lower or to raise the temperature one degree at a time. Note: If at maximum temperature (192°F), only the button will work, and if at minimum (187°F) temperature, only the arrow will work. 3. Once you have reached your optimal brew temperature, press the Menu button to set your default brew temperature. Continue pressing Menu to scroll through the remaining 17
-
 1
1 -
2
-
3
-
4
-
5
-
6
-
7
-
8
-
9
-
10
-
11
-
 12
12 -
 13
13 -
 14
14 -
 15
15 -
 16
16 -
 17
17 -
 18
18 -
 19
19 -
 20
20 -
 21
21 -
 22
22 -
23
-
24
-
25
 |
 |
