Cuisinart SS-700 SS-700 Manual - Page 8
Setting Up Your Brewer, Set-Up & First Brew - brewer for k cups
 |
UPC - 086279028907
View all Cuisinart SS-700 manuals
Add to My Manuals
Save this manual to your list of manuals |
Page 8 highlights
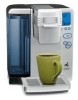
Set-Up & First Brew IMPORTANT: Do not attempt to use your Cuisinart® Single Serve Brewing System until it has been set up for its first use as outlined below. NOTE: If Brewer has been exposed to temperatures below freezing, wait at least two hours for Brewer to reach room temperature before brewing. An extremely cold Brewer will not operate. Setting Up Your Brewer 1. Unwrap cord and plug the Brewer into a grounded outlet. Make sure to remove packing tape, clear plastic sticker from control panel, and sticker from water reservoir. Also be sure to remove the polybag from the My K-Cup® located in the compartment on the right side of the brewer. 2. Place a large cup or mug (10 oz. minimum) on the drip tray. 3. Remove lid from reservoir, then lift reservoir straight up and away from the Brewer. Wash the reservoir with warm soapy water. 4. Fill reservoir with water to the max fill line and return with lid to unit (see figure 1). Water Reservoir Lid Water Reservoir 6. The Brewer will automatically fill the internal tank with water and heating will begin. This will take approximately 4 minutes. During the heating period, NOT READY will be displayed on the control panel (see figure 2). Heating Mode figure 2 Note: It is normal to see small amounts of water dripping into the water reservoir during this and subsequent heatings. Once the water is heated, OPEN HEAD will be displayed. 7. When the control panel displays OPEN HEAD (see figure 3), open and close the brewing chamber. READY and brew size icons will be displayed with the default size shown as a solid mug (see figure 4). Idle Mode Ready Mode figure 1 5. Press the power switch located on the rear right side of the Brewer. The switch is spring-loaded and will return to original position automatically. 8 figure 3 figure 4
-
 1
1 -
2
-
 3
3 -
 4
4 -
 5
5 -
 6
6 -
 7
7 -
 8
8 -
 9
9 -
 10
10 -
 11
11 -
 12
12 -
 13
13 -
14
-
15
-
16
-
17
-
18
-
19
-
20
-
21
-
22
-
23
-
24
-
25
 |
 |
